Dynamic Tables
Dynamic tables store data directly in TAS, typically code lists and configuration tables (cost centres, approvers, limits, branch addresses). Templates read values from them in calculations and variables. The screen is available to administrators; open it via Administration › Integration and Data Management › Dynamic Tables.
Table list
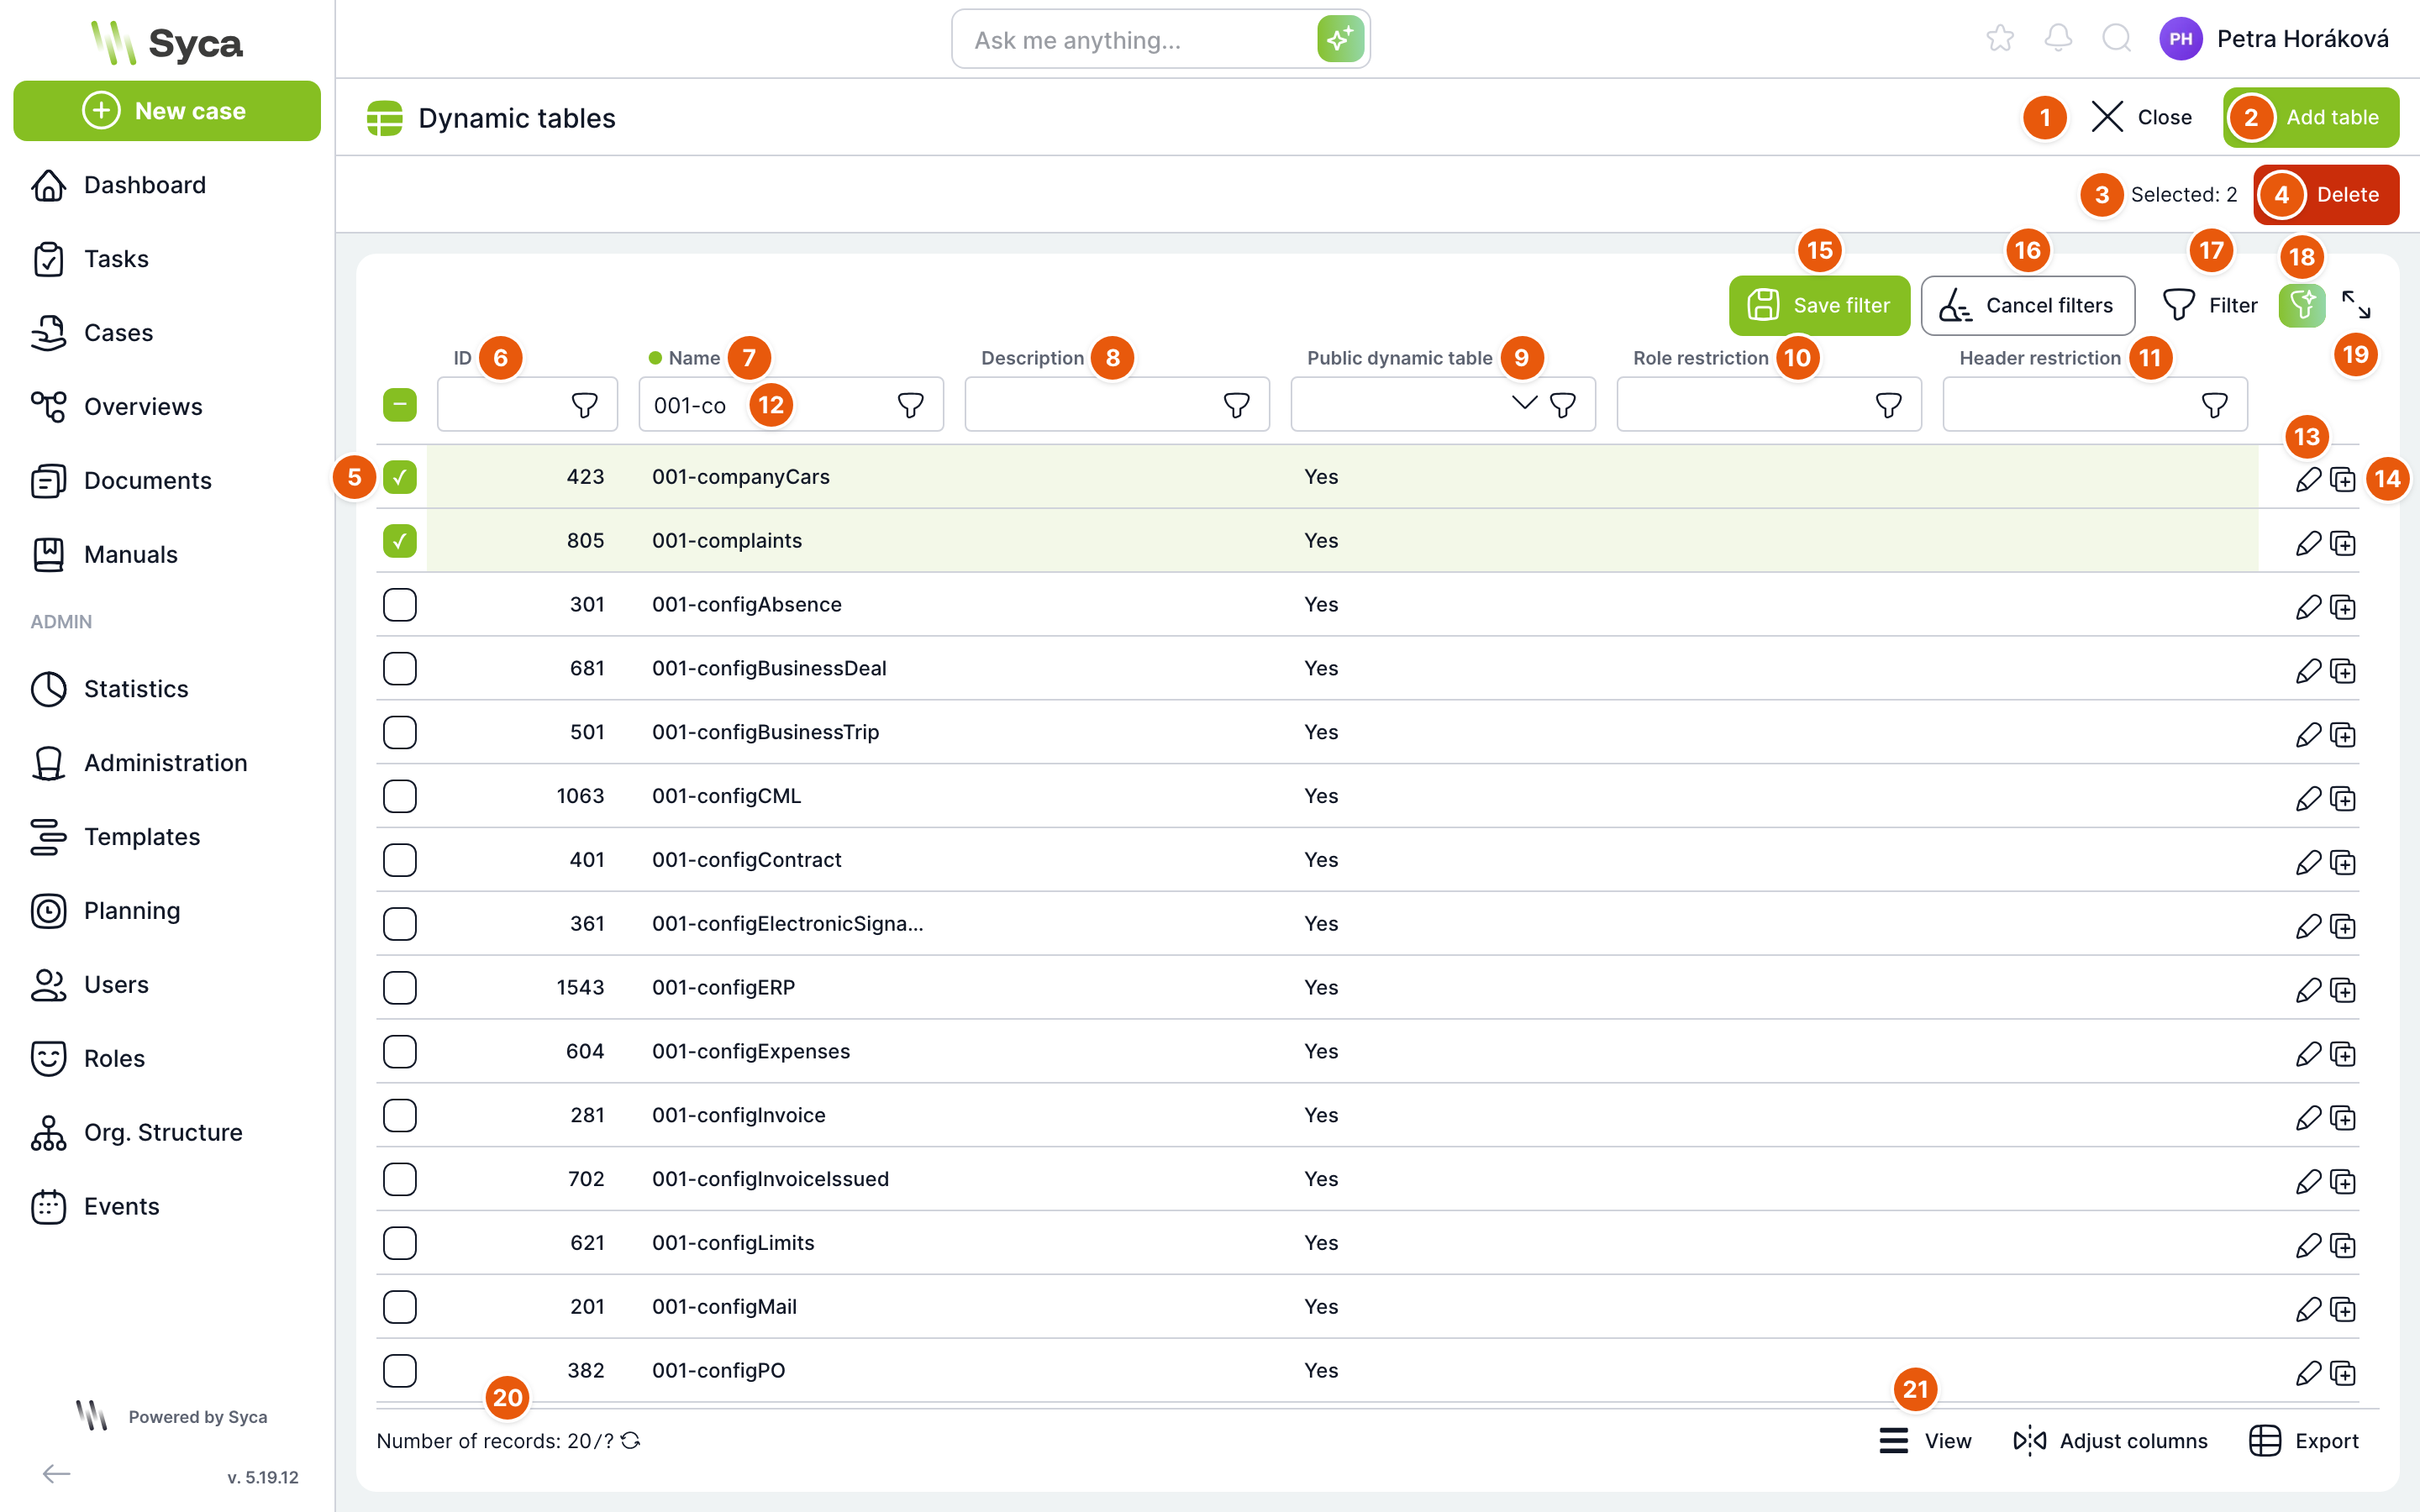
| No. | Element | Purpose |
|---|---|---|
| 1 | Close | Returns you to the Administration menu. |
| 2 | Add table | Opens the window for creating a new table, see Creating a new table. |
| 3 | Selected | Number of tables marked with the checkbox. |
| 4 | Delete | Bulk deletion of tables, see below. The button is inactive when no rows are selected. |
| 5 | Checkbox | Marks the table for bulk deletion. The checkbox in the header marks all displayed rows. |
| 6 | ID | Numeric identifier of the table. In calculations, a table can be referenced by its ID or name. |
| 7 | Name | Unique name of the table. The list is sorted by it by default. |
| 8 | Description | Short description of the table's purpose. |
| 9 | Public dynamic table | Yes or No, see Settings. |
| 10 | Restriction to role | Role to which management of the table is restricted. |
| 11 | Restriction to header | Template header that is the only one whose calculations may read the table. |
| 12 | Column filter | Field below each column header. Type the text you are looking for and the list is narrowed down. |
| 13 | Edit (pencil) | Opens the table detail. Double-clicking the row does the same. |
| 14 | Copy | Creates a copy of the table, see Copying a table. |
| 15 | Save filter | Saves the current combination of filters under your own name so that you can select it with one click next time. Displayed only when a filter is set. |
| 16 | Clear filters | Clears all set filters. |
| 17 | Filter | Opens the window for building a filter with multiple conditions. |
| 18 | AI filter | Filter entered as a sentence, for example "public tables with a role restriction". Displayed only when AI.enabled is turned on in Configuration. |
| 19 | Full screen | Displays the list in full screen. |
| 20 | Record count | How many tables match the filter. The arrows icon reloads the list. |
| 21 | List tools | Switching the view, selecting and ordering columns, and exporting the list to a file. |
Copying a table
The Copy icon on a row opens the Copy table definition window.
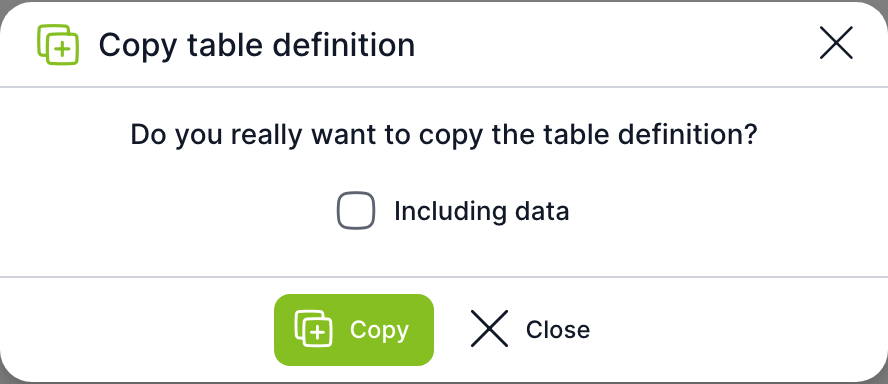
| Field | Purpose |
|---|---|
| Including data | Unchecked: only the columns are copied. Checked: all rows are copied as well. |
| Copy | Creates a new table named clone(1)_<původní název>. If that name already exists, the next number is used. |
The copy takes over the description, notes and the Public dynamic table flag. The role and header restrictions are not copied; set them again on the copy if needed. You can then rename the copy in its settings.
Bulk deletion
Mark the tables with the checkboxes and click Delete. The Delete dynamic tables window opens.
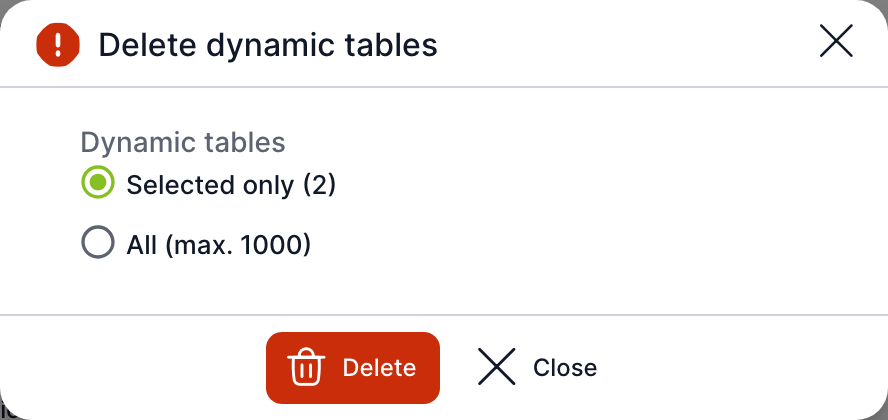
| Option | Purpose |
|---|---|
| Selected only | Deletes only the marked tables. Their number is shown in brackets. |
| All (max. 1000) | Deletes all dynamic tables in the application, up to 1000. |
After you click Delete, TAS asks for confirmation once more. The table is deleted together with all its rows and columns.
The All option deletes all tables in the application, not just those you currently see in the filtered list. To delete selected tables, always keep Selected only chosen. Before deleting a table, verify that no template uses it – calculations that read it would stop working.
Creating a new table
Click Add table. The Dynamic table / New window opens on the Settings tab.
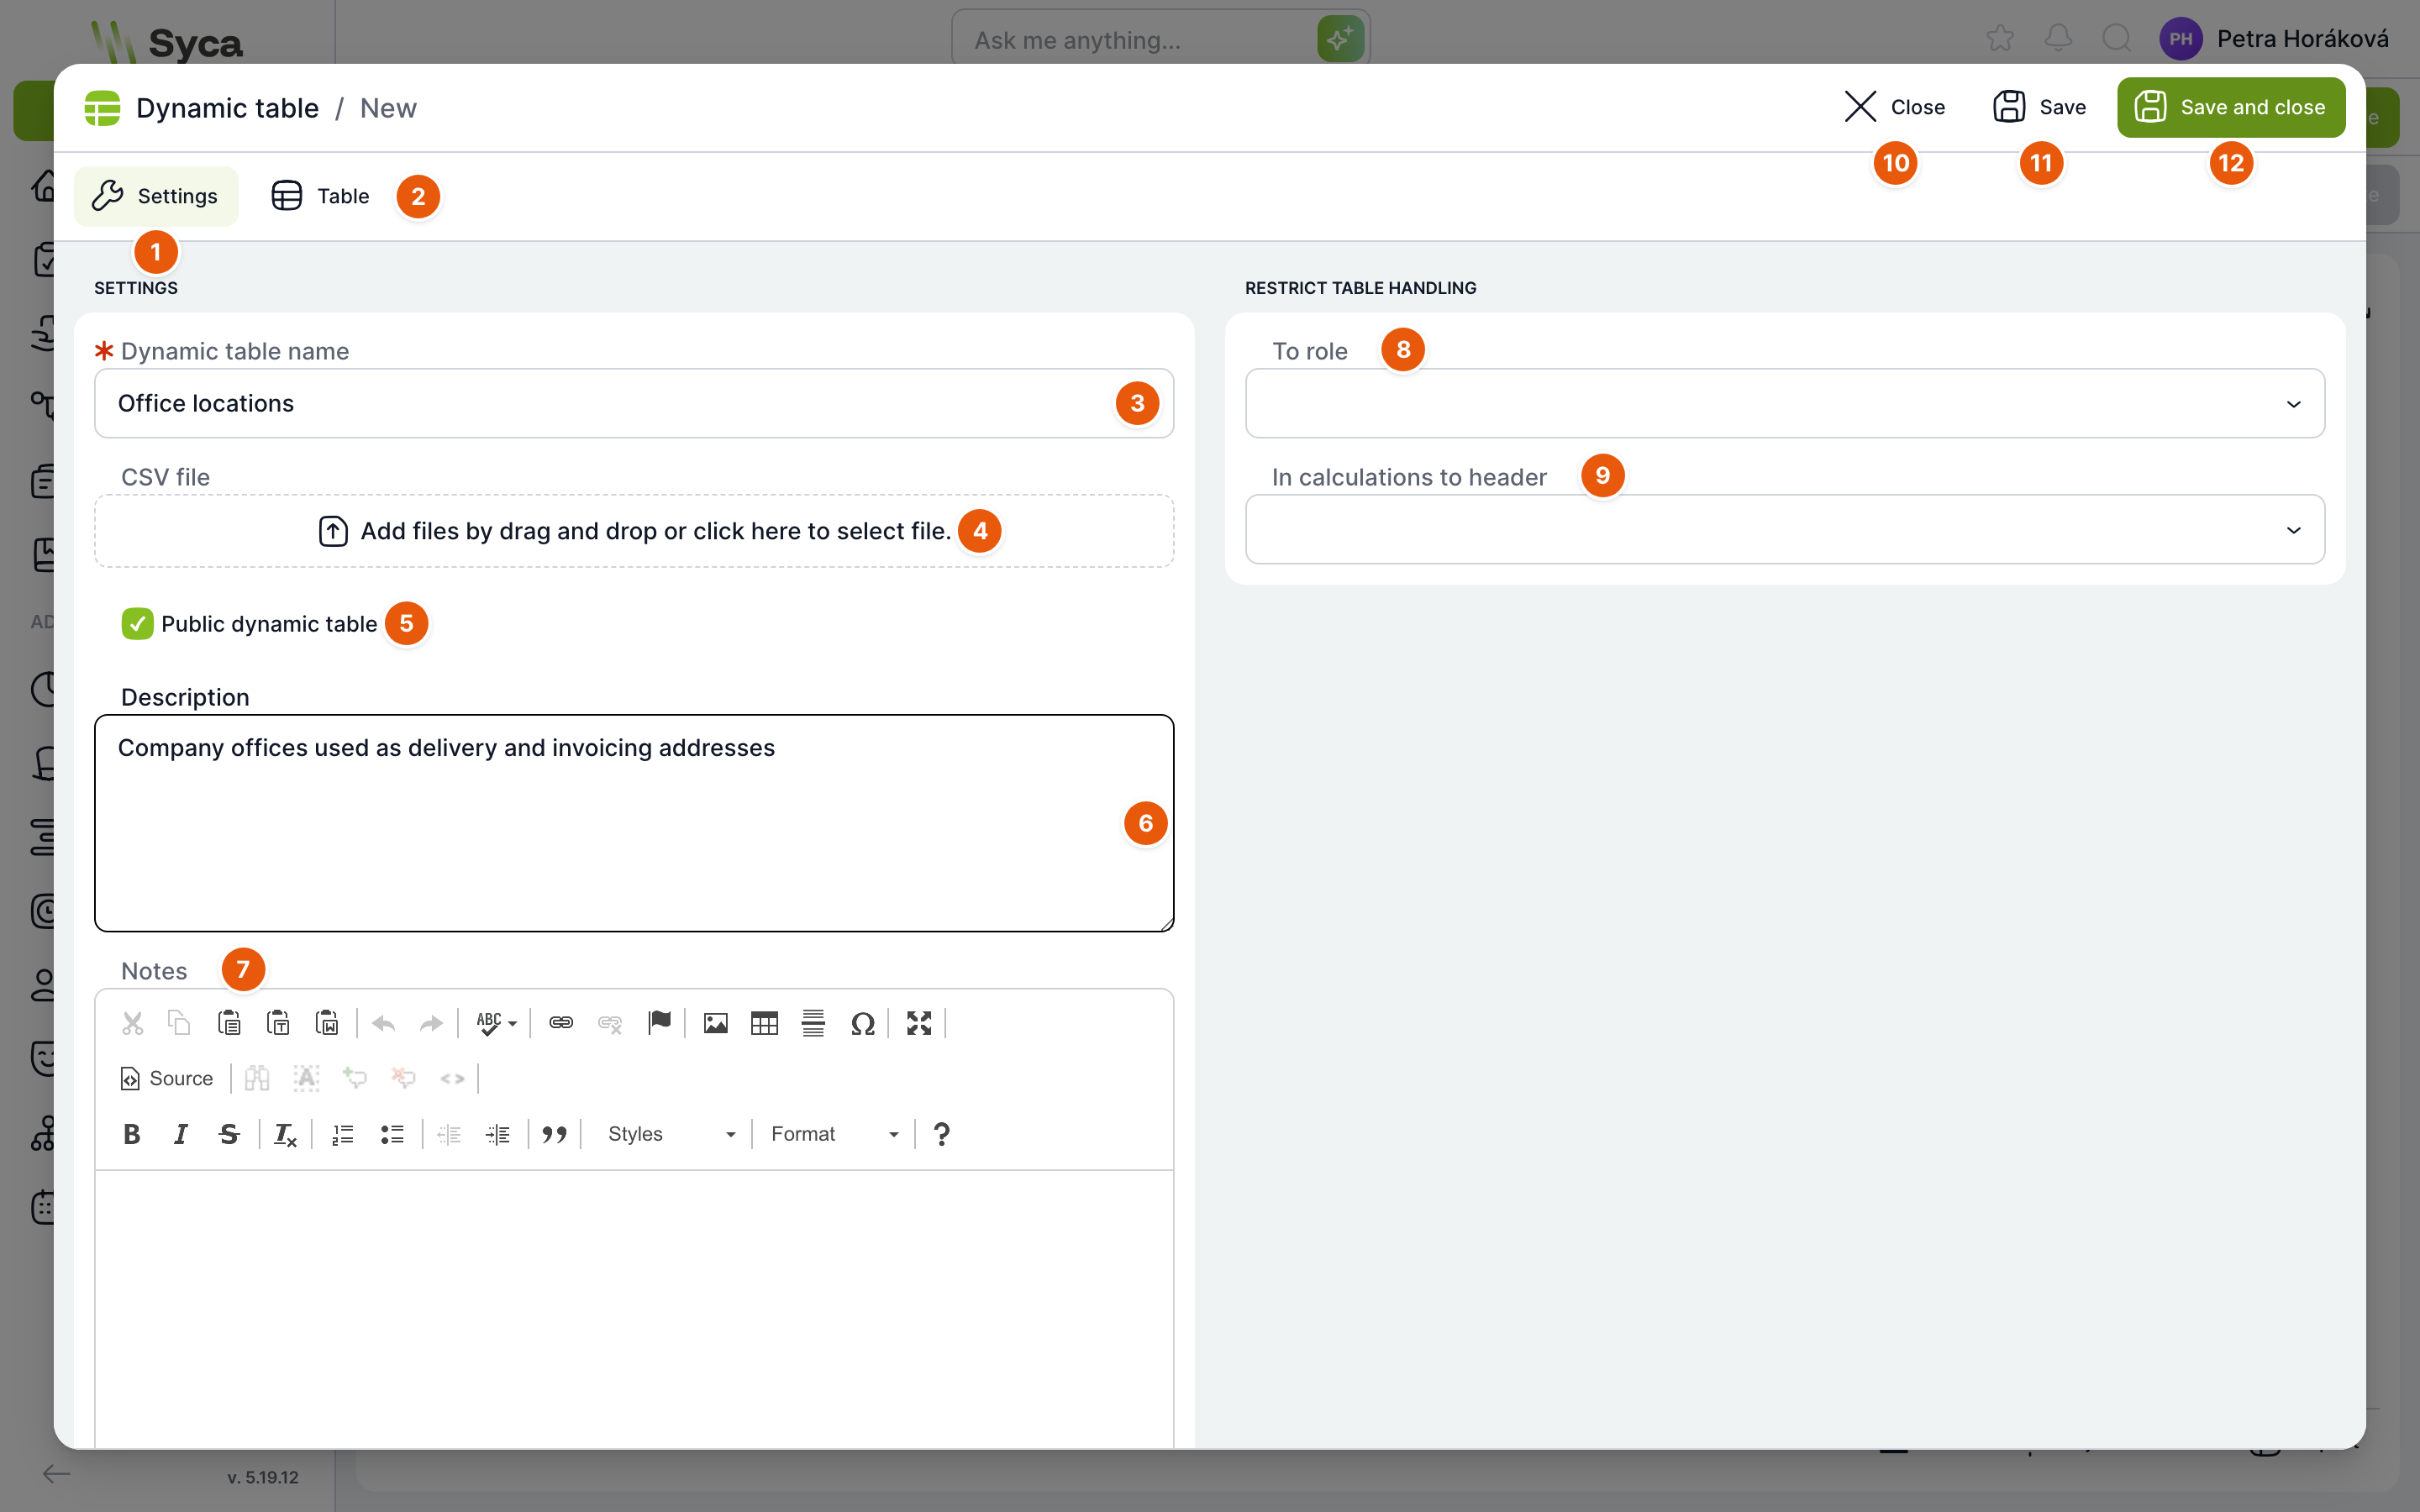
| No. | Element | Purpose |
|---|---|---|
| 1 | Settings | Tab with the table properties (currently open). |
| 2 | Table | Tab with the data. You can switch to it once the name is filled in. If you have unsaved changes, TAS asks whether to save them. |
| 3 | Dynamic table name | Required. The name must be unique in the application; calculations in templates reference the table by this name. |
| 4 | CSV file | Optionally upload a CSV file to populate the table immediately. The procedure is the same as for importing into an existing table, see Import from CSV. |
| 5 | Public dynamic table | Checked for a new table. For its meaning, see Settings. |
| 6 | Description | Short description, displayed in the table list. |
| 7 | Notes | Longer formatted text, for example what the table is for and who maintains it. |
| 8 | To role | Restriction of management to a role, see Settings. |
| 9 | In calculations to header | Restriction of calculations to a template header, see Settings. |
| 10 | Close | Closes the window. If you have unsaved changes, TAS asks whether to save them. |
| 11 | Save | Creates the table and keeps the window open, so you can switch to the Table tab and add columns and rows. |
| 12 | Save and close | Creates the table and closes the window. |
Both save buttons become active only after you change something and the form is valid.
How to create a table with data
- Click Add table and fill in Dynamic table name and Description.
- Insert the data in one of two ways:
- upload a CSV file to the CSV file field, check the preview and click Save and close, or
- click Save, switch to the Table tab, add columns with the Add column button and rows with the Add row button.
- The table appears in the list. Open it with the pencil or by double-clicking.
Table detail – Table tab
When you open a table from the list, its data is displayed.
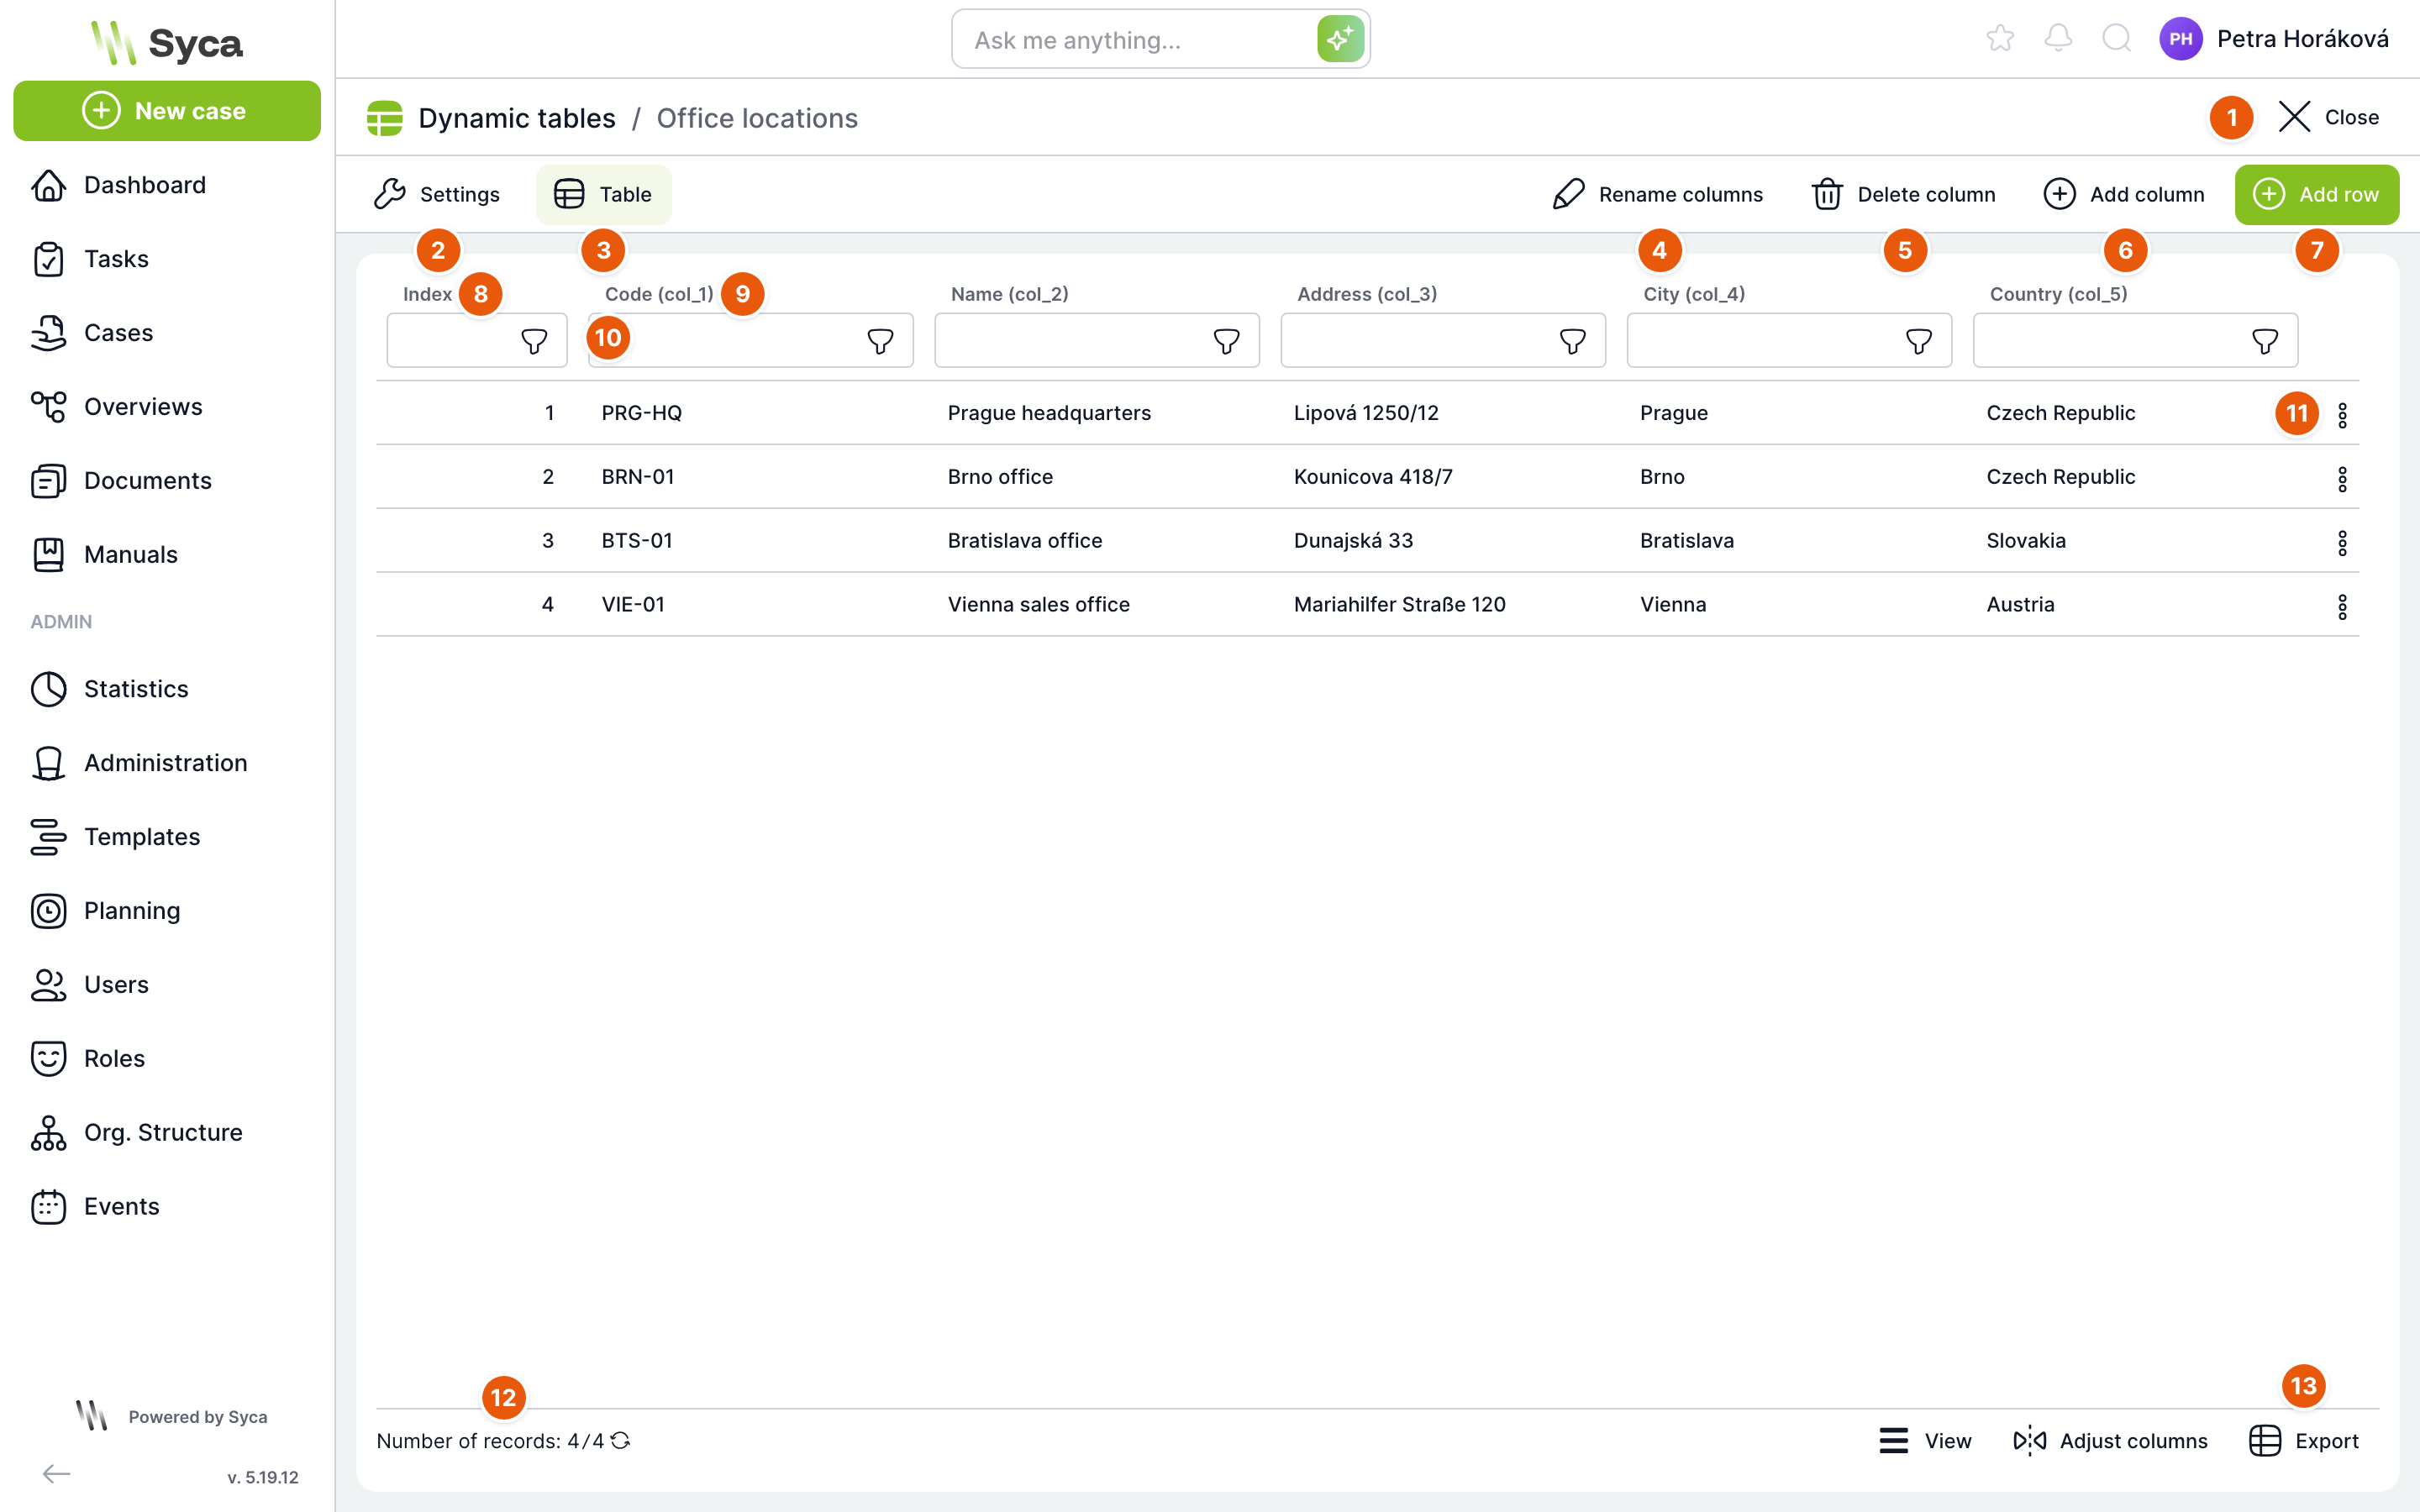
| No. | Element | Purpose |
|---|---|---|
| 1 | Close | Returns to the table list. You can also return to the list by clicking Dynamic Tables in the breadcrumb navigation. |
| 2 | Settings | Switches to the tab with the table properties. |
| 3 | Table | Tab with the data (currently open). |
| 4 | Rename columns | Opens the window for changing the names of all columns. |
| 5 | Delete column | Opens the window for deleting one column. |
| 6 | Add column | Adds a new column at the end of the table. |
| 7 | Add row | Opens the window for a new row. Until the table has at least one column, the button is inactive and the tip "Add the first table column" is displayed instead of data. |
| 8 | Index | Row identifier. Calculations use it to find the row, and selections in variables are stored against it. |
| 9 | Column header | Column name followed by its system identifier in brackets: col_1, col_2 … Calculations use this identifier, which is why it does not change when the column is renamed. |
| 10 | Column filter | Narrows the rows by text in the given column. |
| 11 | More options | Menu of row actions, see below. |
| 12 | Record count | Number of rows matching the filter. |
| 13 | Export | Export of rows to a file. Next to it are the view and column options. |
Rows are sorted in the order you set when adding or moving a row. Double-clicking a row opens the Edit row window. Pressing the Delete key on a selected row opens a confirmation of its deletion.
Row actions

| Action | Purpose |
|---|---|
| Edit | Opens the Edit row window with the values of all cells. |
| Copy | Opens the Copy row window – a new row pre-filled with the values of the selected row. |
| Move | Opens the Move row window for changing the order. |
| Delete | Deletes the row after confirmation. |
Adding and copying a row
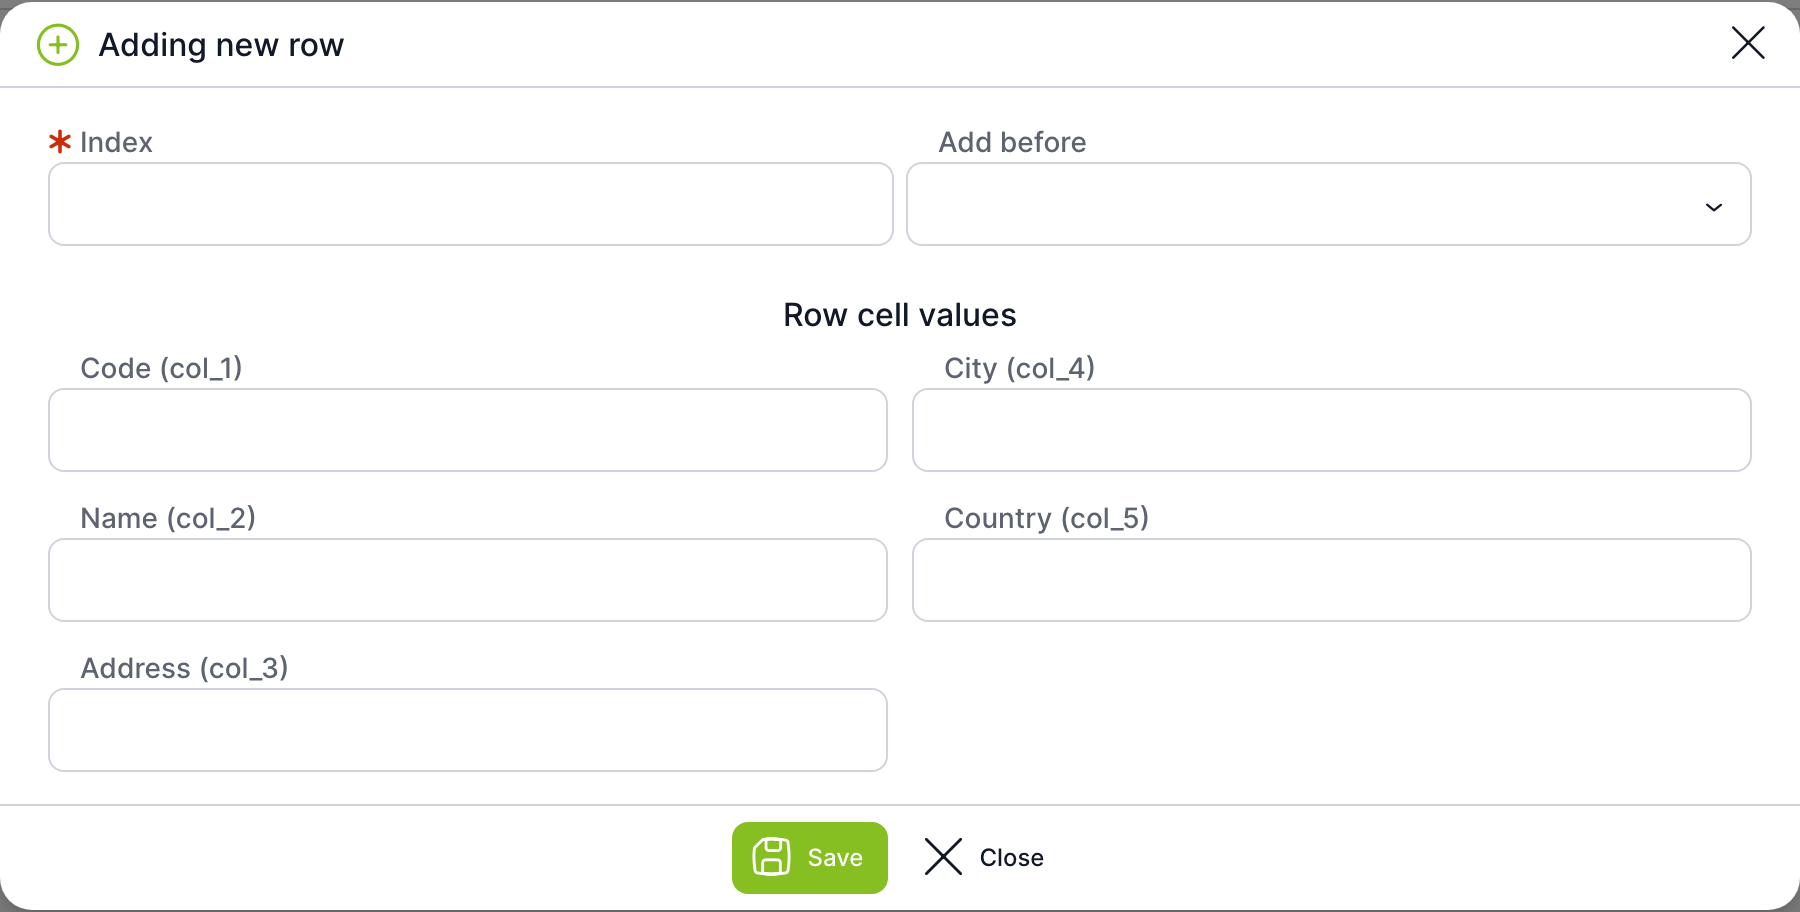
| Field | Purpose |
|---|---|
| Index | Required. Identifier of the new row, for example the next number in the sequence or a code. Choose an index that does not yet exist in the table – calculations and variables look up the row by it. |
| Add before | Optional. The row before which the new row is inserted. If you leave the field empty, the row is added at the end. |
| Cell values in the row | A field for each table column, labelled with the column name and its col_… identifier. An empty field means an empty cell. |
| Save | Adds the row. |
| Close | Closes the window without saving. |
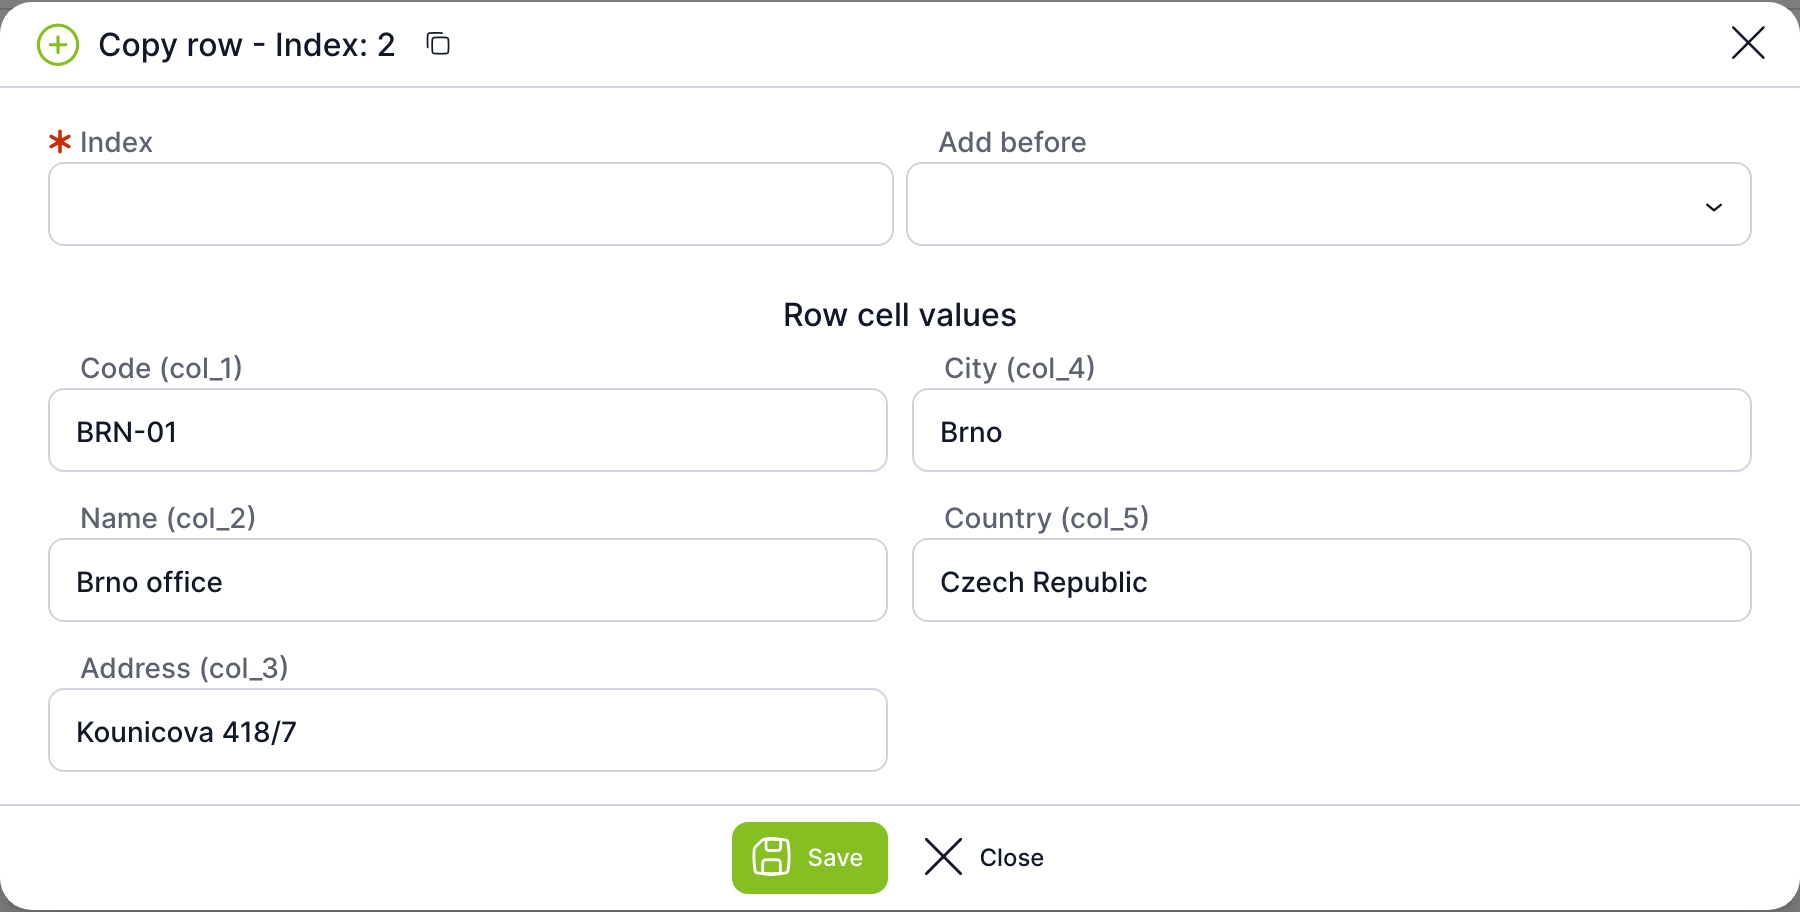
The Copy row window is the same, except that the cell values are pre-filled from the selected row and the title shows the index of the original row. Fill in the index of the new row yourself.
Editing a row
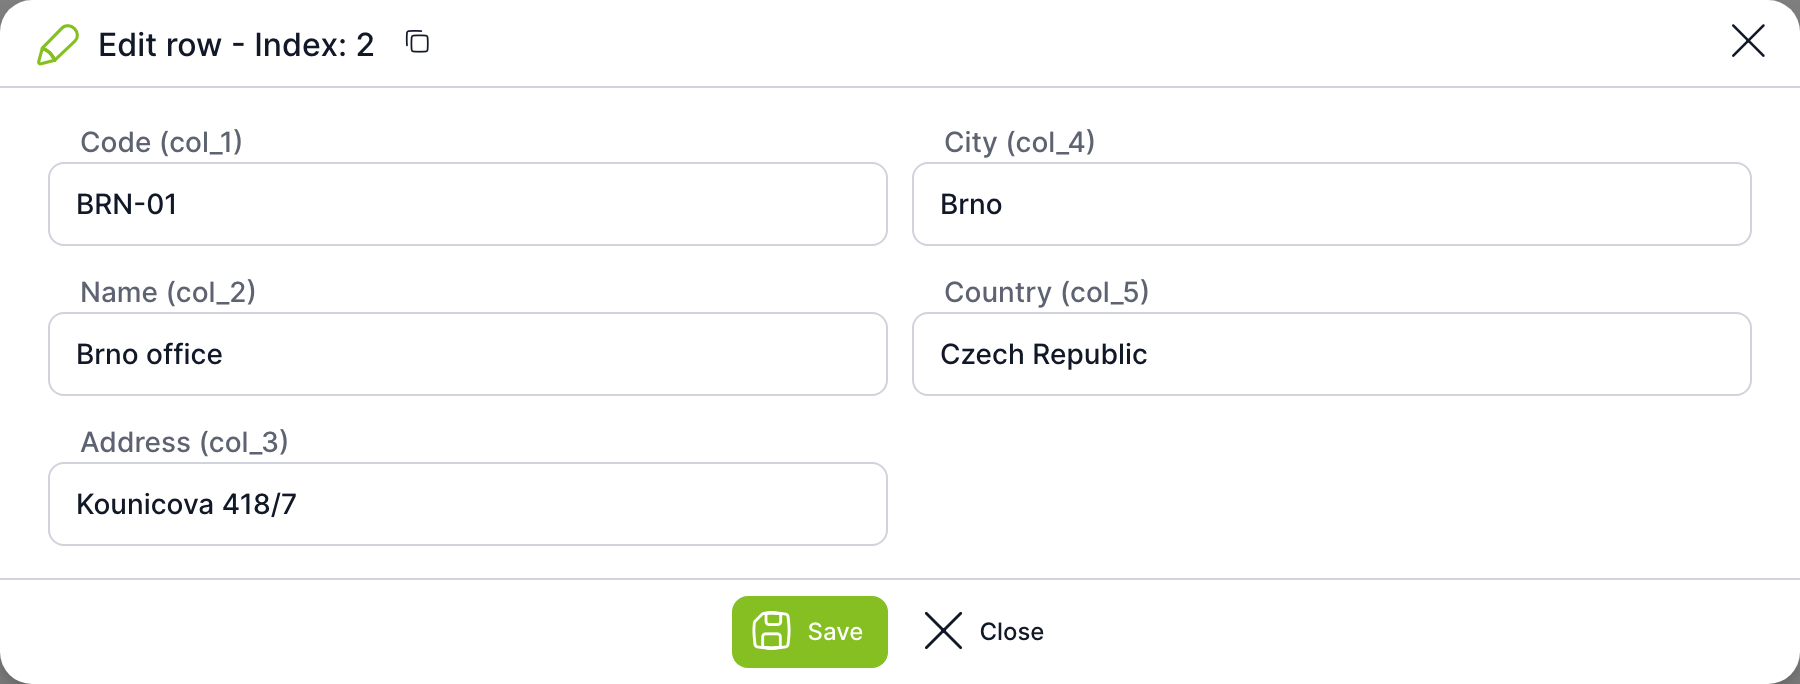
Edit the cell values and click Save. The row index is shown in the window title and cannot be changed. The icon next to the index copies it to the clipboard.
Moving a row
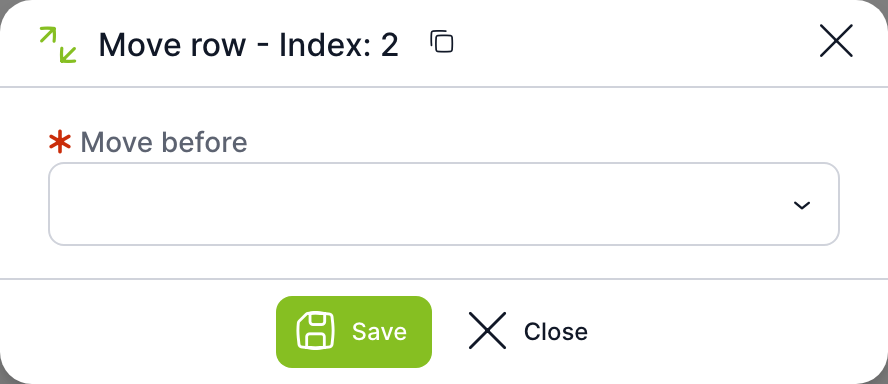
In the Move before field (required), select the row before which the selected row should be placed and click Save. Rows are listed in the menu by their index.
Deleting a row

Click Delete to remove the row, or No to go back without changes.
Adding a column
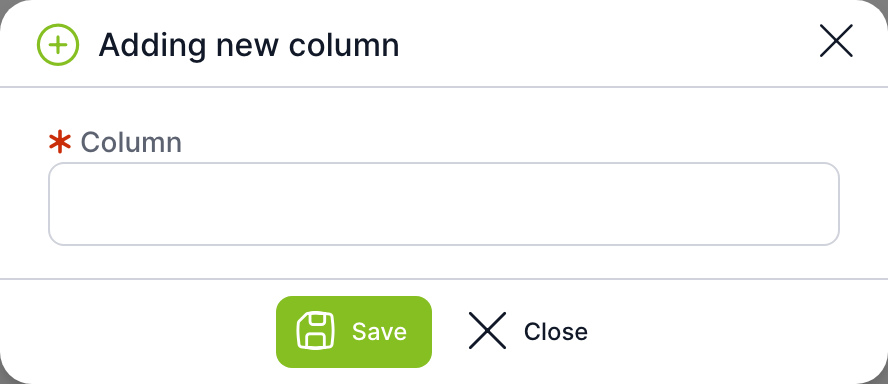
Enter the name of the new column in the Column field (required) and click Save. The column is added at the end of the table and receives the next free col_… identifier. It remains empty for existing rows.
Renaming columns
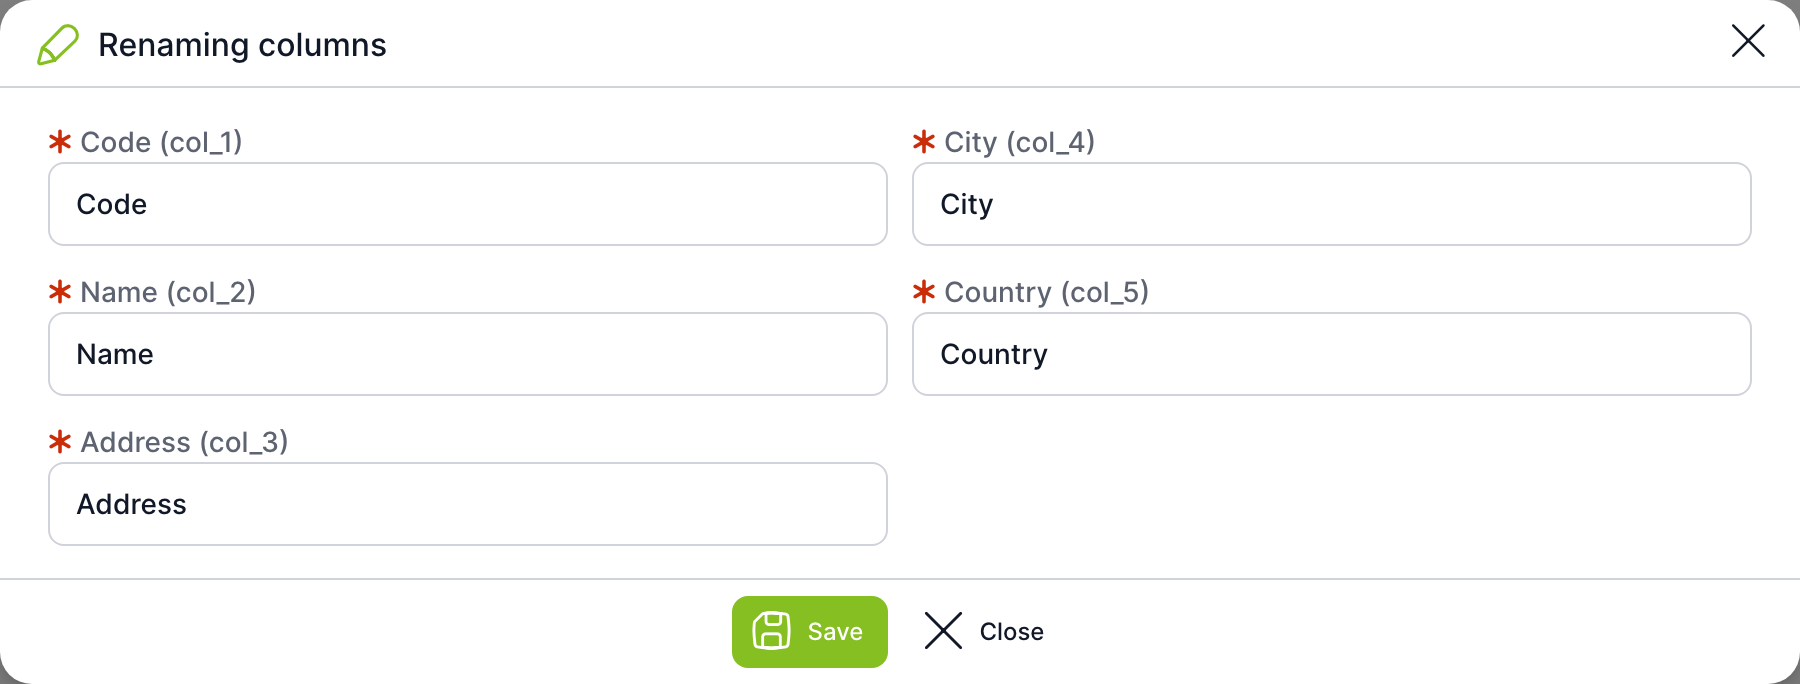
The Rename columns window contains a field for each column. All fields are required. Saving changes only the displayed name; the col_… identifier stays the same, so calculations that reference the column by this identifier keep working.
Deleting a column
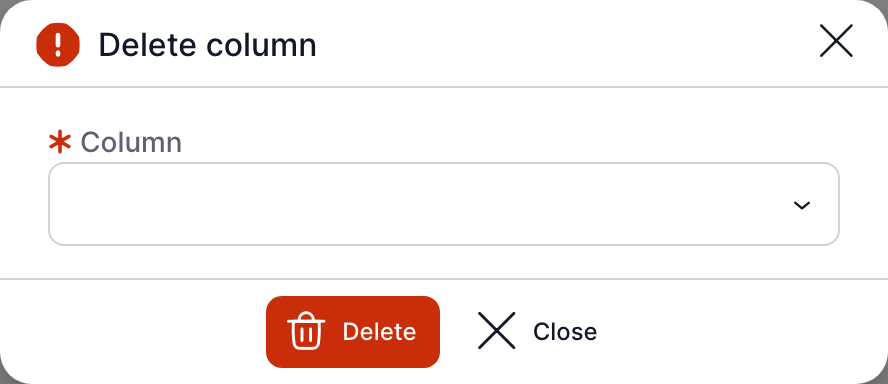
In the Column field (required), select the column and click Delete. The column disappears together with all its values. The window does not ask again; the deletion happens immediately.
Deleting a column or row takes effect immediately in all templates that read the table. Before deleting a column, verify that no calculation or variable uses it.
Table detail – Settings tab
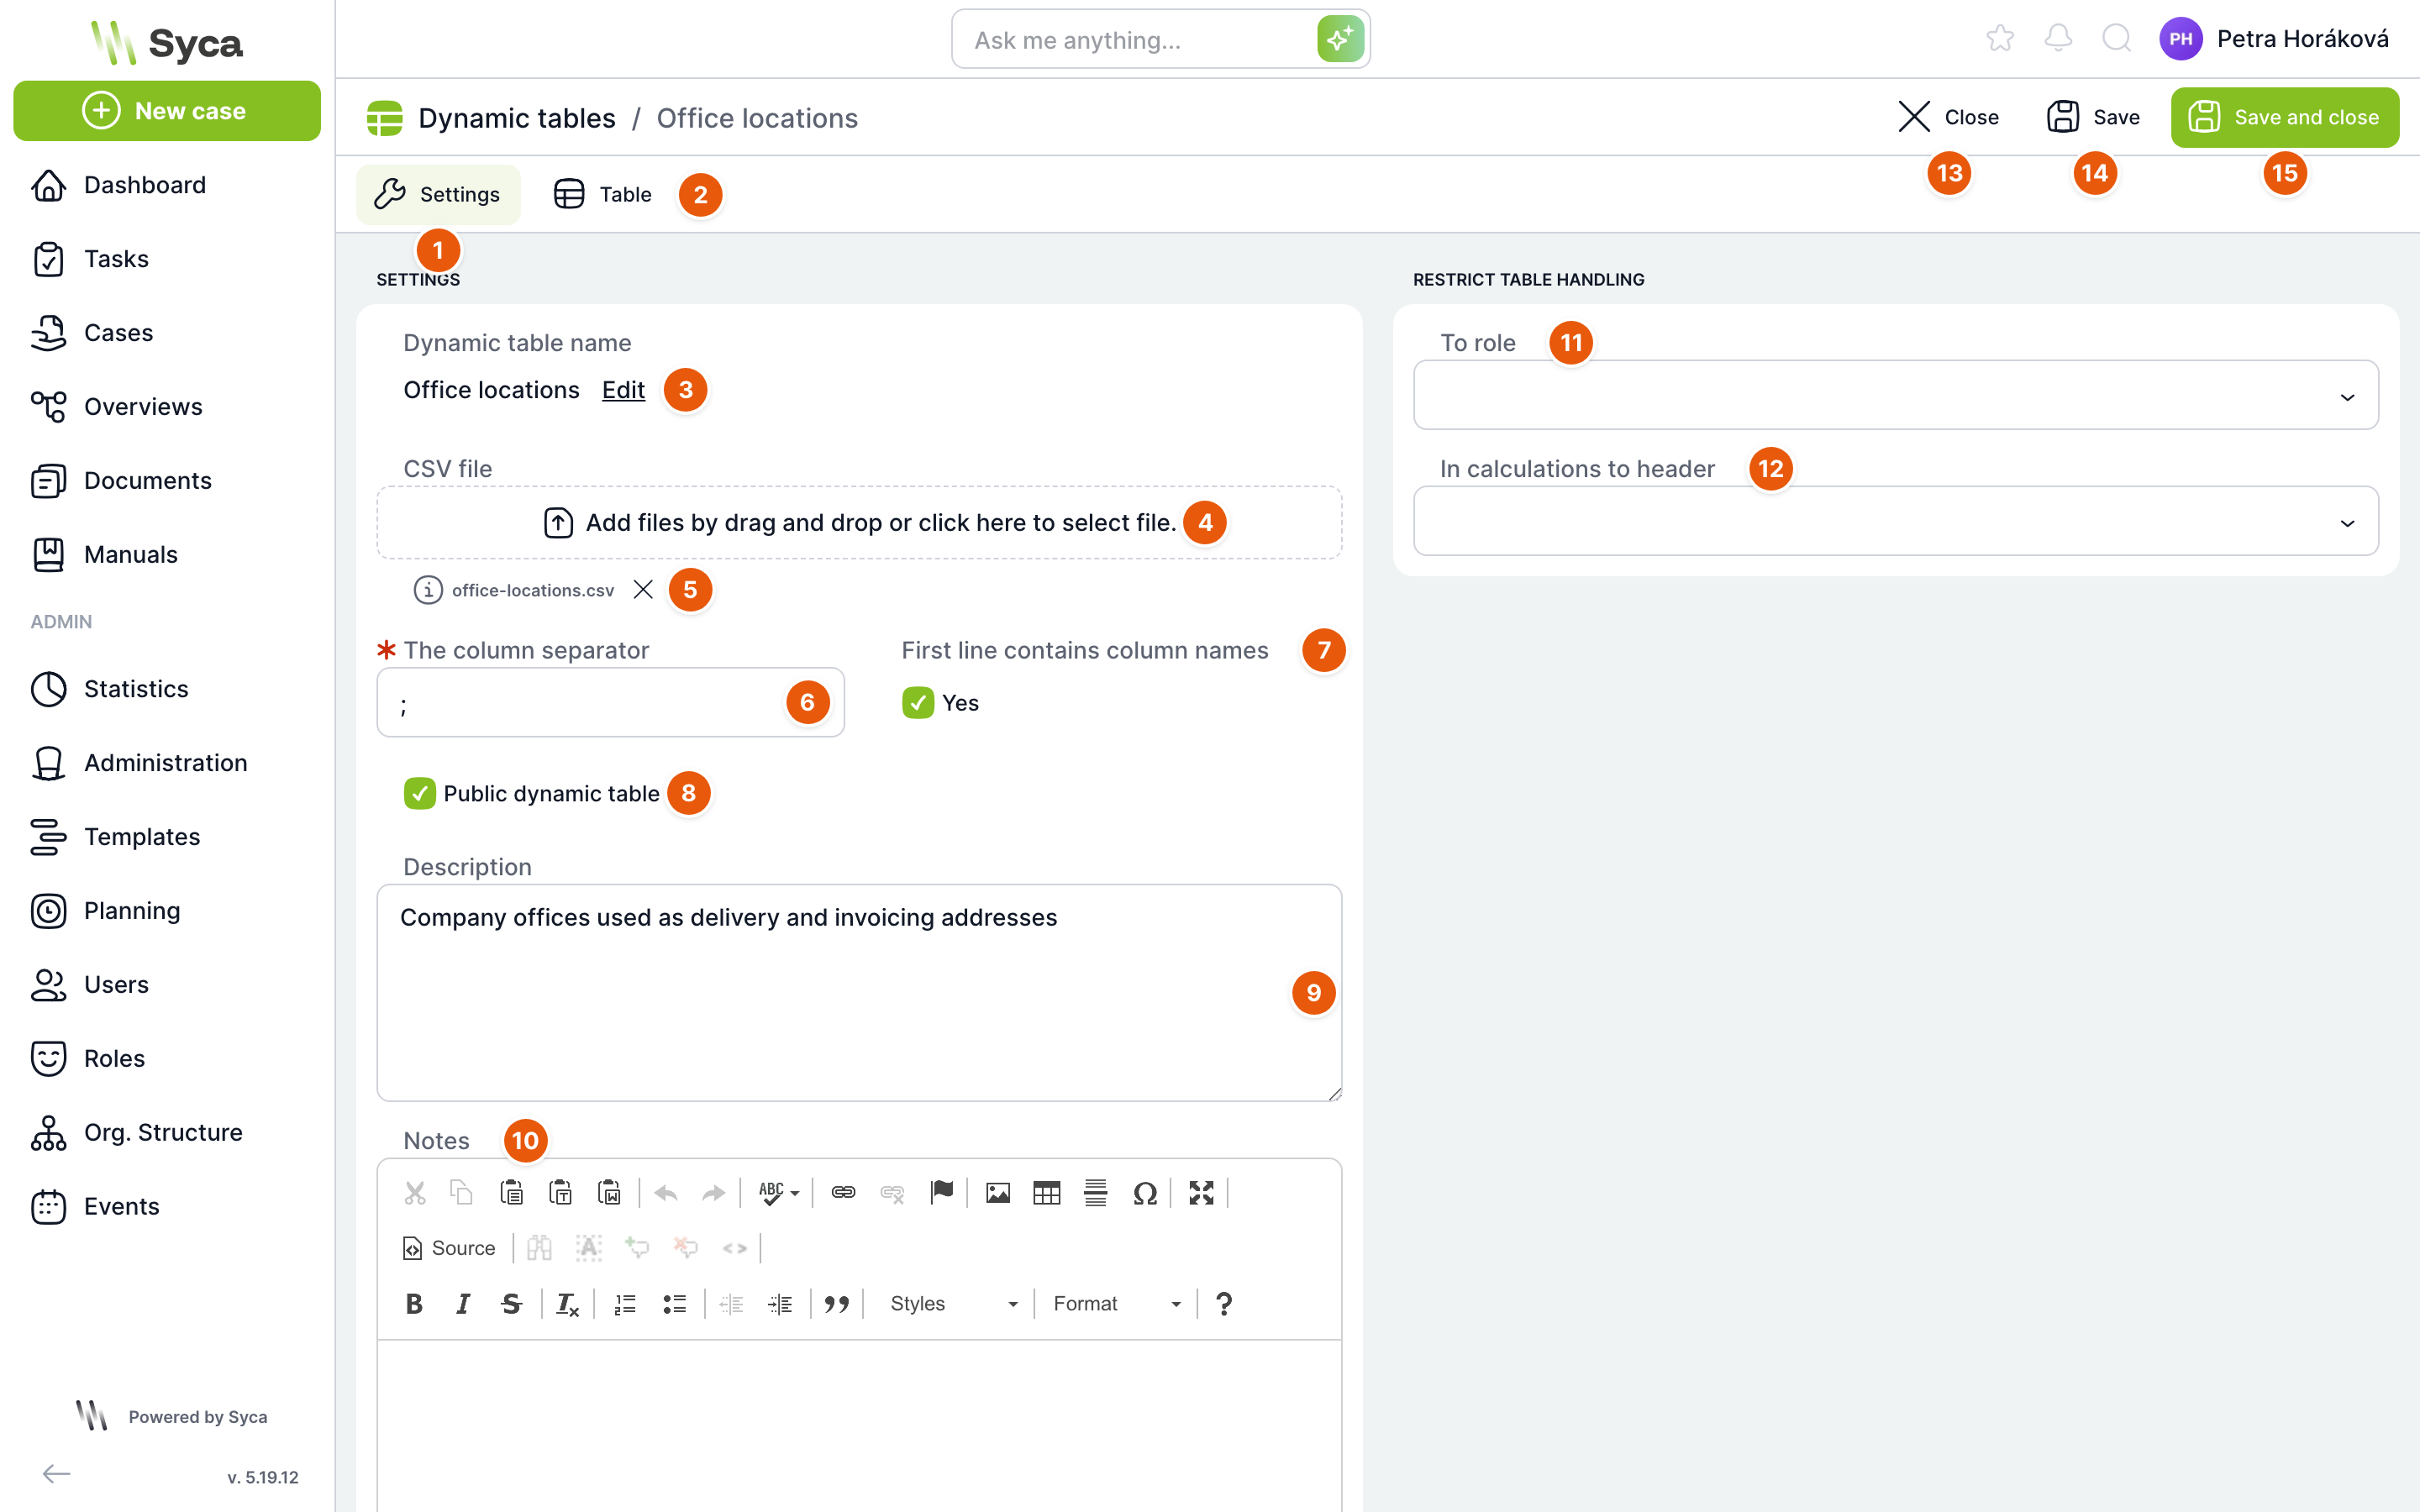
| No. | Element | Purpose |
|---|---|---|
| 1 | Settings | Tab with the table properties (currently open). |
| 2 | Table | Switches to the table data. |
| 3 | Edit | Enables editing of the table name, see Renaming a table. |
| 4 | CSV file | Field for uploading a CSV file by dragging and dropping or clicking. The uploaded file is saved only with the Save button, see Import from CSV. |
| 5 | Uploaded file name | Name of the file you are currently importing. Remove it with the cross. Without a new file, the name of the last imported file and the import date are shown here. |
| 6 | Column separator | Required; displayed after a file is uploaded. TAS detects it from the file content (comma, semicolon, tab, colon or pipe). If the preview is not split correctly, correct it. |
| 7 | First row contains column names | Checked: the first row of the file contains the column names. Unchecked: columns are named field1, field2 … and the first row is imported as data. |
| 8 | Public dynamic table | Checked: the table data is accessible to all logged-in users, for example when a form offers values from it for selection. Unchecked: only administrators may work with the table. |
| 9 | Description | Short description, displayed in the table list. |
| 10 | Notes | Longer formatted text for the table maintainer. |
| 11 | To role | A template variable of the dynamic table type using this table may be created or saved only by an administrator who has the selected role. For a non-public table, working with the data is also restricted to these administrators. An empty field means no restriction. |
| 12 | In calculations to header | Calculations may read the table only in cases of the selected template header. A calculation in another template ends with an insufficient permissions error. An empty field means no restriction. |
| 13 | Close | Returns to the table list. If you have unsaved changes, TAS asks whether to save them. |
| 14 | Save | Saves the settings and, if you have uploaded a CSV file, performs the import. Active only when something has changed. |
| 15 | Save and close | The same, and returns you to the table list. |
The To role and In calculations to header fields can be changed only by a superadministrator. Other administrators see their value but cannot change it.
Renaming a table
The name is saved separately, not with the Save buttons.
- Click Edit next to the name.
- Type the new name and click Save dynamic table name.
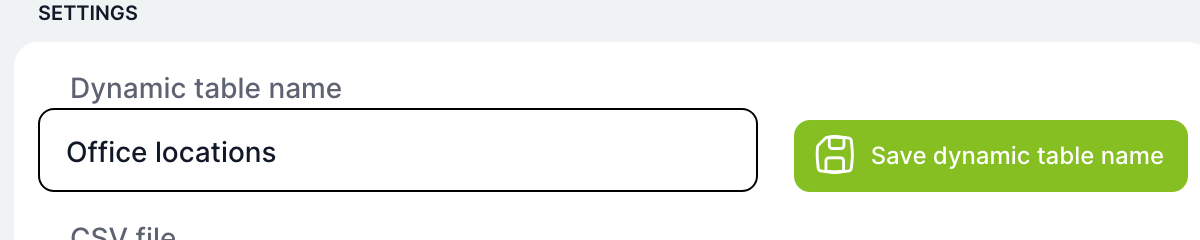
- TAS asks whether you really want to change the name and warns about the impact on calculations. Click Confirm to save the name, or No to restore the original name.
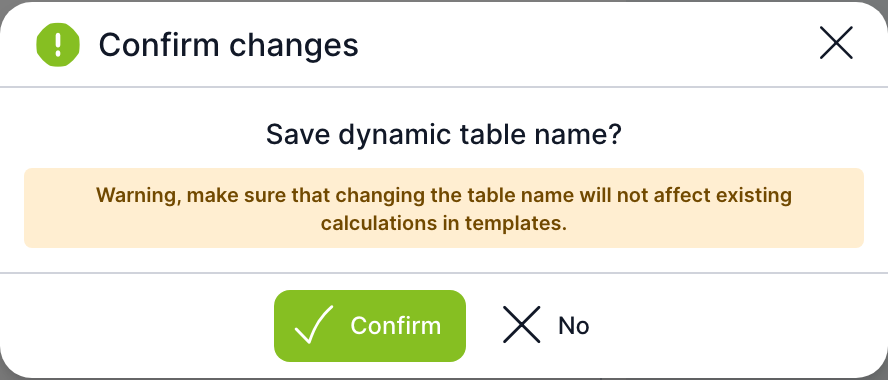
Calculations in templates often reference a table by its name. After renaming, they would no longer find the table. Before changing the name, go through the templates that use the table and update them.
Import from CSV
The import replaces the entire table content with the content of the file.
- On the Settings tab, drag the file into the CSV file field, or click the field and select the file.
- Check the Column separator and the First row contains column names option.
- A Preview of the file is displayed at the bottom of the page. Each column header shows the name and the
col_…identifier the column will receive after the import.

- Click Save. When the import finishes, the message "CSV file has been uploaded." is displayed, and the name of the imported file with the date appears below the file field.
- Check the result on the Table tab.
| Rule | What it means |
|---|---|
| Content is replaced | All existing rows and columns are removed and replaced with the content of the file. The import does not add anything to existing data. |
| Column identifiers | Columns receive col_… identifiers according to their order in the file. Keep the column order unchanged, otherwise calculations will read different columns than before. |
| ID or Index column | If the file contains a column named ID or Index, its values are used as row indexes. The values must not repeat, otherwise the import ends with an error. Without such a column, TAS numbers the rows itself. |
| Column names | A column name must not be a number. |
| Empty file | The import rejects a file without data. |
The import cannot be undone. Before uploading a new version of the data, download the current content with the Export button on the Table tab.
Related: CSV files, Templates – variables and calculations.