DMS attributes
DMS attributes are additional data stored with each document in TAS, for example the document category, contract number or validity date. On this screen you create and edit attributes and assign them to logical document types. The screen is available to the administrator and to users with the DMS administrator role. Open it in Administration → Integration and data management → DMS attributes.
How attributes work
- Each document has a logical type (for example General document). Logical types are the values of the system attribute Logical type.
- You assign to each logical type the attributes that are filled in for documents of that type. When a user selects the Logical file type in the document detail, in the Document information section, fields for the attributes assigned to that type appear below it.
- Users can also display attributes as columns in the document list (in Settings, in the DMS – columns section).
TAS includes four system attributes:
| Attribute | Purpose |
|---|---|
| Logical type | List of logical document types. The default type has the key UND (General document). To add a new logical type, add a new row to the value list of this attribute. |
| Case | Name of the case the document belongs to. TAS fills it in automatically. |
| Template | Name of the template of the case the document belongs to. TAS fills it in automatically. |
| Folder | The folder the document is filed in. The values correspond to document folders and are read-only in the attribute window. |
The Logical type, Case and Template attributes cannot be deleted; TAS rejects the deletion. For the Logical type attribute, do not change the keys of existing values, because documents refer to them. The key of an existing row is therefore read-only.
Attribute list
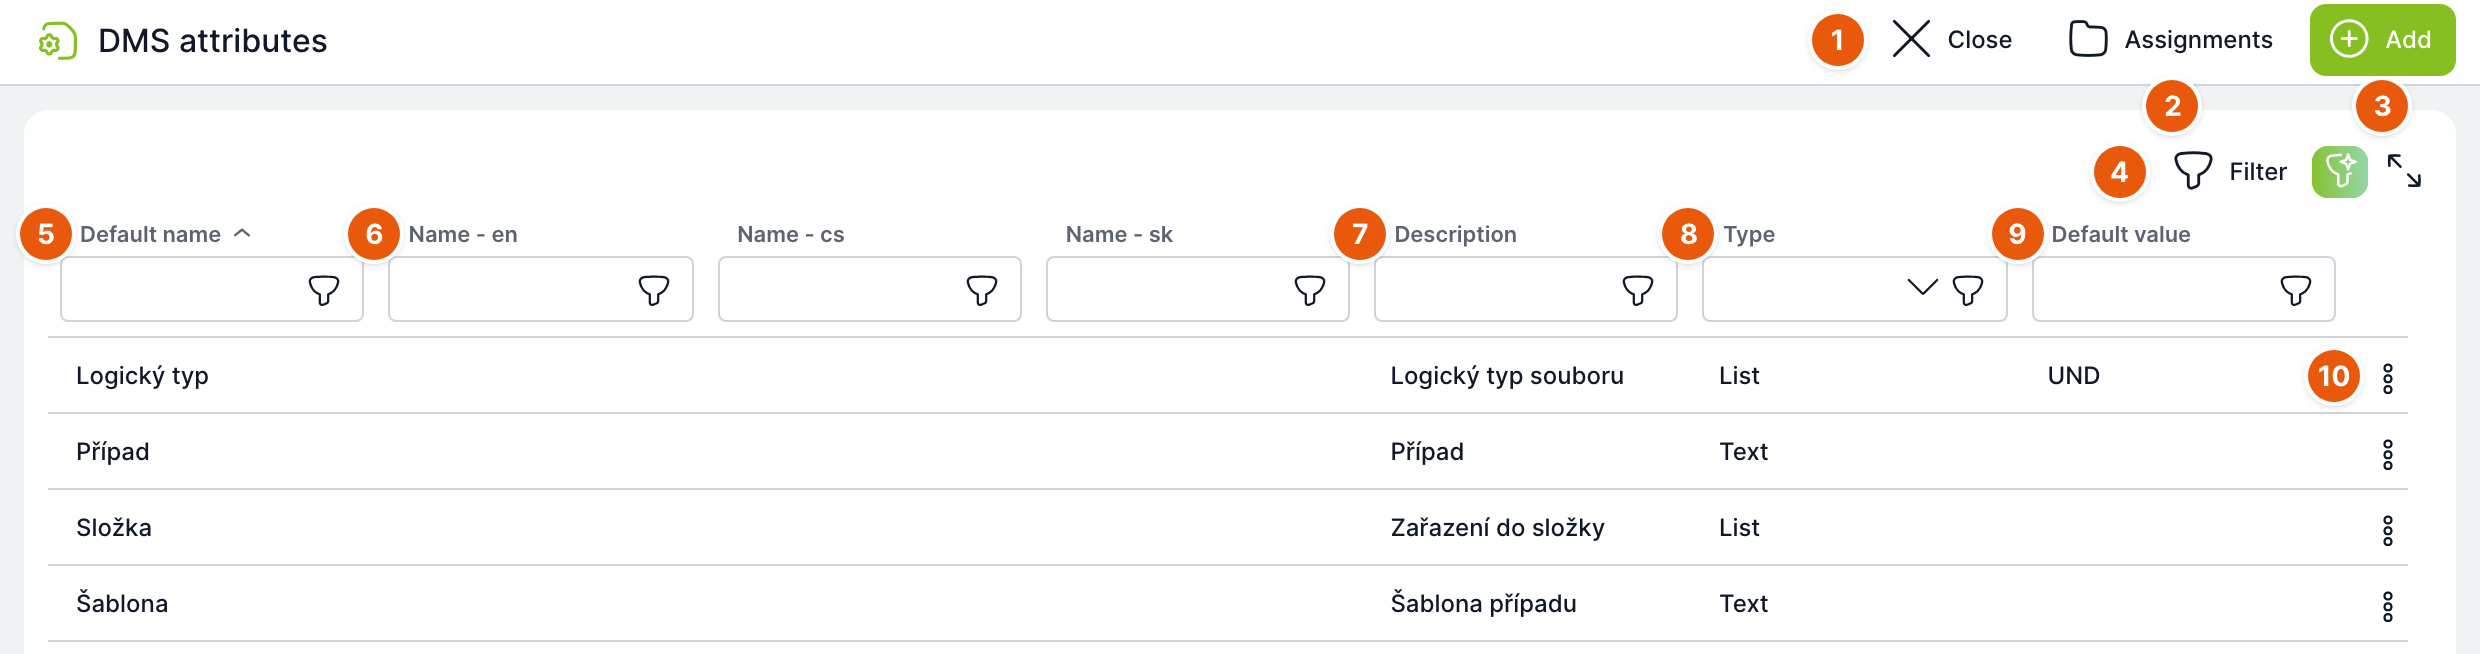
| No. | Element | Purpose |
|---|---|---|
| 1 | Close | Returns you to the Administration menu. |
| 2 | Assignment | Opens the assignment of attributes to logical document types (see below). |
| 3 | Add | Opens the window for creating a new attribute. |
| 4 | Filter | Opens a window for building a filter from multiple conditions. Quick filters for individual columns are in the row below their headers. The green button next to it is the AI filtering assistant (only with artificial intelligence enabled). |
| 5 | Default name | Attribute name used when no translation is filled in for the user's language. The list is sorted by this column by default. |
| 6 | Name – en, cs, sk… | Translations of the name for the individual application languages. There are as many columns as your installation has languages. |
| 7 | Description | Description of the attribute for administrators. |
| 8 | Type | Data type of the attribute: Text, Number, List or Date. Filtered by selecting from a menu. |
| 9 | Default value | Value that TAS sets for the attribute when a document is uploaded (see Default value). |
| 10 | Row menu | The Edit and Delete actions. |
You can also open an attribute by double-clicking its row. The list footer shows the number of records and buttons for display settings, columns and export to a file.
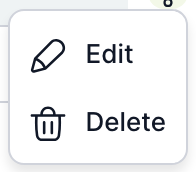
Delete asks for confirmation before deleting. A deleted attribute disappears from all logical types it was assigned to.
Attribute window
Open the window with the Add button (titled Add attribute) or by editing an existing attribute (the title is the attribute name). The screenshot shows a List-type attribute being edited.
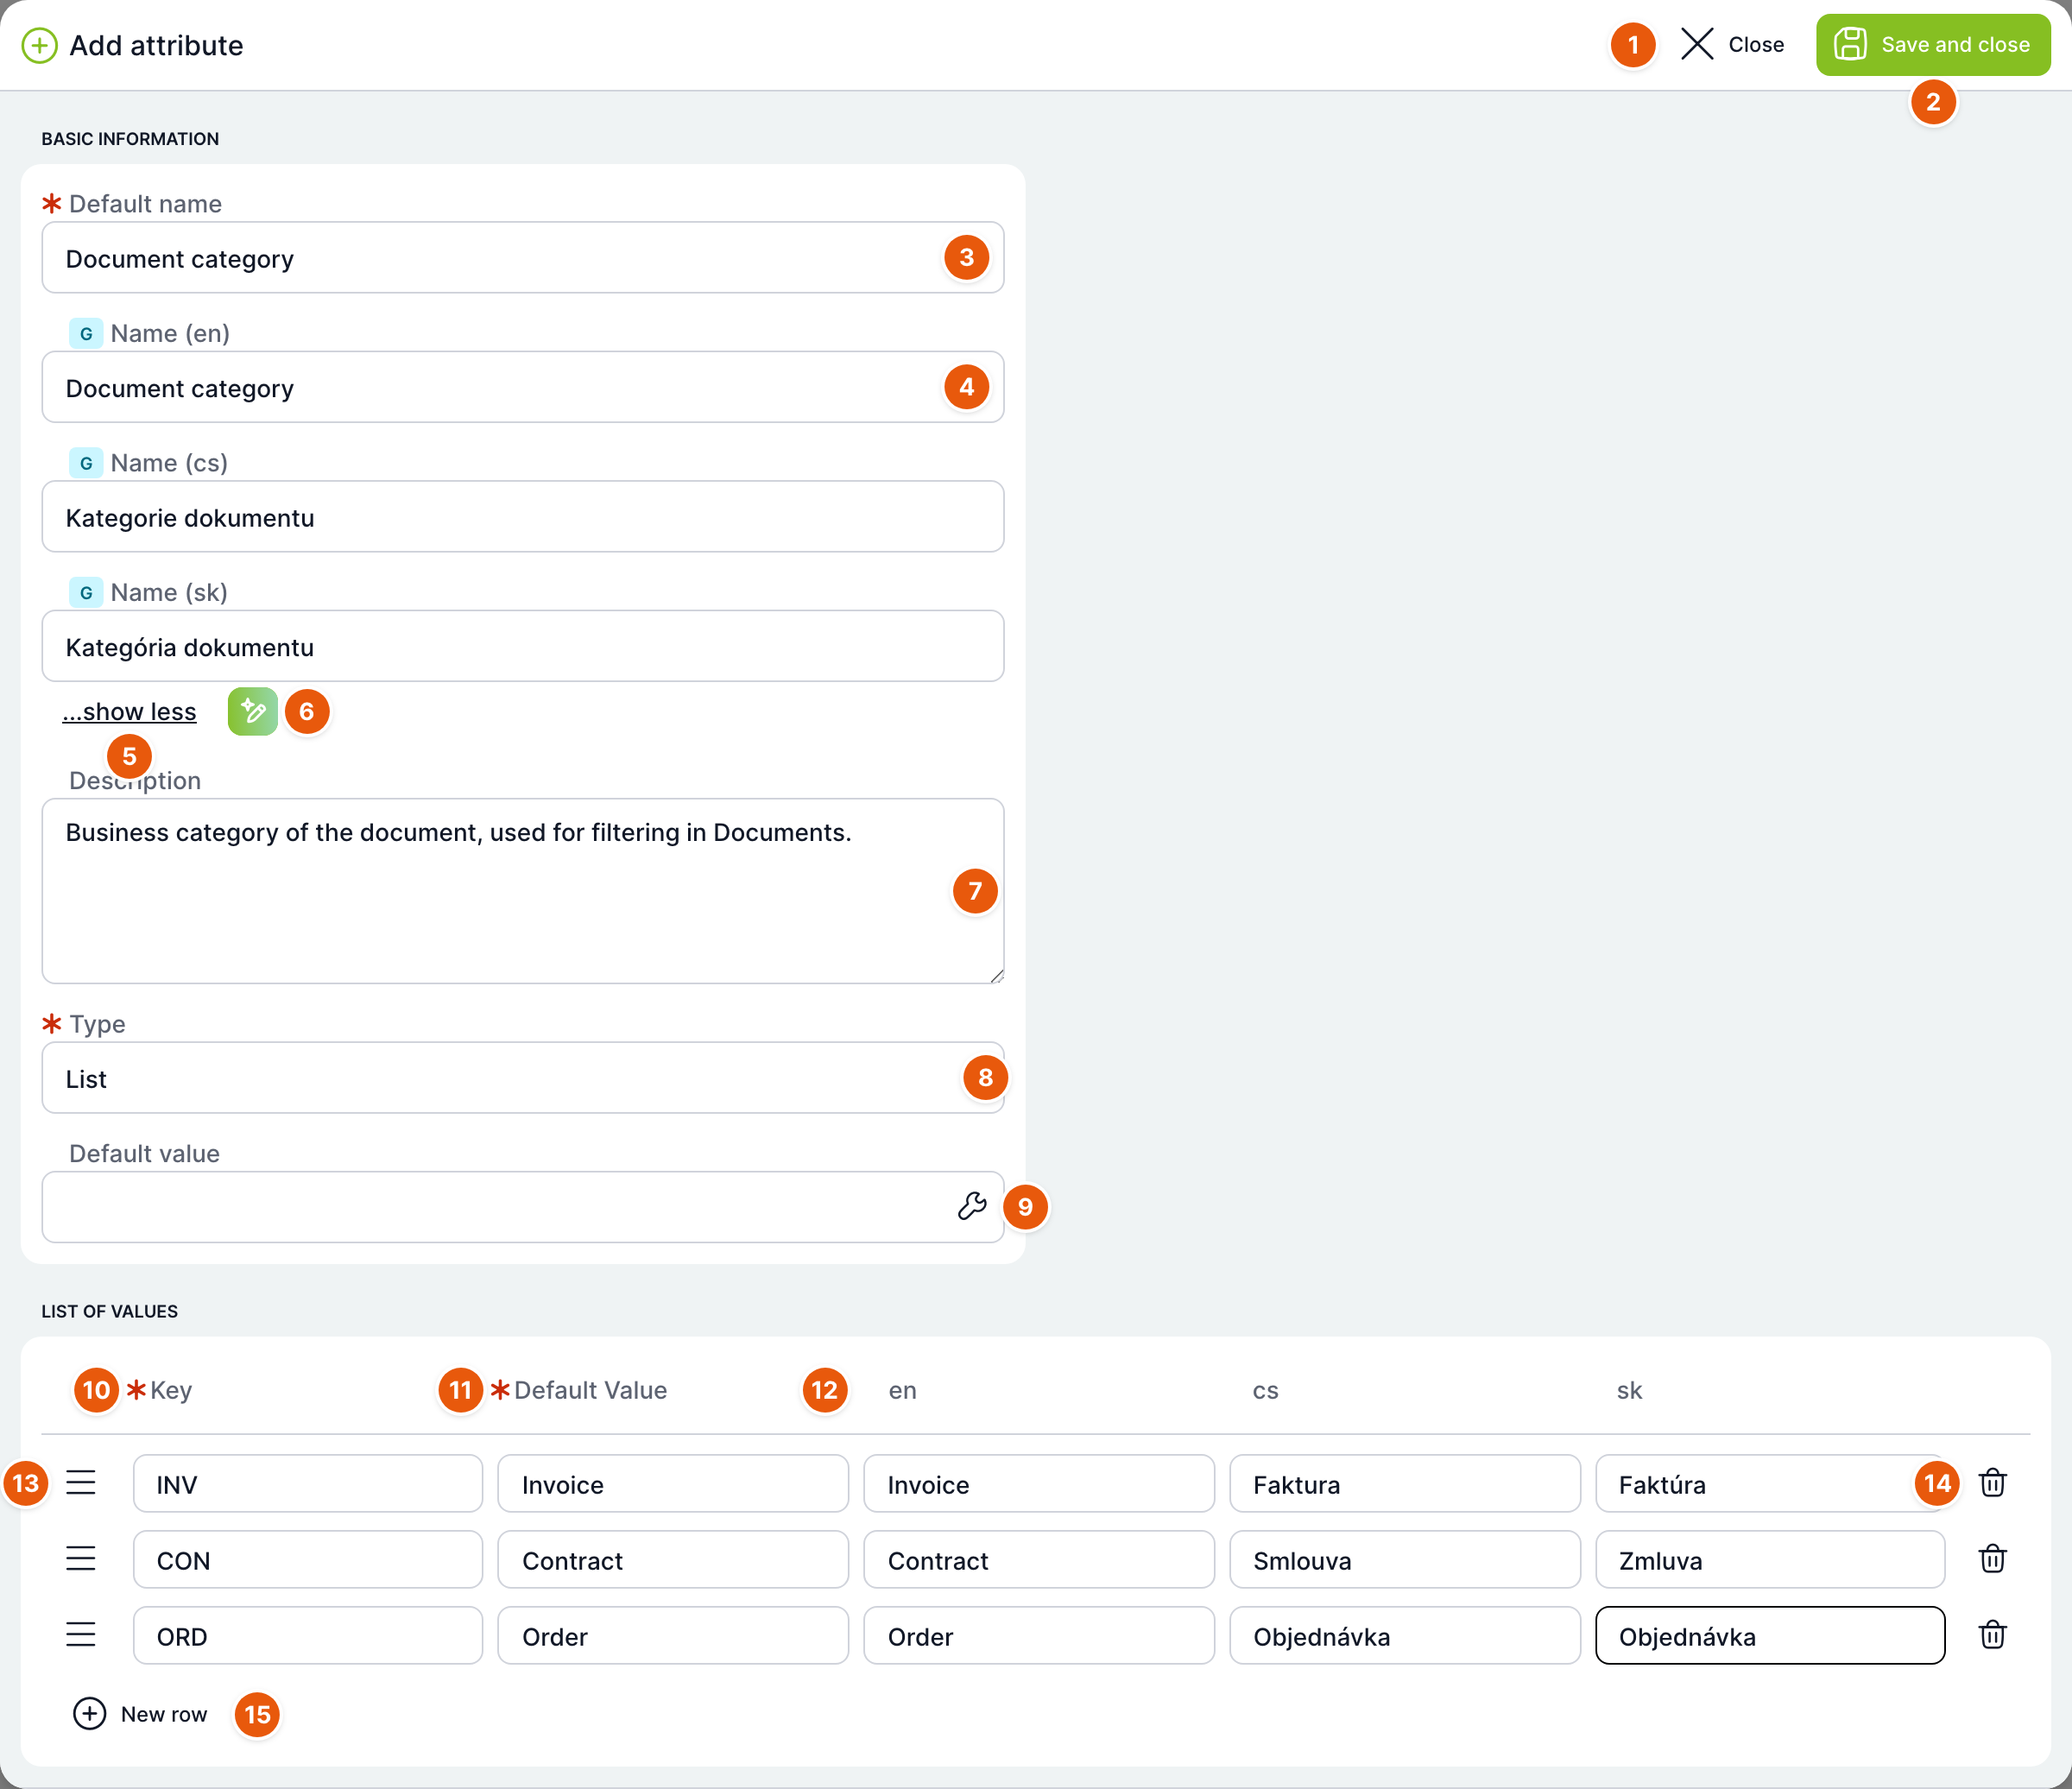
| No. | Element | Purpose |
|---|---|---|
| 1 | Close | Closes the window. If you have made changes, TAS asks Save changes? Click Confirm to save the changes or No to discard them. |
| 2 | Save and close | Saves the attribute and closes the window. If a required field is empty, TAS shows a warning and keeps the window open. |
| 3 | Default name | Required. Attribute name displayed when there is no translation for the user's language. |
| 4 | Name (language) | Translation of the name for the individual languages. Show the fields with the More language variants link. |
| 5 | ...show less | Hides the translation fields. |
| 6 | AI translation | Translates the default name into all languages and fills in the translation fields. The button is visible only when artificial intelligence is enabled in the installation. Check the translation before saving. |
| 7 | Description | Free-text description of the attribute. |
| 8 | Type | Required. Text, Number, List or Date. Depending on the type, the user fills in a text field, a number, a selection from a list or a date in the document detail. When you select List, the Value list section appears. |
| 9 | Default value – Settings | Default value field. The key icon opens a menu of placeholder values (see below). |
| 10 | Key | Required. The value stored with the document. It cannot be changed for saved rows. |
| 11 | Default value | Required. Text the user sees in the selection when there is no translation for their language. |
| 12 | en, cs, sk… | Translations of the value text for the individual languages. Optional. |
| 13 | Move | Drag the icon to change the order of values. Works when the list has at least two rows. |
| 14 | Delete | Removes the row from the value list. |
| 15 | New row | Adds another value. |
TAS skips value list rows without a key when saving. The value list is saved only for the List type.
This is the system attribute Logical type with a single logical type UND (General document). Add another logical type with the New row button:
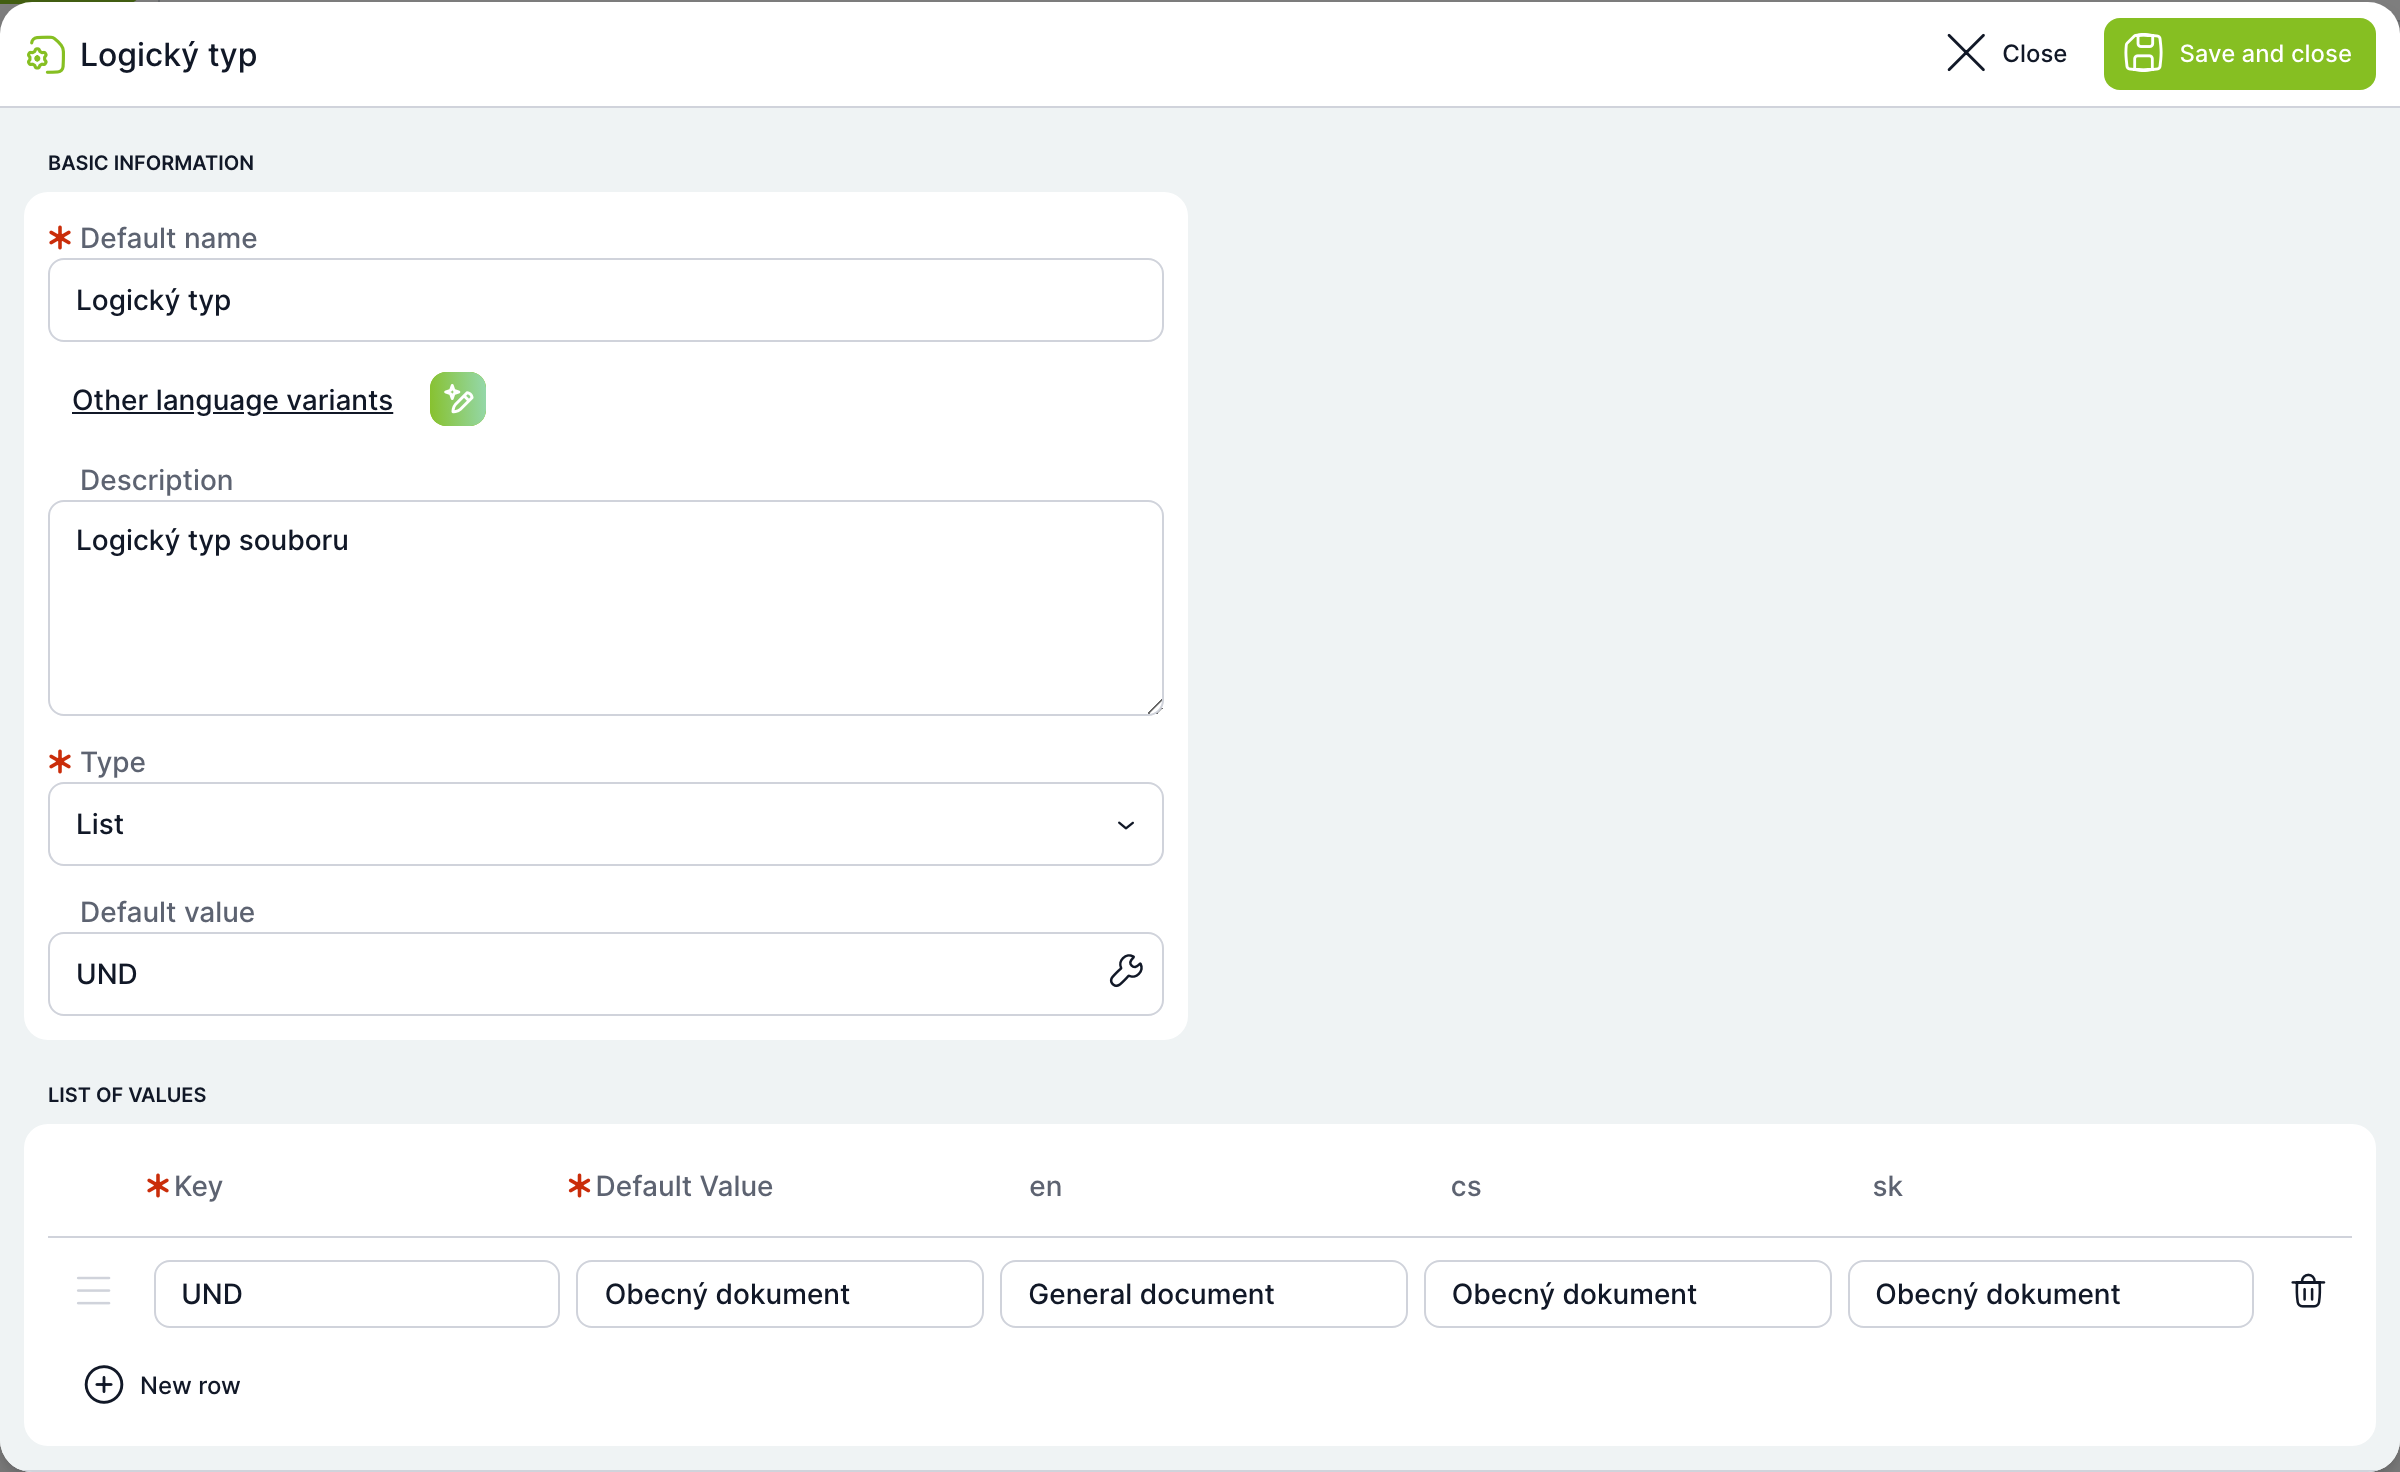
Default value
TAS uses the default value when a document is uploaded. Fixed text (without the # character) is filled in only if the attribute does not have a value yet. A value starting with # is a placeholder: on upload, TAS replaces it with data from the file or from the case. If the data is not found, the existing value is kept.
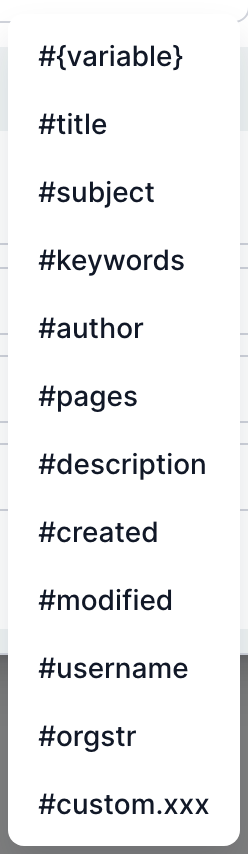
| Value | What TAS fills in |
|---|---|
| #{variable} | The value of a variable of the case the document is uploaded to. Replace the word variable with the variable name, for example #{Supplier}. |
| #title, #subject, #keywords, #author, #description | Title, subject, keywords, author and description from the file properties. |
| #pages | Number of pages from the file properties. |
| #created, #modified | Creation date and last modification date from the file properties. |
| #username | The user who uploaded the document. |
| #orgstr | The organizational unit of the user who uploaded the document. |
| #custom.xxx | Custom file property named xxx (replace xxx with the property name). |
How to create an attribute
- Click Add.
- Fill in the Default name and, optionally, the translations and Description.
- Select the Type. For the List type, add values: a key and text for each.
- Optionally fill in the Default value.
- Click Save and close.
- Assign the attribute to logical document types (see below). Without an assignment, it is not displayed in the document detail.
Assigning attributes to logical types
The Assignment button opens the DMS attribute assignment screen. There is one selector for each logical document type: available attributes are on the left, attributes assigned to that type on the right.
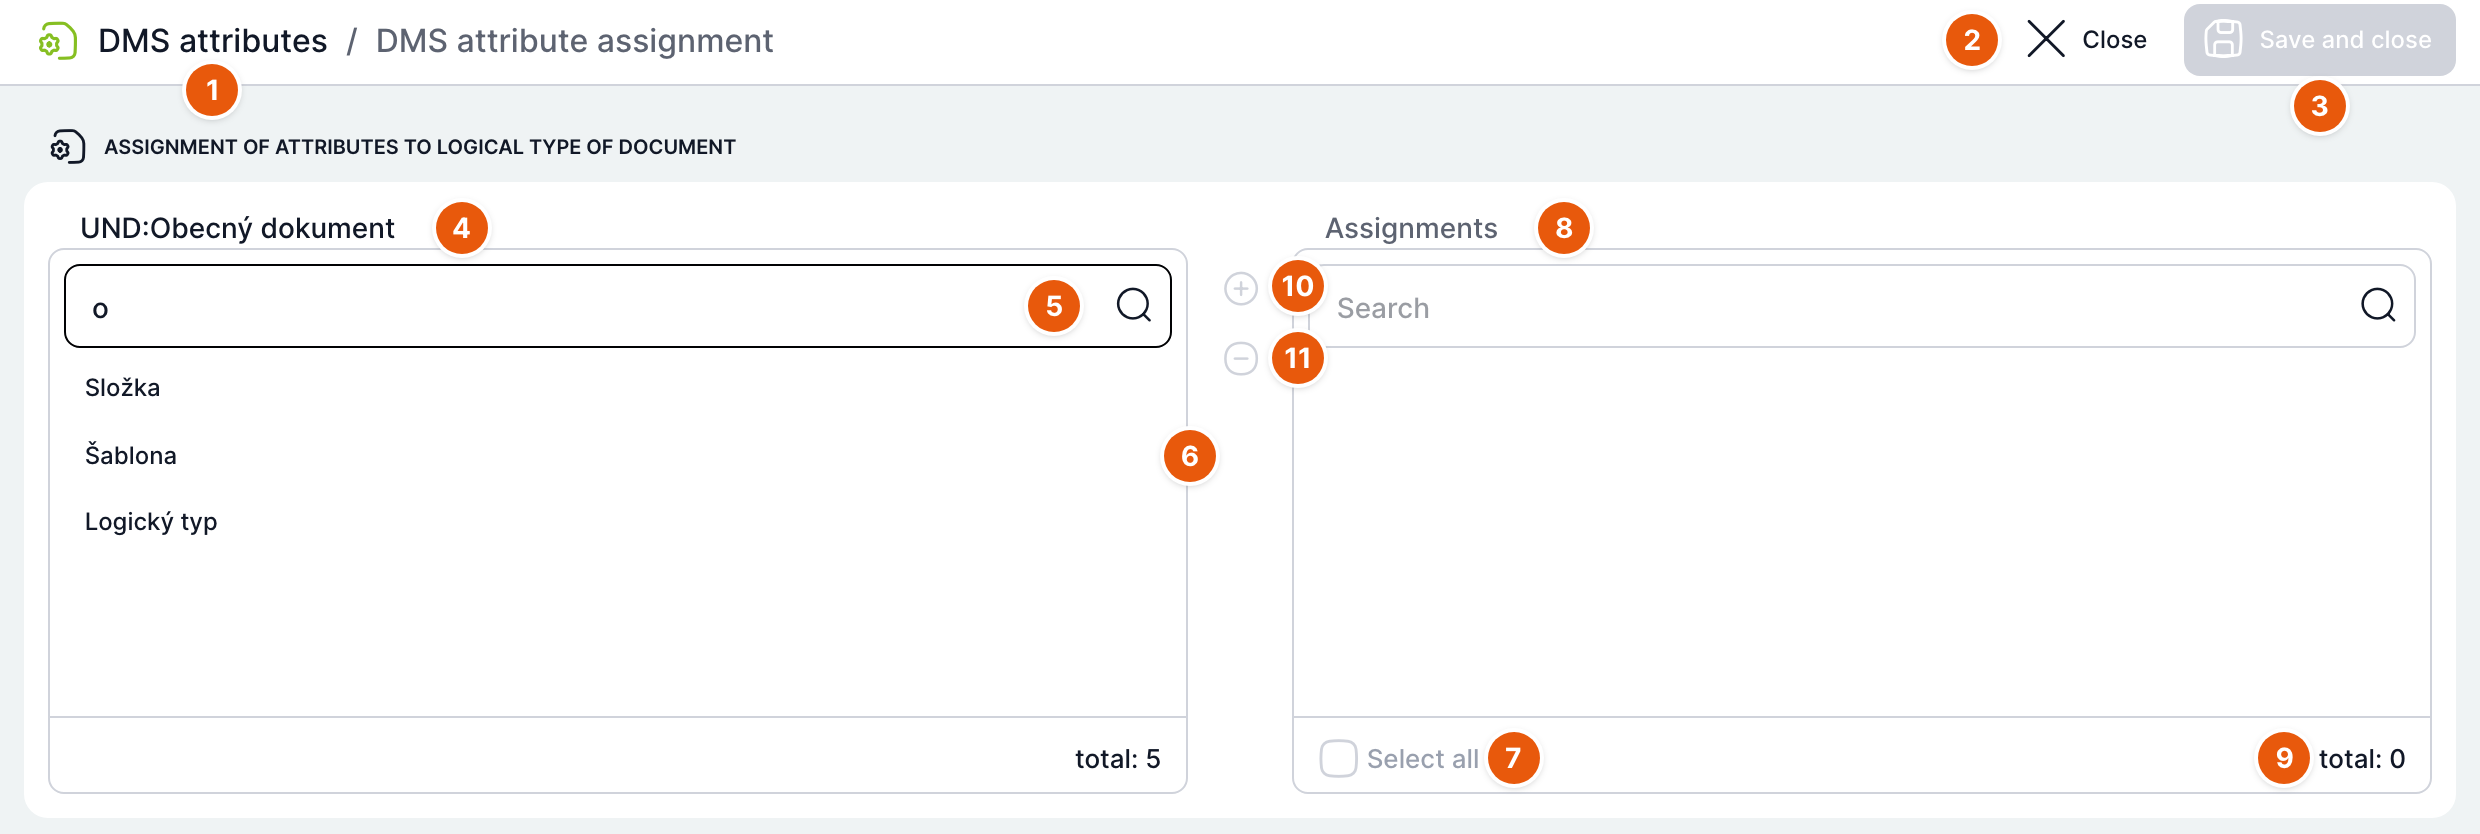
| No. | Element | Purpose |
|---|---|---|
| 1 | DMS attributes | Returns to the attribute list. |
| 2 | Close | Returns you to the attribute list without saving. If you have unsaved changes, TAS asks whether to save them. |
| 3 | Save and close | Saves the assignments for all logical types and returns you to the list. It becomes active only after you change something. |
| 4 | Logical type | Key and name of the logical type you are assigning attributes to (here UND: General document). |
| 5 | Search | Narrows the list by attribute name. The screenshot shows a search for attributes containing “o”. |
| 6 | Available attributes | Attributes the type does not have yet. Click an attribute (or drag it to the right) to assign it. |
| 7 | Select all | Selects all items in the list. |
| 8 | Assignment | Attributes assigned to the logical type. Click an attribute to move it back to the left. This list also has a search. |
| 9 | total | Number of items in the list. |
| 10 | Move selected to the right | Assigns the selected attributes. |
| 11 | Move selected to the left | Removes the selected attributes from the assignment. |
Saving sets each logical type to exactly the attributes on the right. A removed attribute is no longer displayed in the detail of documents of that type.
Related: Documents, Shared files.