Roles, Competences and Competence Rules
Roles determine what a user can do in TAS: which templates they can start, which tasks they handle and which cases they can see. Competences and competence rules let you assign roles in bulk and automatically. Only administrators can see the Roles page. To open it, select Roles in the main menu.
Roles, competences and rules: what is the difference
| Term | What it is | How it reaches the user |
|---|---|---|
| Role | The basic permission. Templates, tasks, case visibility and system rights are always checked against roles. | Manually in the role or user detail, through directory synchronization, by a process or through a competence. |
| Competence | A bundle: a group of users together with a group of roles. The roles are either selected manually or defined by a name pattern (for example, all roles whose name contains "001 Accounting"). | Every member of the competence receives all of its roles with the source Competence. |
| Competence rule | A template for creating competences. From a text, typically the name of a directory group, it creates a competence and adds roles and users to it. | During user synchronization from LDAP, or manually with the Apply action. |
Saving a competence does not change users' roles right away. The competence is only flagged for regeneration (the Generation status column shows Yes). The roles are assigned or removed only when the scheduled job Competence generator runs. By default it runs daily at 4:00, but it is disabled after installation. If you use competences, enable it in Administration on the Crons page.
Role list
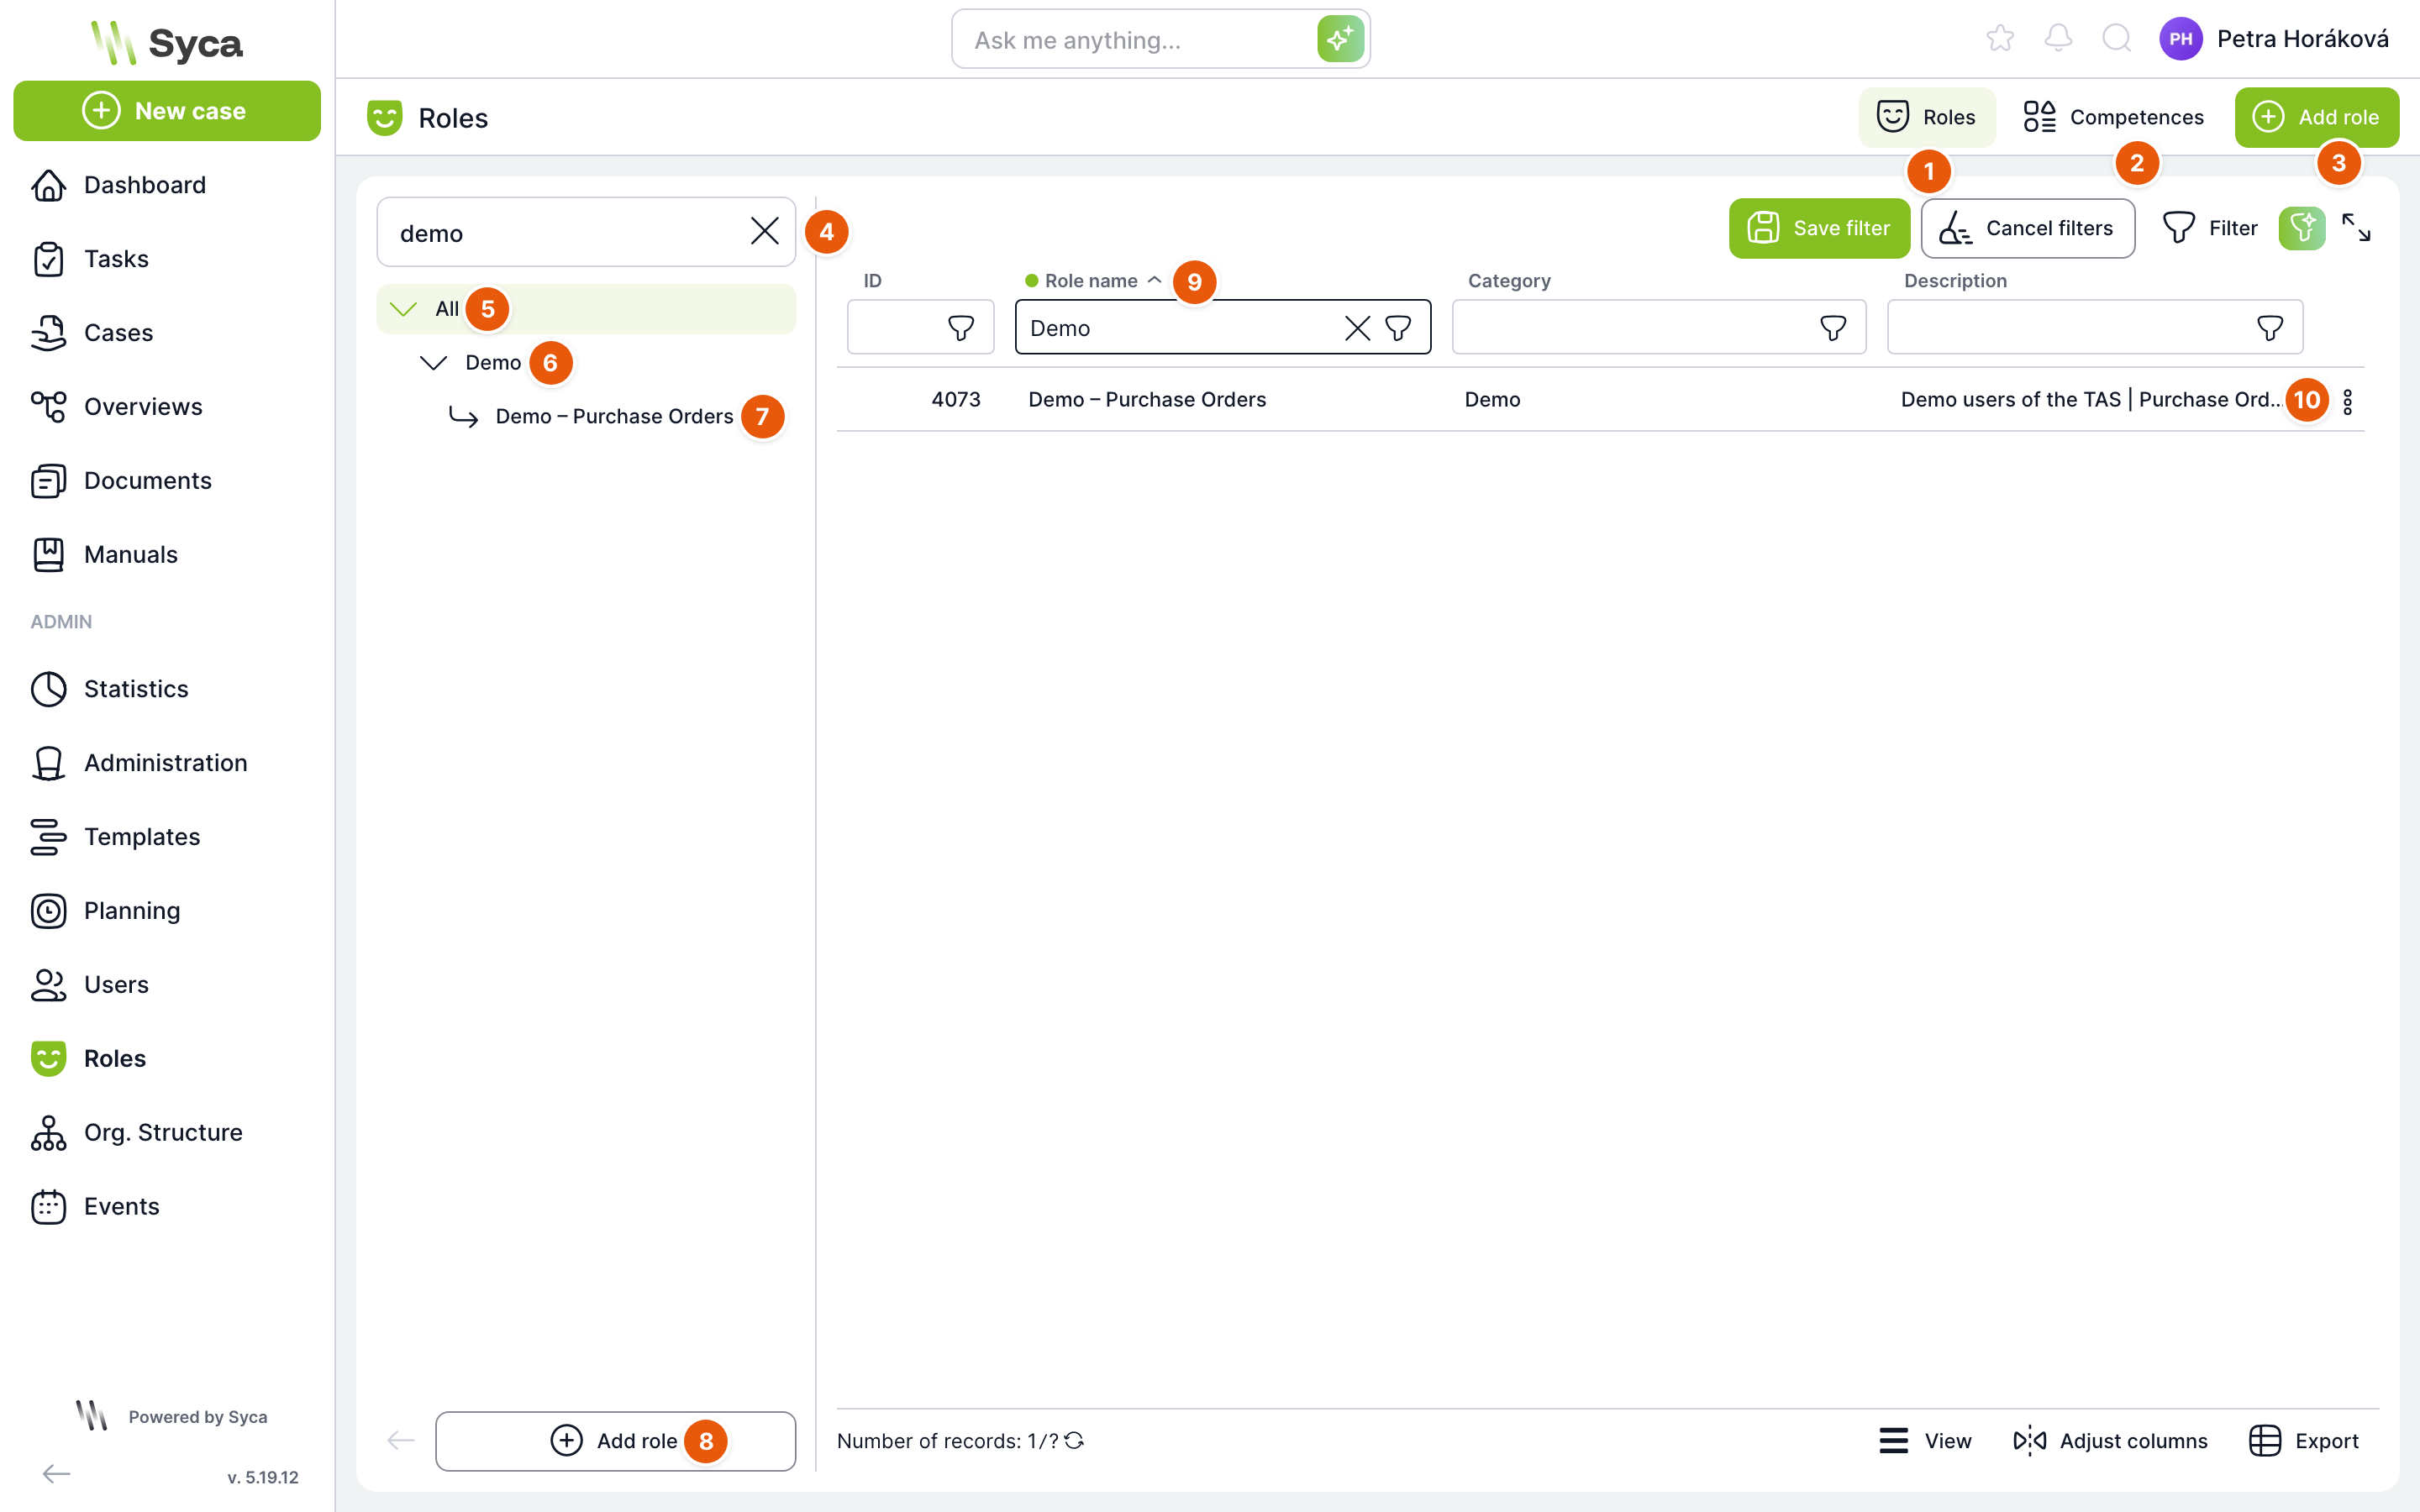
| No. | Element | Purpose |
|---|---|---|
| 1 | Roles | Tab with the list of roles. |
| 2 | Competences | Tab with the list of competences. |
| 3 | Add role | Opens the window for a new role. |
| 4 | Search | Filters the role tree by name. |
| 5 | All | Root of the tree. Click it to show all roles in the table. |
| 6 | Category | Roles in the tree are grouped by category. Roles without a category are in the Uncategorized group. |
| 7 | Role | Click it to show only this role in the table. |
| 8 | Add role | Same as button 3. |
| 9 | Column filter | The table has the columns ID, Role name, Category and Description. Filters, sorting, saved filters, views, columns and export work the same as in other tables. |
| 10 | Row actions | Edit, Copy, Delete. |
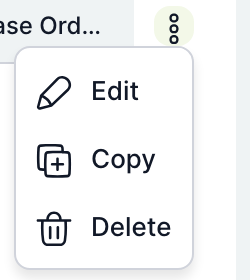
| Action | Purpose |
|---|---|
| Edit | Opens the role detail. Double-clicking the row does the same. |
| Copy | Creates a role named clone(1)_<název> with the same category, description, restriction and all assigned users, and opens it. System roles cannot be copied. |
| Delete | Deletes the role after confirmation. The role is removed from all users, from all template headers and from template visibility settings. The $AllUsers role cannot be deleted. |
Only a super administrator sees system roles (names starting with $) in the list. A regular administrator sees only $AllUsers. System roles are described in the System Roles article.
Role detail
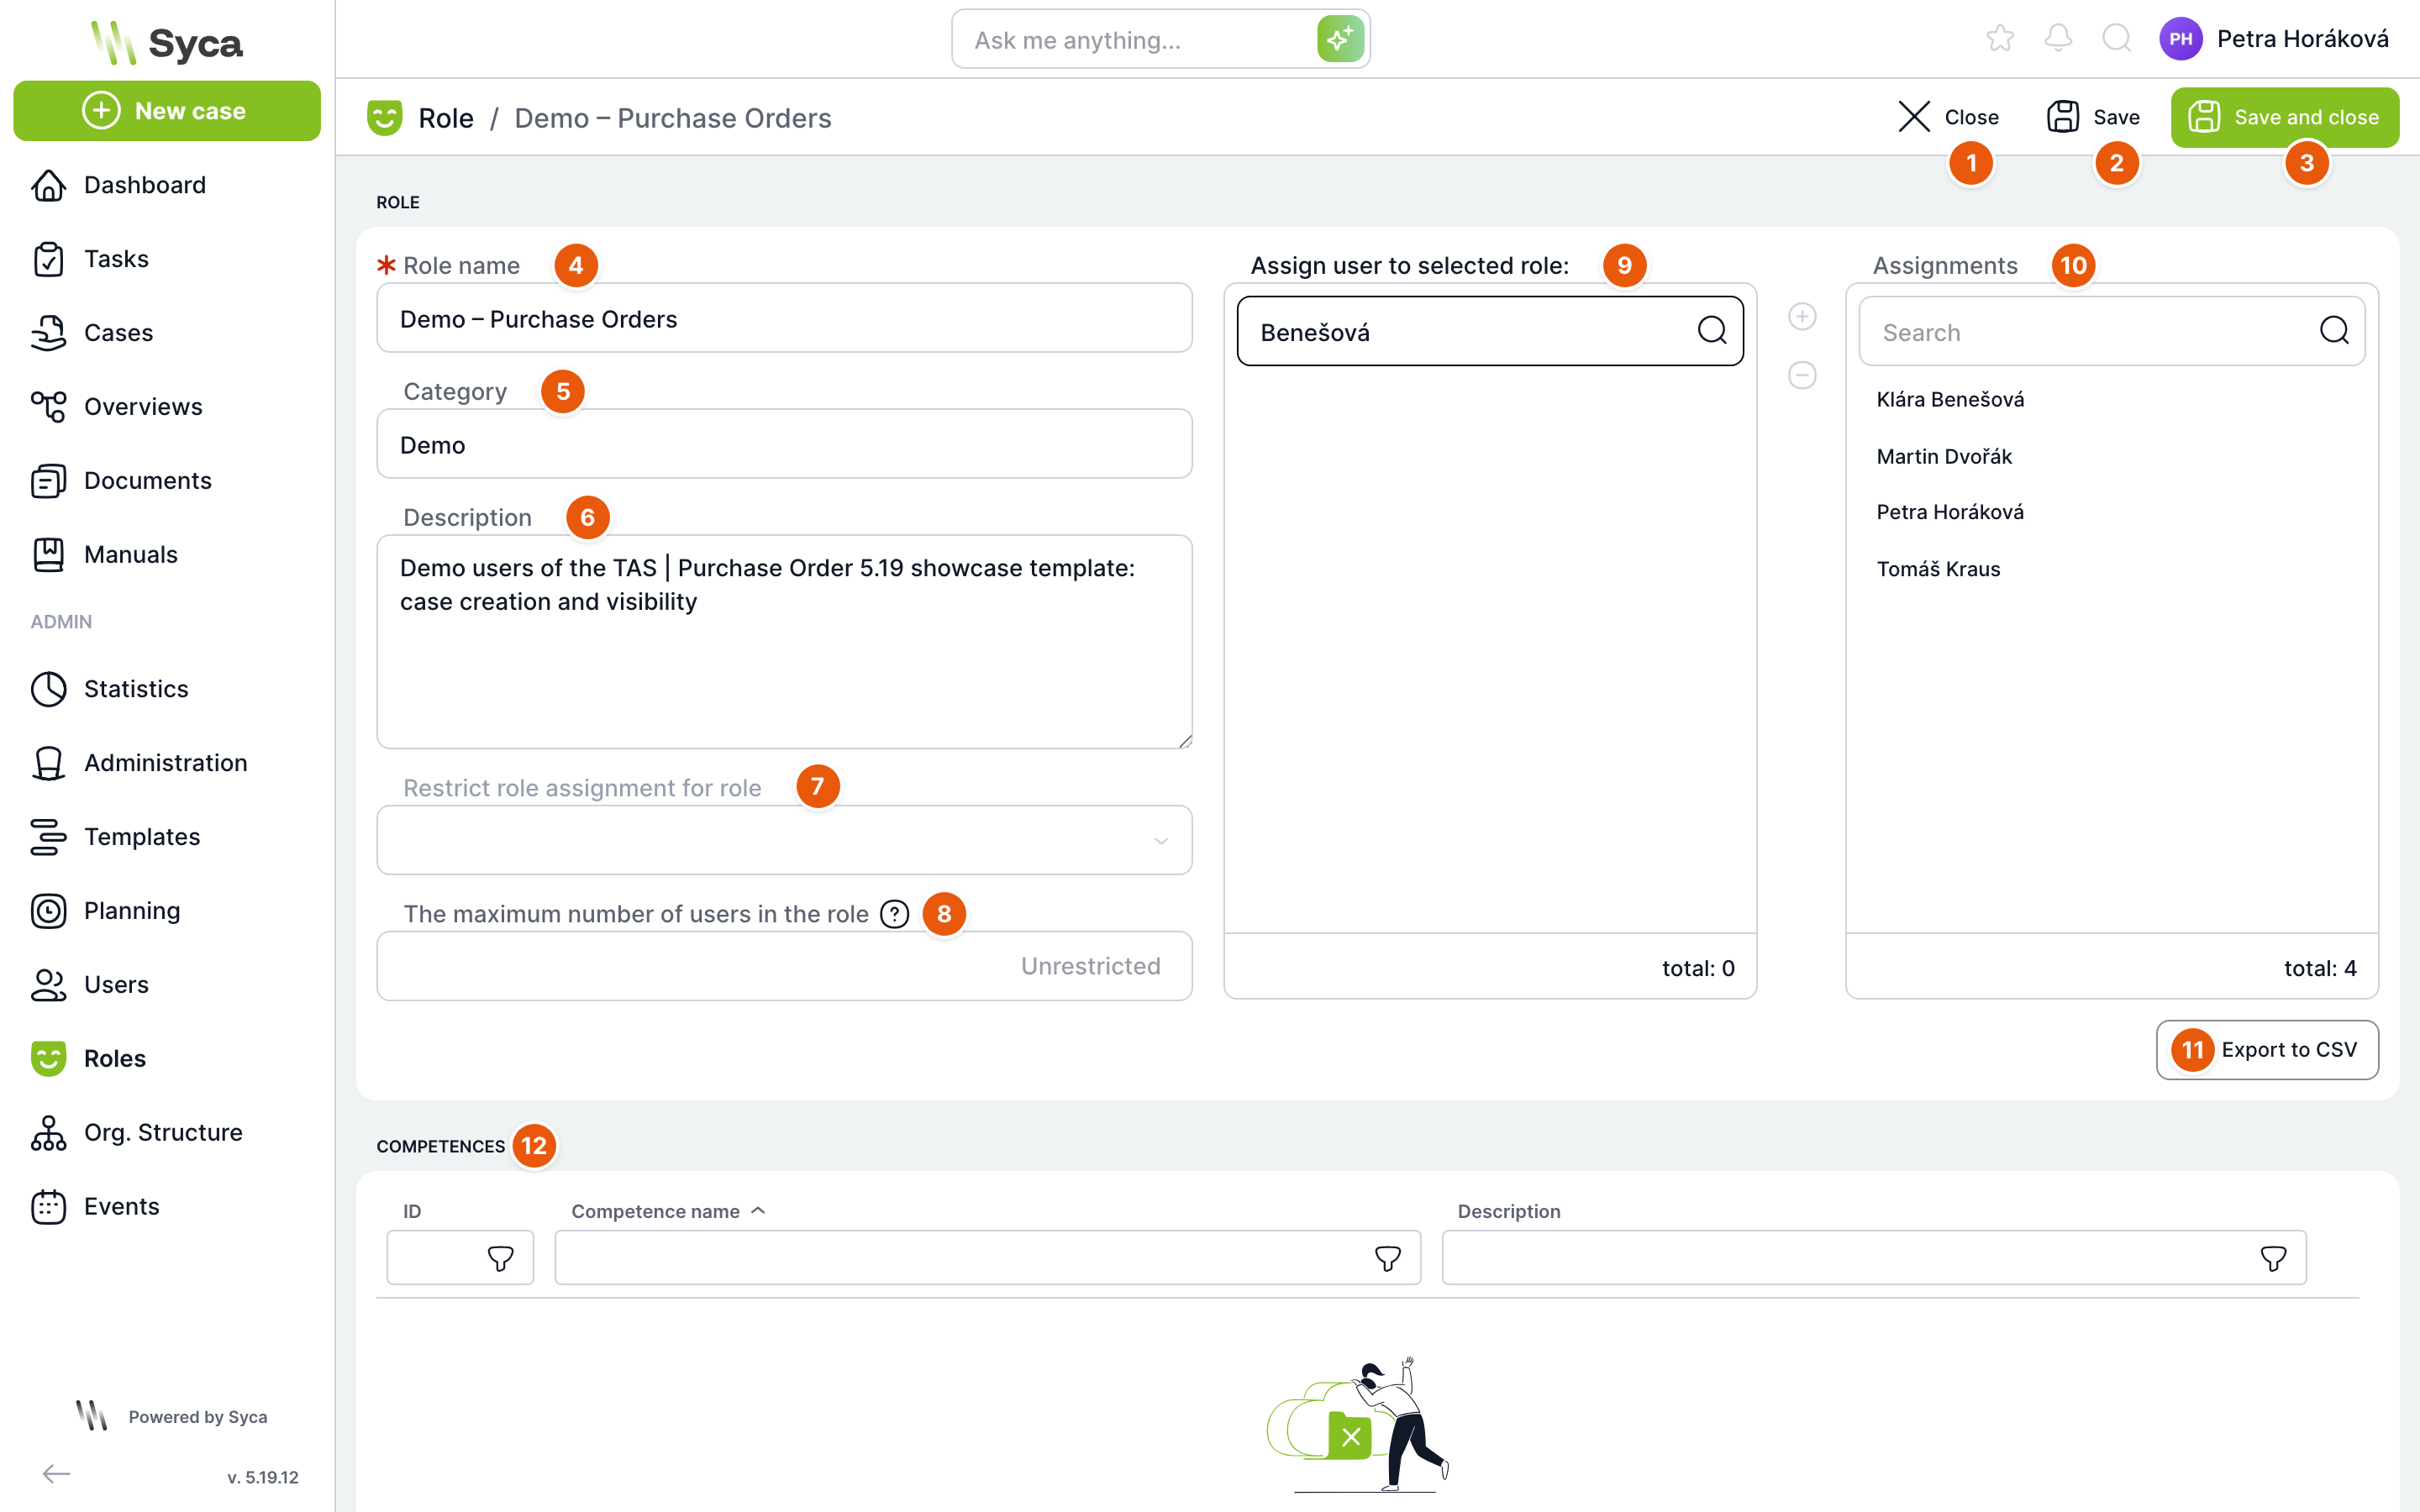
| No. | Element | Purpose |
|---|---|---|
| 1 | Close | Closes the detail. If there are unsaved changes, TAS asks you first. |
| 2 | Save | Saves and keeps the detail open. |
| 3 | Save and close | Saves and returns you to the list. |
| 4 | Role name | Required. This is the name you select the role by in templates. |
| 5 | Category | Group in the role tree. Select an existing category or type a new one. |
| 6 | Description | What the role is for. We recommend filling it in so that other administrators can find their way around. |
| 7 | Restrict role assignment to role | Only users who have the role selected here can then assign and edit this role. Only a super administrator can set it; for everyone else the field is disabled. |
| 8 | Maximum number of users in role | How many users can have the role. An empty field means unlimited. If the limit is exceeded, TAS refuses to save. |
| 9 | Assign users to selected role | Users who do not have the role. Search filters the list. Move users with the plus button or by double-clicking. |
| 10 | Assigned | Users who have the role. Remove them with the minus button. |
| 11 | Export to CSV | Downloads the list of active users in the role (ID, username, first name, last name, display name, email, source and external ID). |
| 12 | Competences | Table of competences that contain this role (ID, Competence name, Description). Read-only. |
The Assigned list contains only users who were given the role manually. Users who have the role from a competence are not listed, and removing users in the role detail does not take the role away from them. Every role change is recorded in the access log.
How to create a role and assign it to users
- Click Add role.
- Fill in Role name, select or type a Category and add a Description.
- In the Assign users to selected role list, search for users and move them to the Assigned list.
- Click Save and close.
Competences
The Competences tab shows all competences. Open the competence rules with the button above the table.
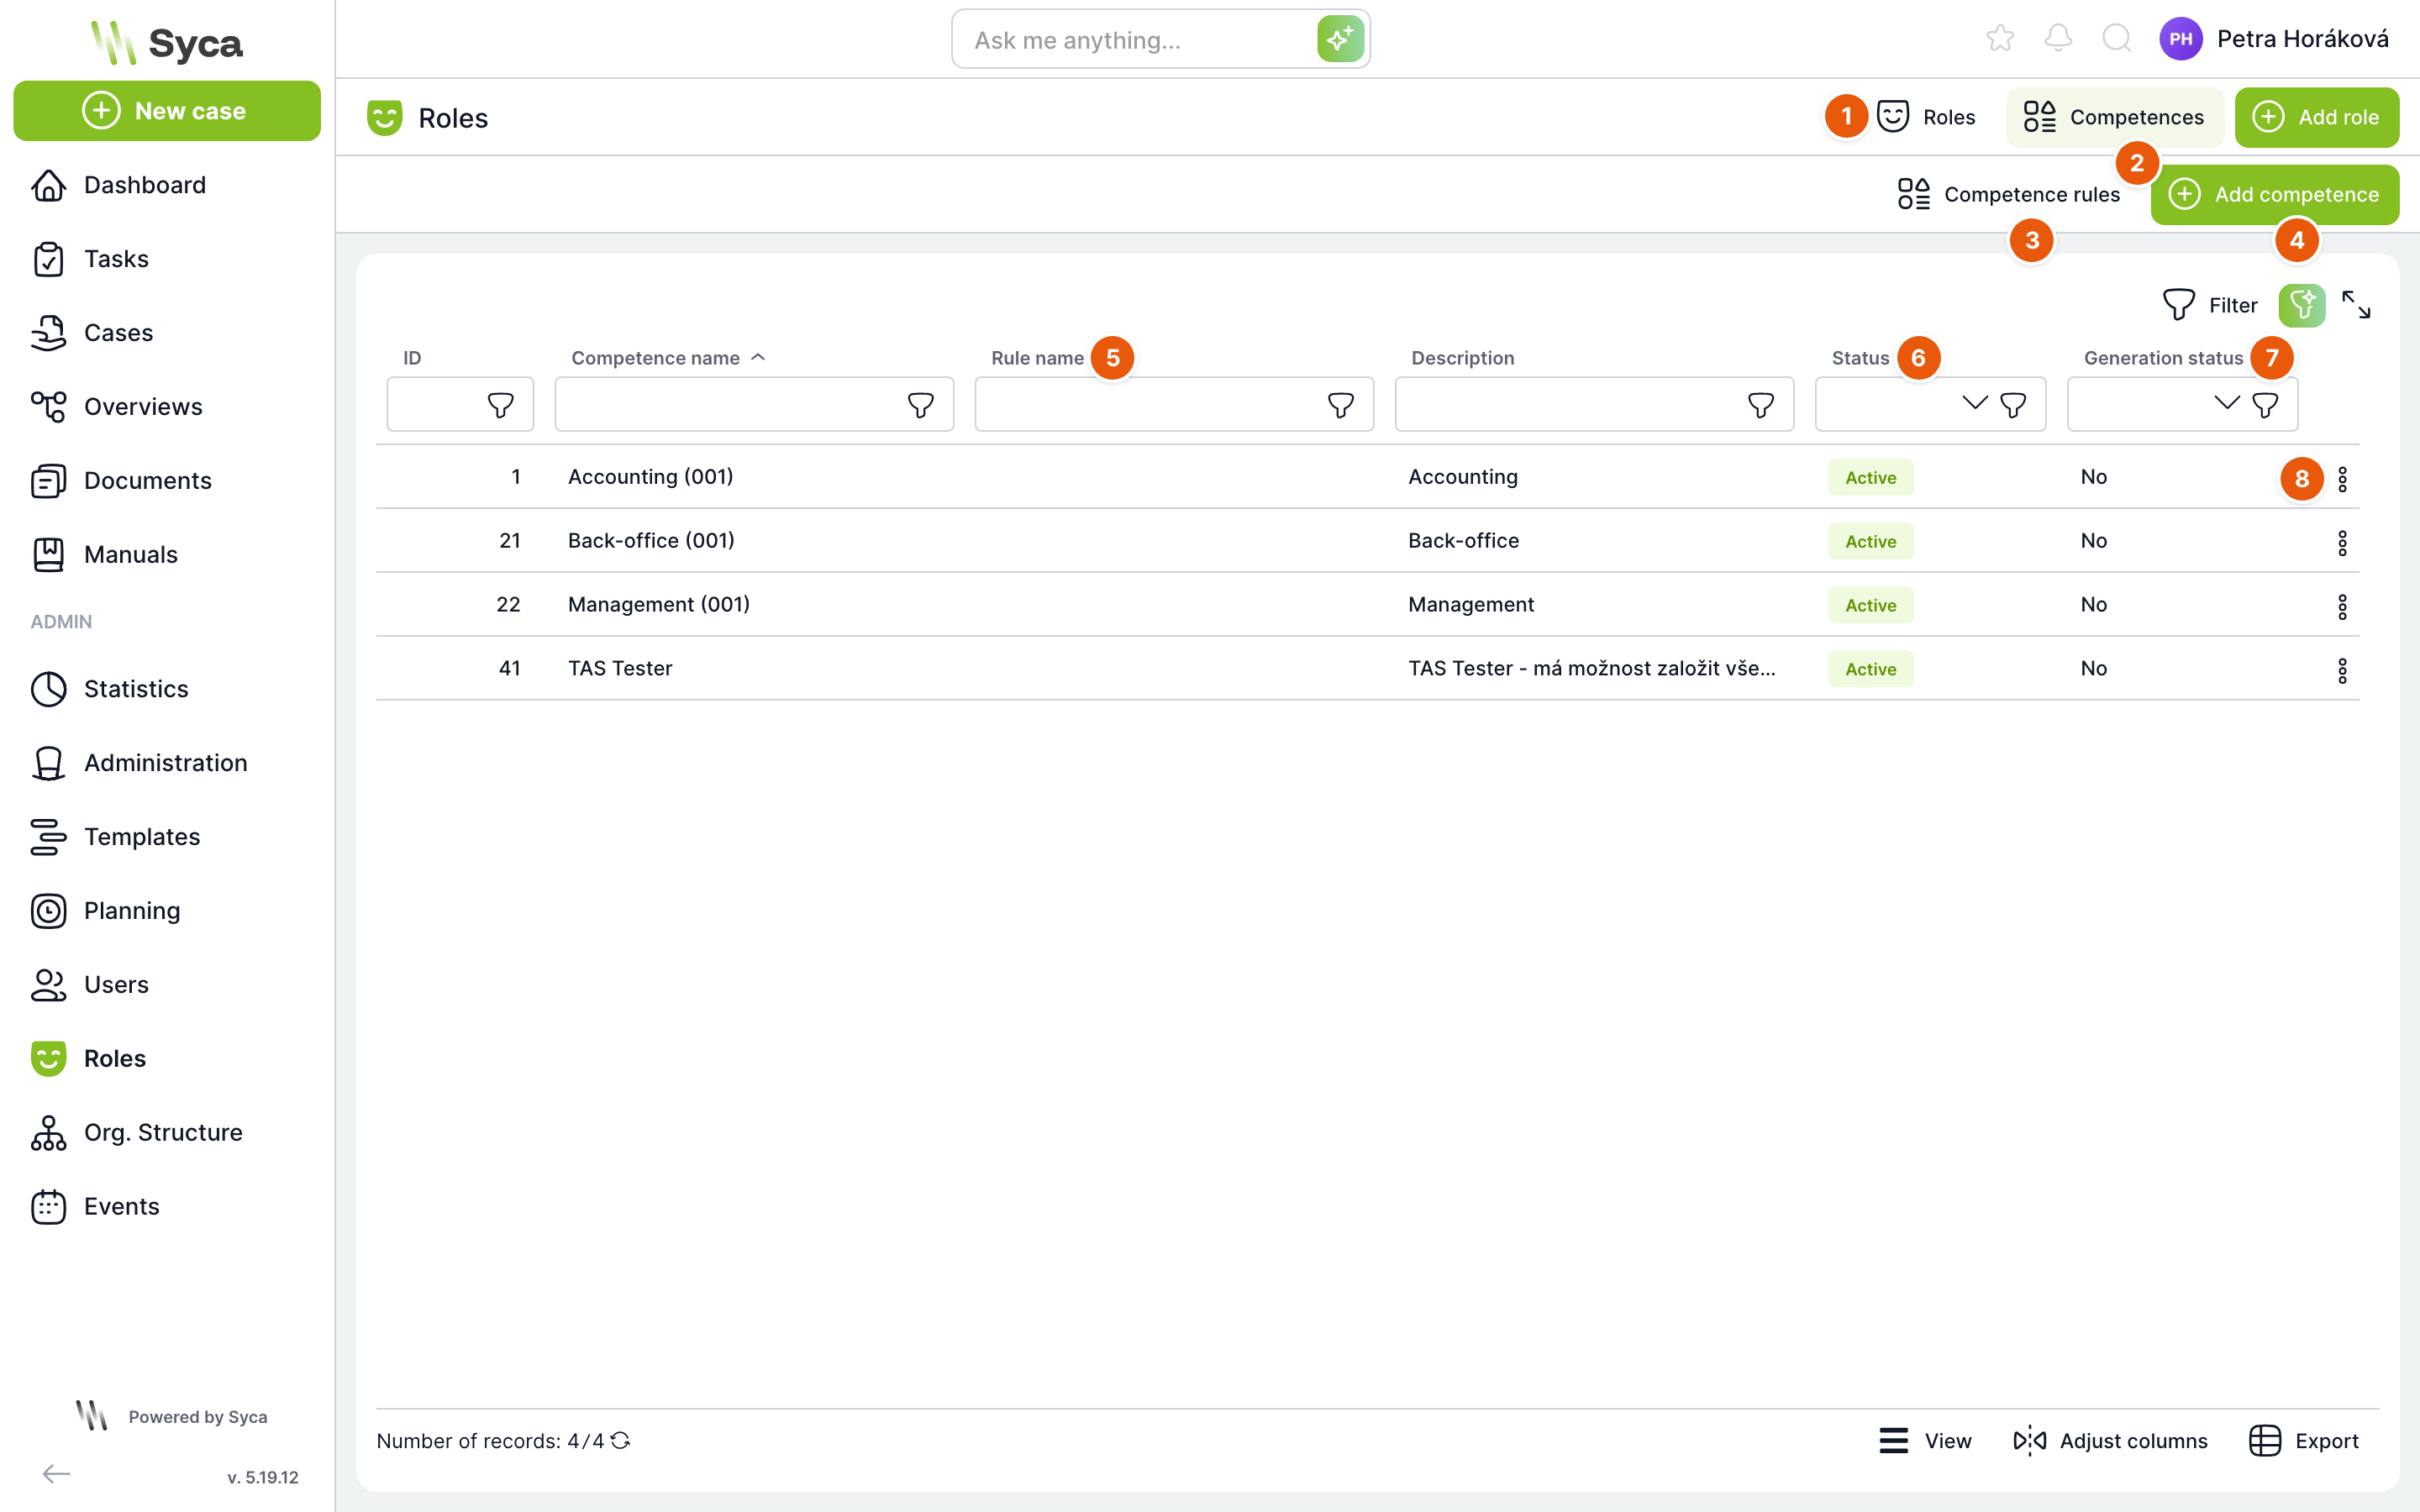
| No. | Element | Purpose |
|---|---|---|
| 1 | Roles | Back to the role list. |
| 2 | Competences | Current tab. |
| 3 | Competence rules | Opens the list of competence rules. |
| 4 | Add competence | Opens the window for a new competence. |
| 5 | Rule name | The rule the competence was created from. Empty for manually created competences. |
| 6 | Status | Active or Inactive. An inactive competence does not assign roles. |
| 7 | Generation status | Yes means the competence is waiting for its roles to be regenerated by the scheduled job. No means the roles are up to date. |
| 8 | Row actions | Edit, Status and Delete. |
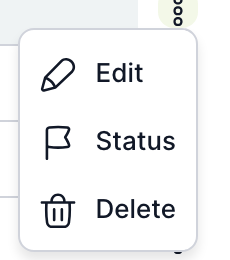
Status opens the Change status window, where you activate or deactivate the competence. Delete removes the competence after confirmation. Competences created from a rule cannot be deactivated, deleted or edited. They are controlled by their rule.
Competence detail
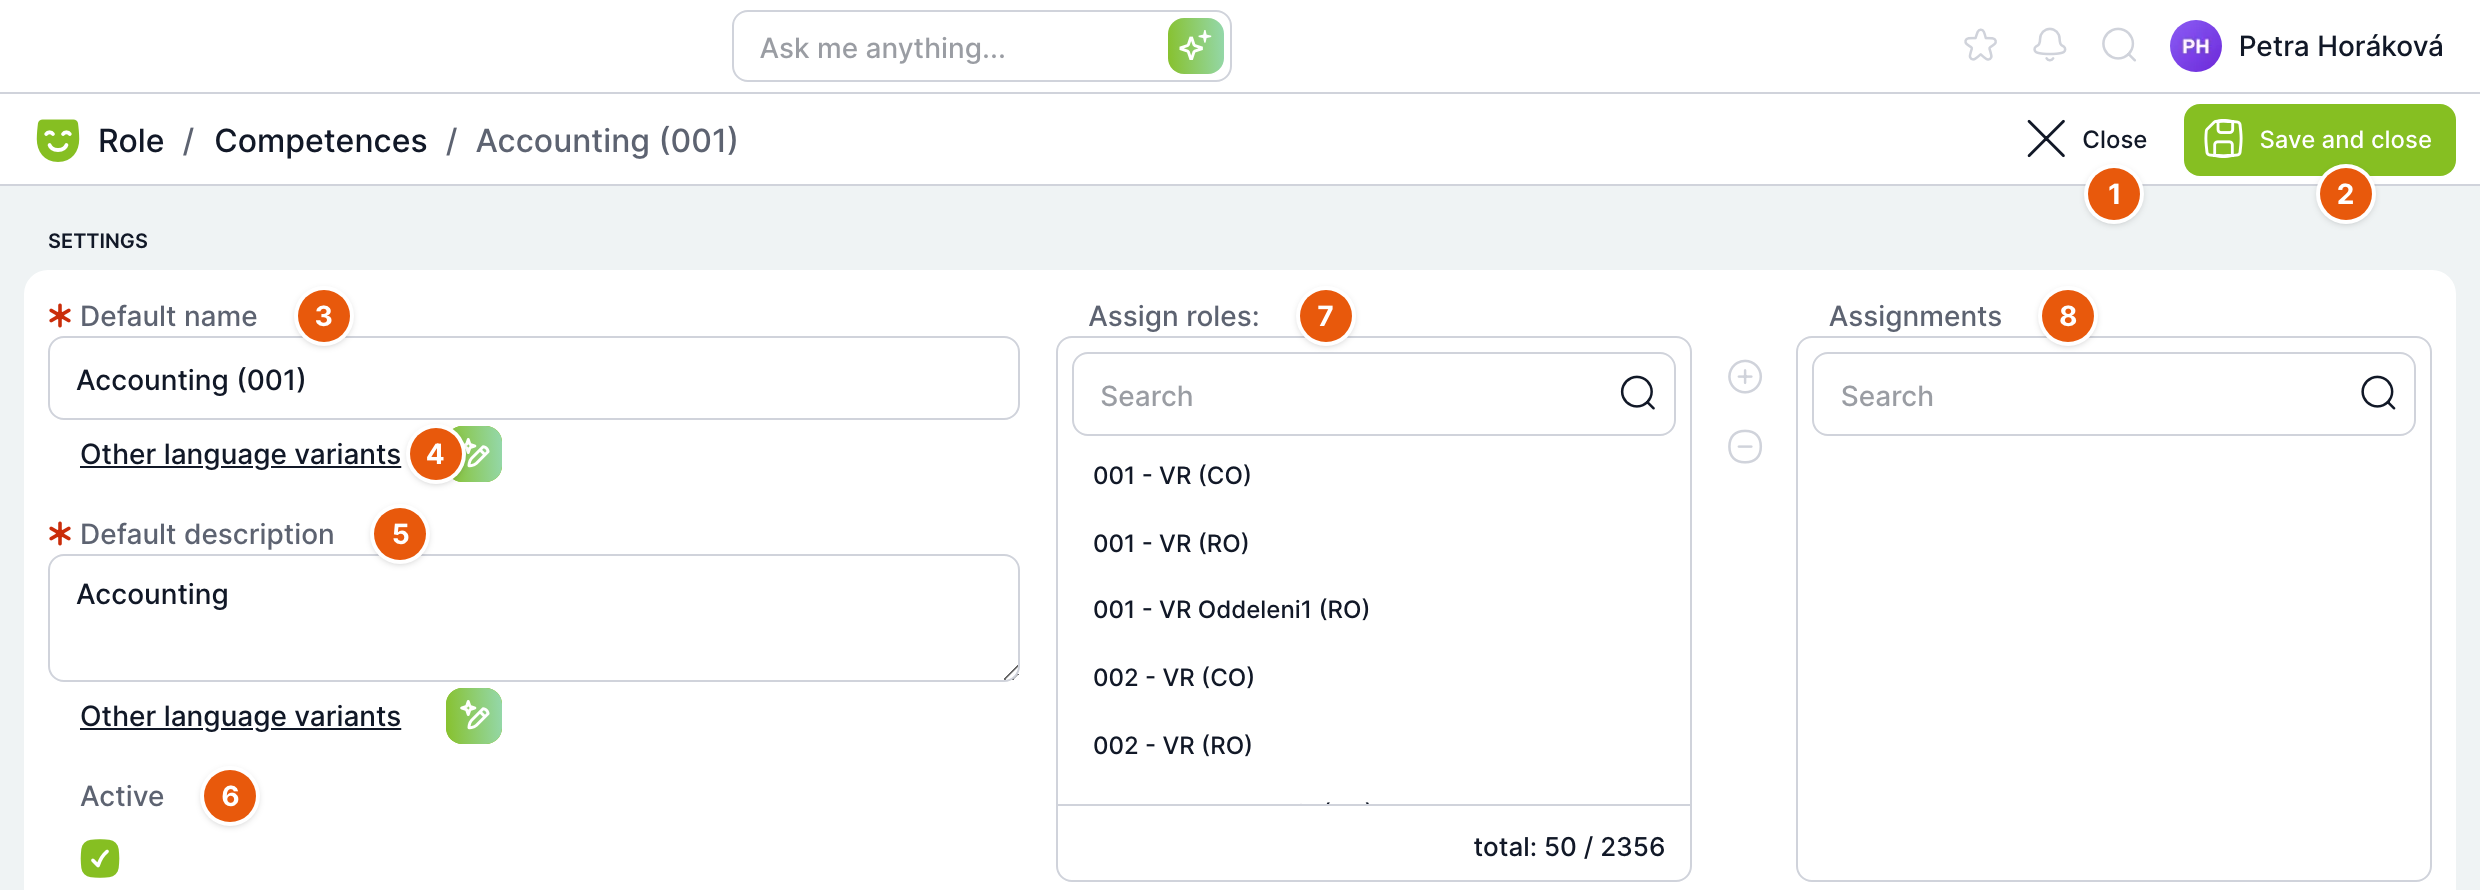
| No. | Field | Purpose |
|---|---|---|
| 1 | Close | Closes the detail without saving. |
| 2 | Save and close | Saves the competence and flags it for regeneration. |
| 3 | Default name | Required. |
| 4 | Other language variants | Names in the other application languages. When AI is enabled, a button for automatic translation is next to it. The same link is also available for the description. |
| 5 | Default description | Required. |
| 6 | Active | Only an active competence assigns roles. |
| 7 | Assign roles | Roles that every member of the competence receives. System roles cannot be added here. |
| 8 | Assigned | Selected roles. Below them is the same pair of Assign users lists for the competence members. |
You can recognize a competence created from a rule by the red notice "A competence created from a rule cannot be edited". All of its fields are disabled.
Regular expressions
Besides fixed selected roles, a competence can assign roles based on a pattern in their name. When a new role with a matching name is created, the competence members receive it the next time the Competence generator job runs, without you having to edit the competence.
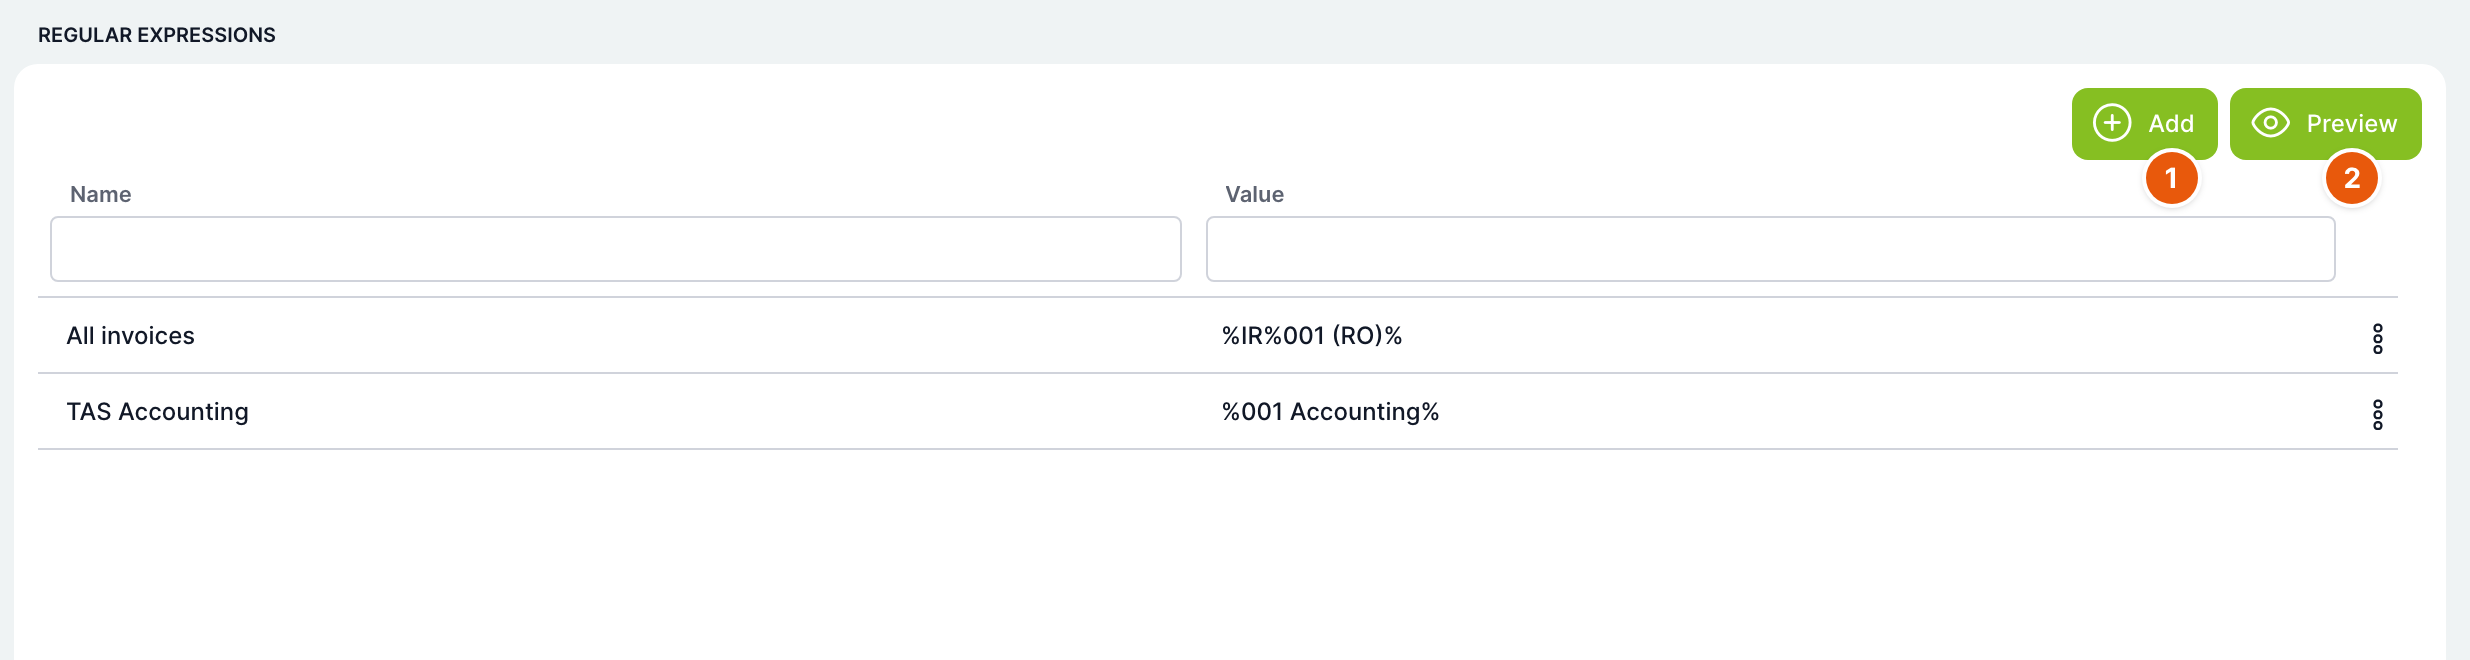
| No. | Element | Purpose |
|---|---|---|
| 1 | Add | Adds a pattern. In the window, enter a Name (a label for you) and a Value (the pattern). The window immediately shows the roles that match the pattern. |
| 2 | Preview | Shows all roles that match any of the competence's patterns. |
Patterns use SQL syntax: % means any number of characters, _ exactly one character, and ^ cancels the special meaning of the next character. For example, %001 Accounting% finds all roles whose name contains "001 Accounting". Patterns apply only to regular roles, never to system roles. Use the row menu to edit or delete a pattern.

Competence rules
Open the rules on the Competences tab with the Competence rules button.
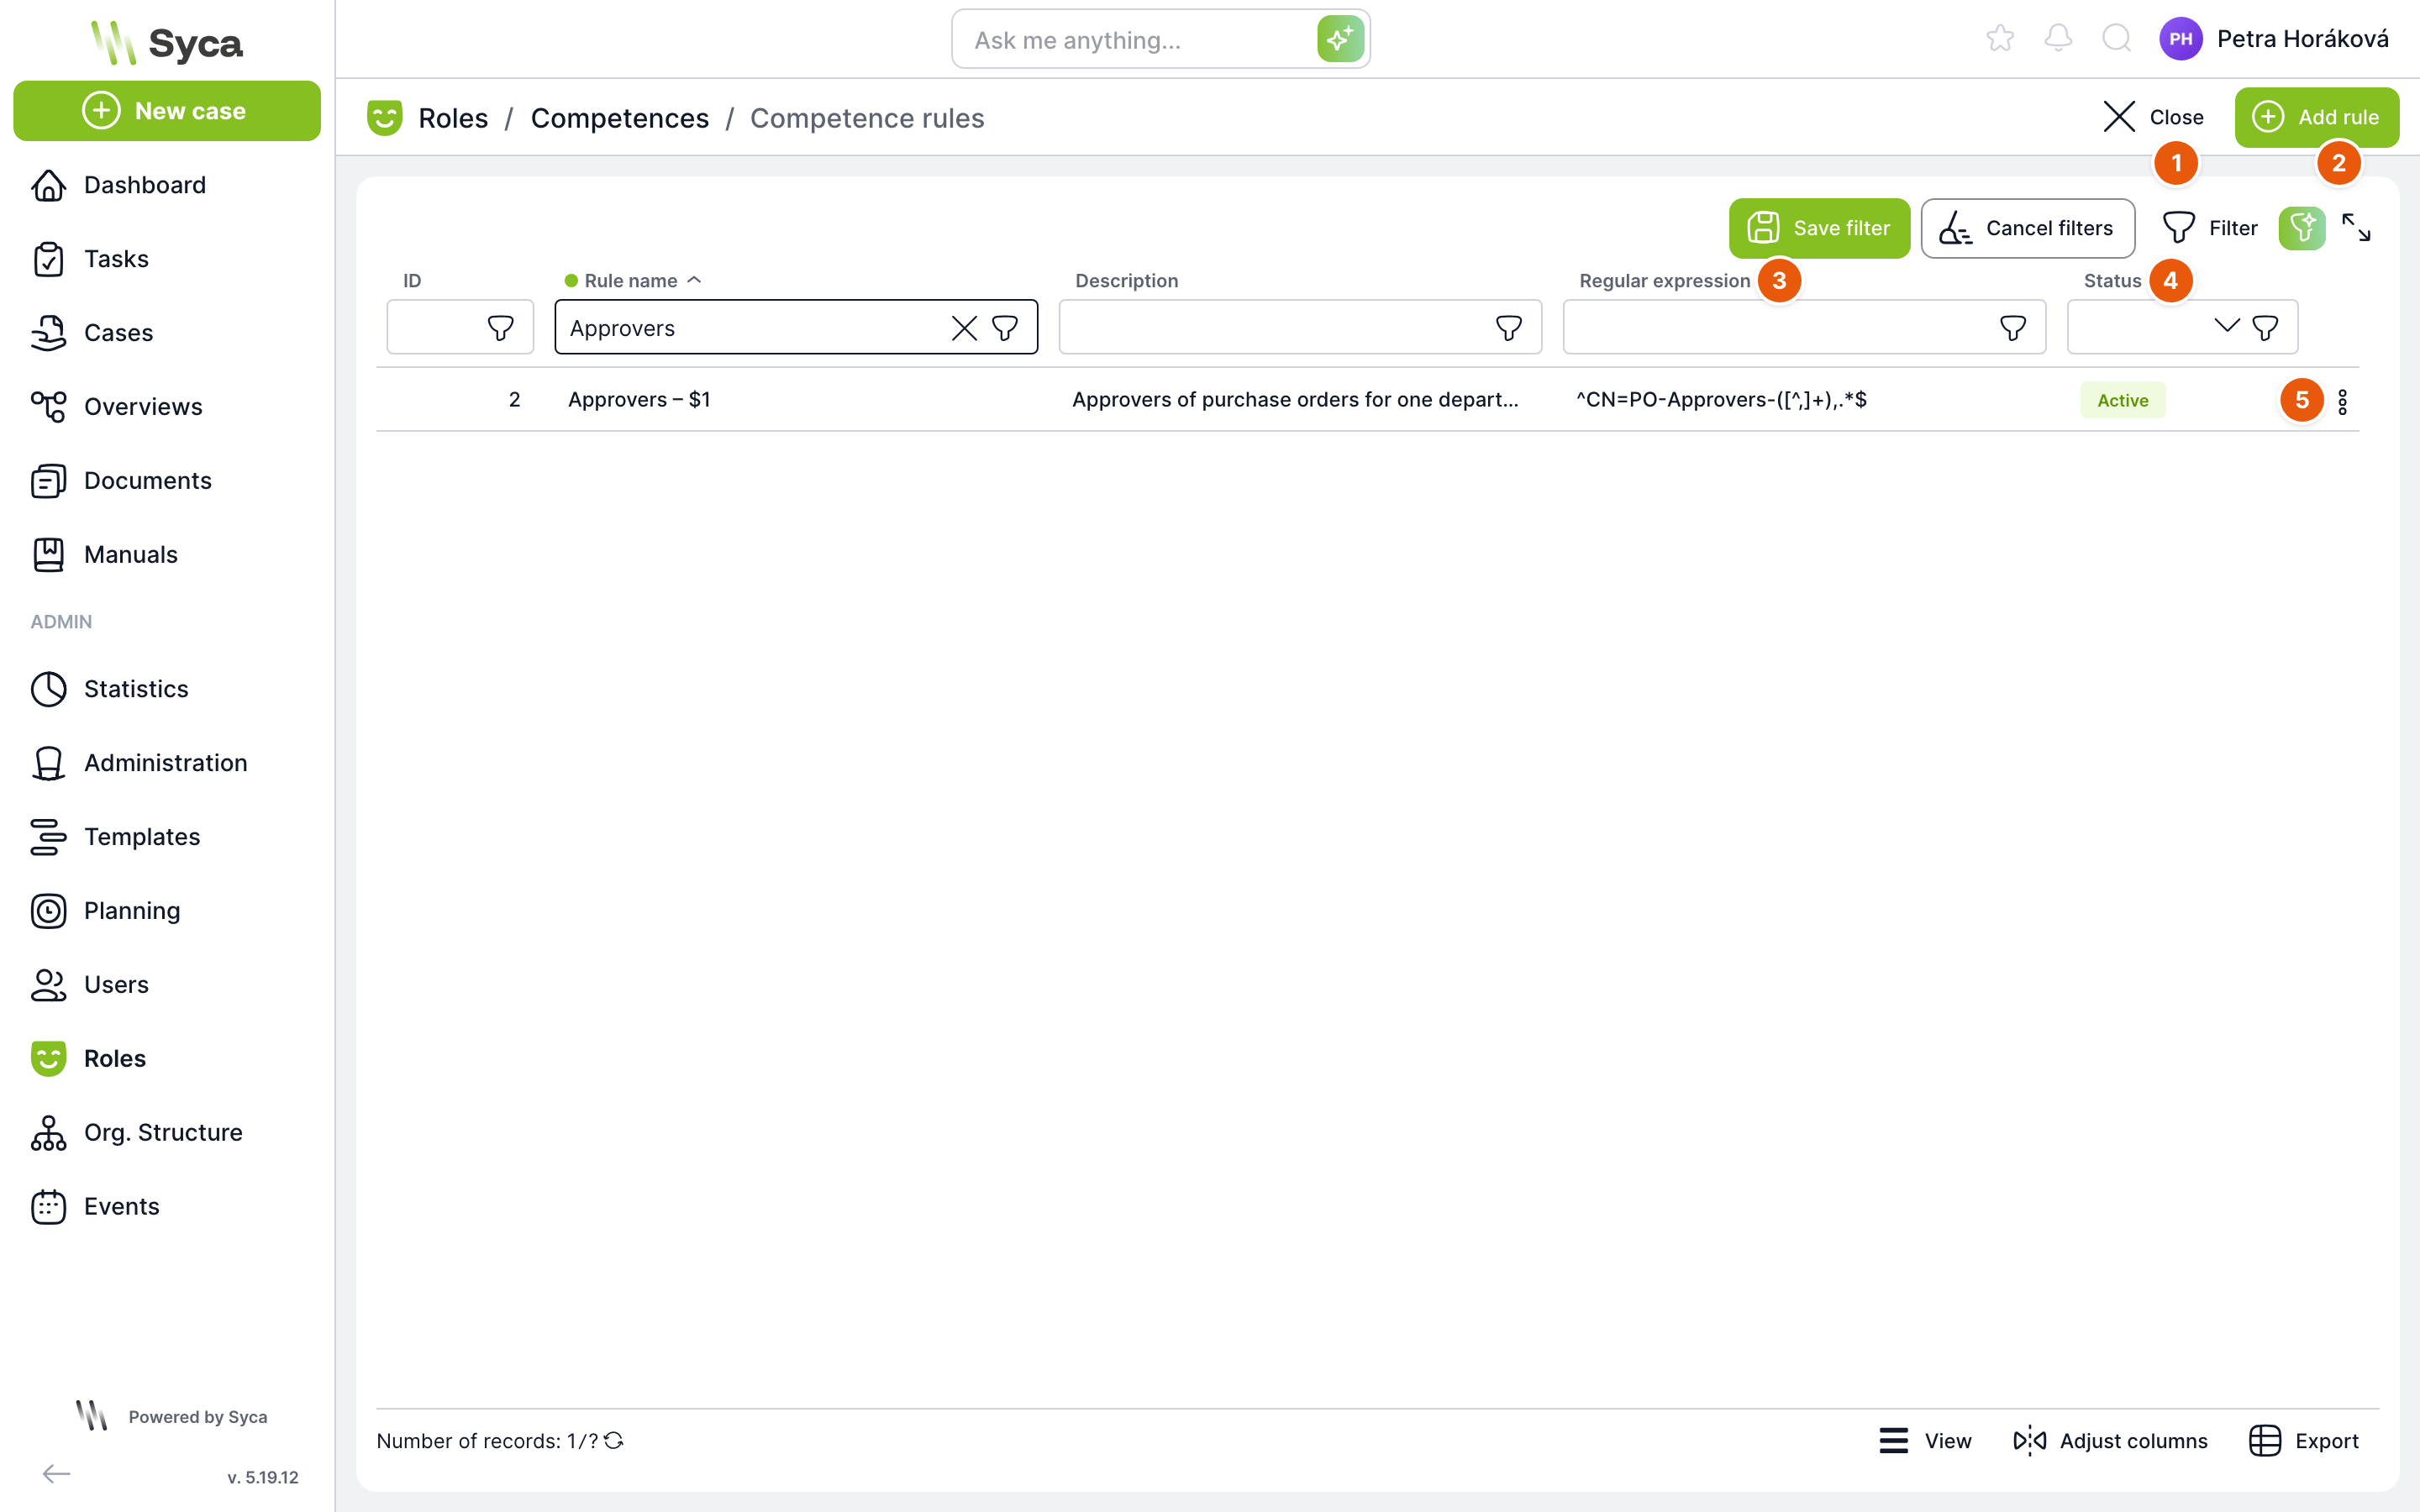
| No. | Element | Purpose |
|---|---|---|
| 1 | Close | Back to competences. |
| 2 | Add rule | Opens the New rule window. |
| 3 | Regular expression | The expression the rule uses to recognize a text, for example a group name. |
| 4 | Status | Active or Inactive. An inactive rule is not used. |
| 5 | Row actions | Edit, Status, Apply, Delete. |
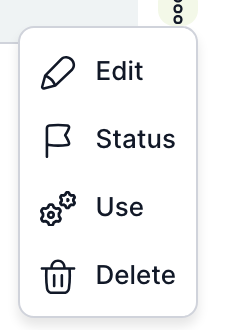
The table also has the columns ID, Rule name and Description. Delete removes the rule and all competences created from it. Apply is available only for an active rule.
Rule detail
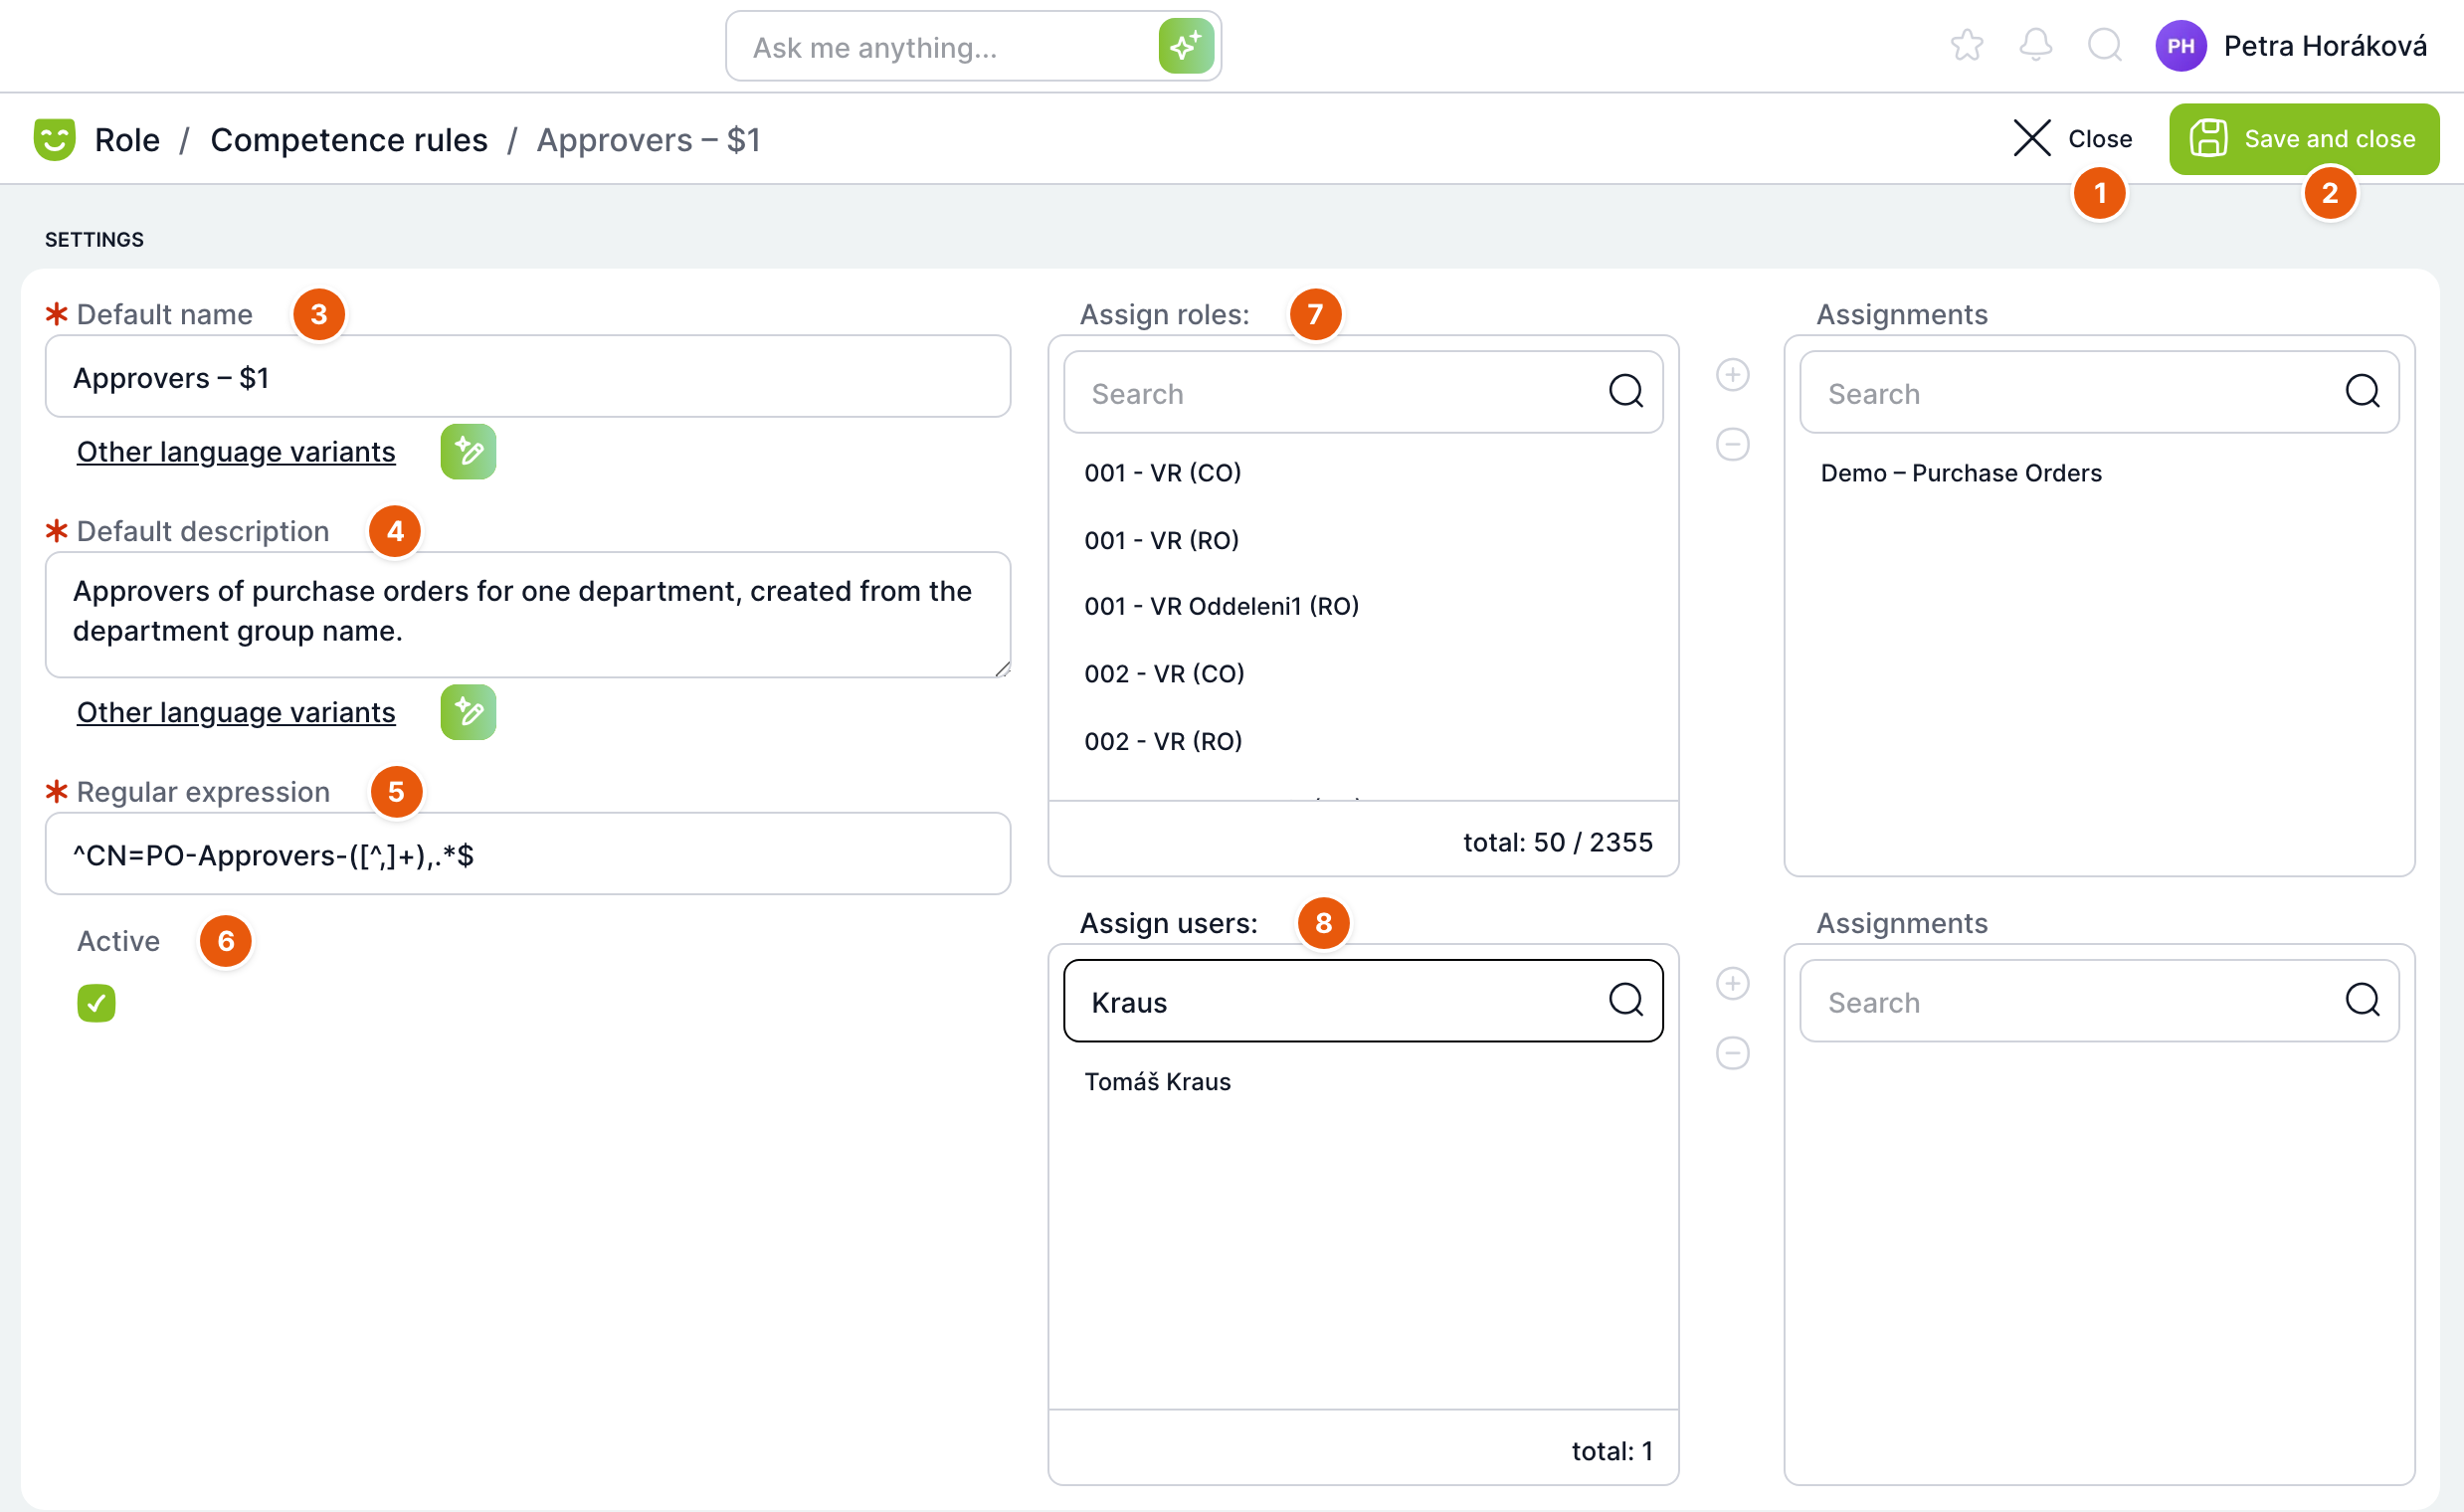
| No. | Field | Purpose |
|---|---|---|
| 1 | Close | Closes the detail without saving. |
| 2 | Save and close | Saves the rule and applies the changes to the competences created from it. |
| 3 | Default name | Required. Name template for the created competences. The tokens $1, $2 … are replaced with the parts of the text captured by parentheses in the regular expression. |
| 4 | Default description | Required. Description of the created competences. Both names also have language variants. |
| 5 | Regular expression | Required. A regular expression in JavaScript syntax, for example ^CN=PO-Approvers-([^,]+),.*$. |
| 6 | Active | Only an active rule creates competences. |
| 7 | Assign roles | Roles that all competences created from the rule receive. |
| 8 | Assign users | Users who will be members of all competences created from the rule, in addition to the users from synchronization. |
Below the settings is the same Regular expressions section as for a competence. You can also use $1, $2 … in role patterns, so for example the pattern %$1% assigns roles whose name contains the captured part.
When you save the rule, TAS deletes the competences whose source text no longer matches the new expression, and updates the other competences created from the rule and flags them for regeneration.
How rules create competences
Rules are applied in two situations:
- User synchronization from LDAP. In Administration, in the Authentication section, the option to use competence rules must be enabled in the LDAP module settings. During synchronization, TAS compares every group the user is a member of (values of the memberOf attribute, typically in the form
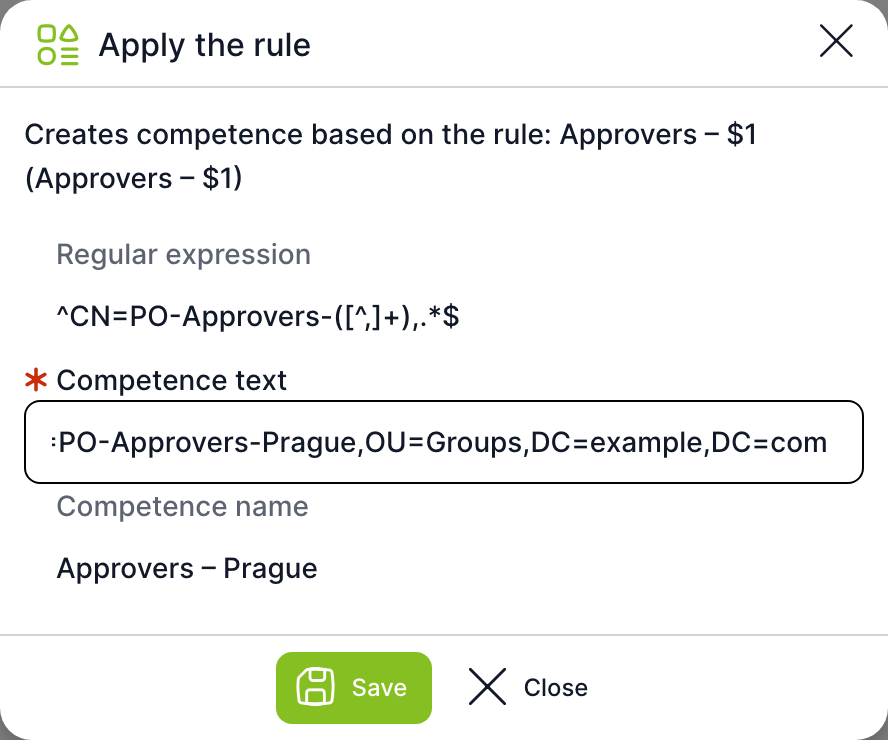
CN=…,OU=…,DC=…) with all active rules. When there is a match, it finds or creates a competence named according to the rule and adds the user to it. It removes the user from groups they are no longer a member of. Locked users have these competences removed. - Manual application. In the rule's row menu, select Apply, enter the Competence text and check which Competence name will be created. The Save button becomes active only when the text matches the expression. The competence is created without users from synchronization.
In both cases, the roles are assigned to the users themselves only by the Competence generator scheduled job.
How to create a rule for directory groups
- Click Competence rules and then Add rule.
- In Default name, type a name template, for example
Approvers – $1, and fill in the description. - In Regular expression, enter an expression that matches the whole group value and captures the variable part in parentheses, for example
^CN=PO-Approvers-([^,]+),.*$. - Leave Active selected.
- In Assign roles, select the roles that all such competences should grant, or add them with a pattern in the Regular expressions section.
- Click Save and close.
- Make sure that the Competence generator job is enabled in Administration on the Crons page.
Related: Users, User Detail, System Roles.