Template graph
The template graph is a graphical process editor that uses BPMN notation. In the graph you create and name tasks and link them with arrows (connections). On each connection you set the conditions that decide which path the case takes. To open the graph, go to the Graph tab of the template. The same data is also available as tables: tasks on the Tasks tab, and connections under the Connections button on the same tab.
The images in this article show the sample template Equipment request: an employee submits an equipment request, a manager approves it or returns it for rework, an automatic task records the approval and IT hands over the equipment.
Graph editor
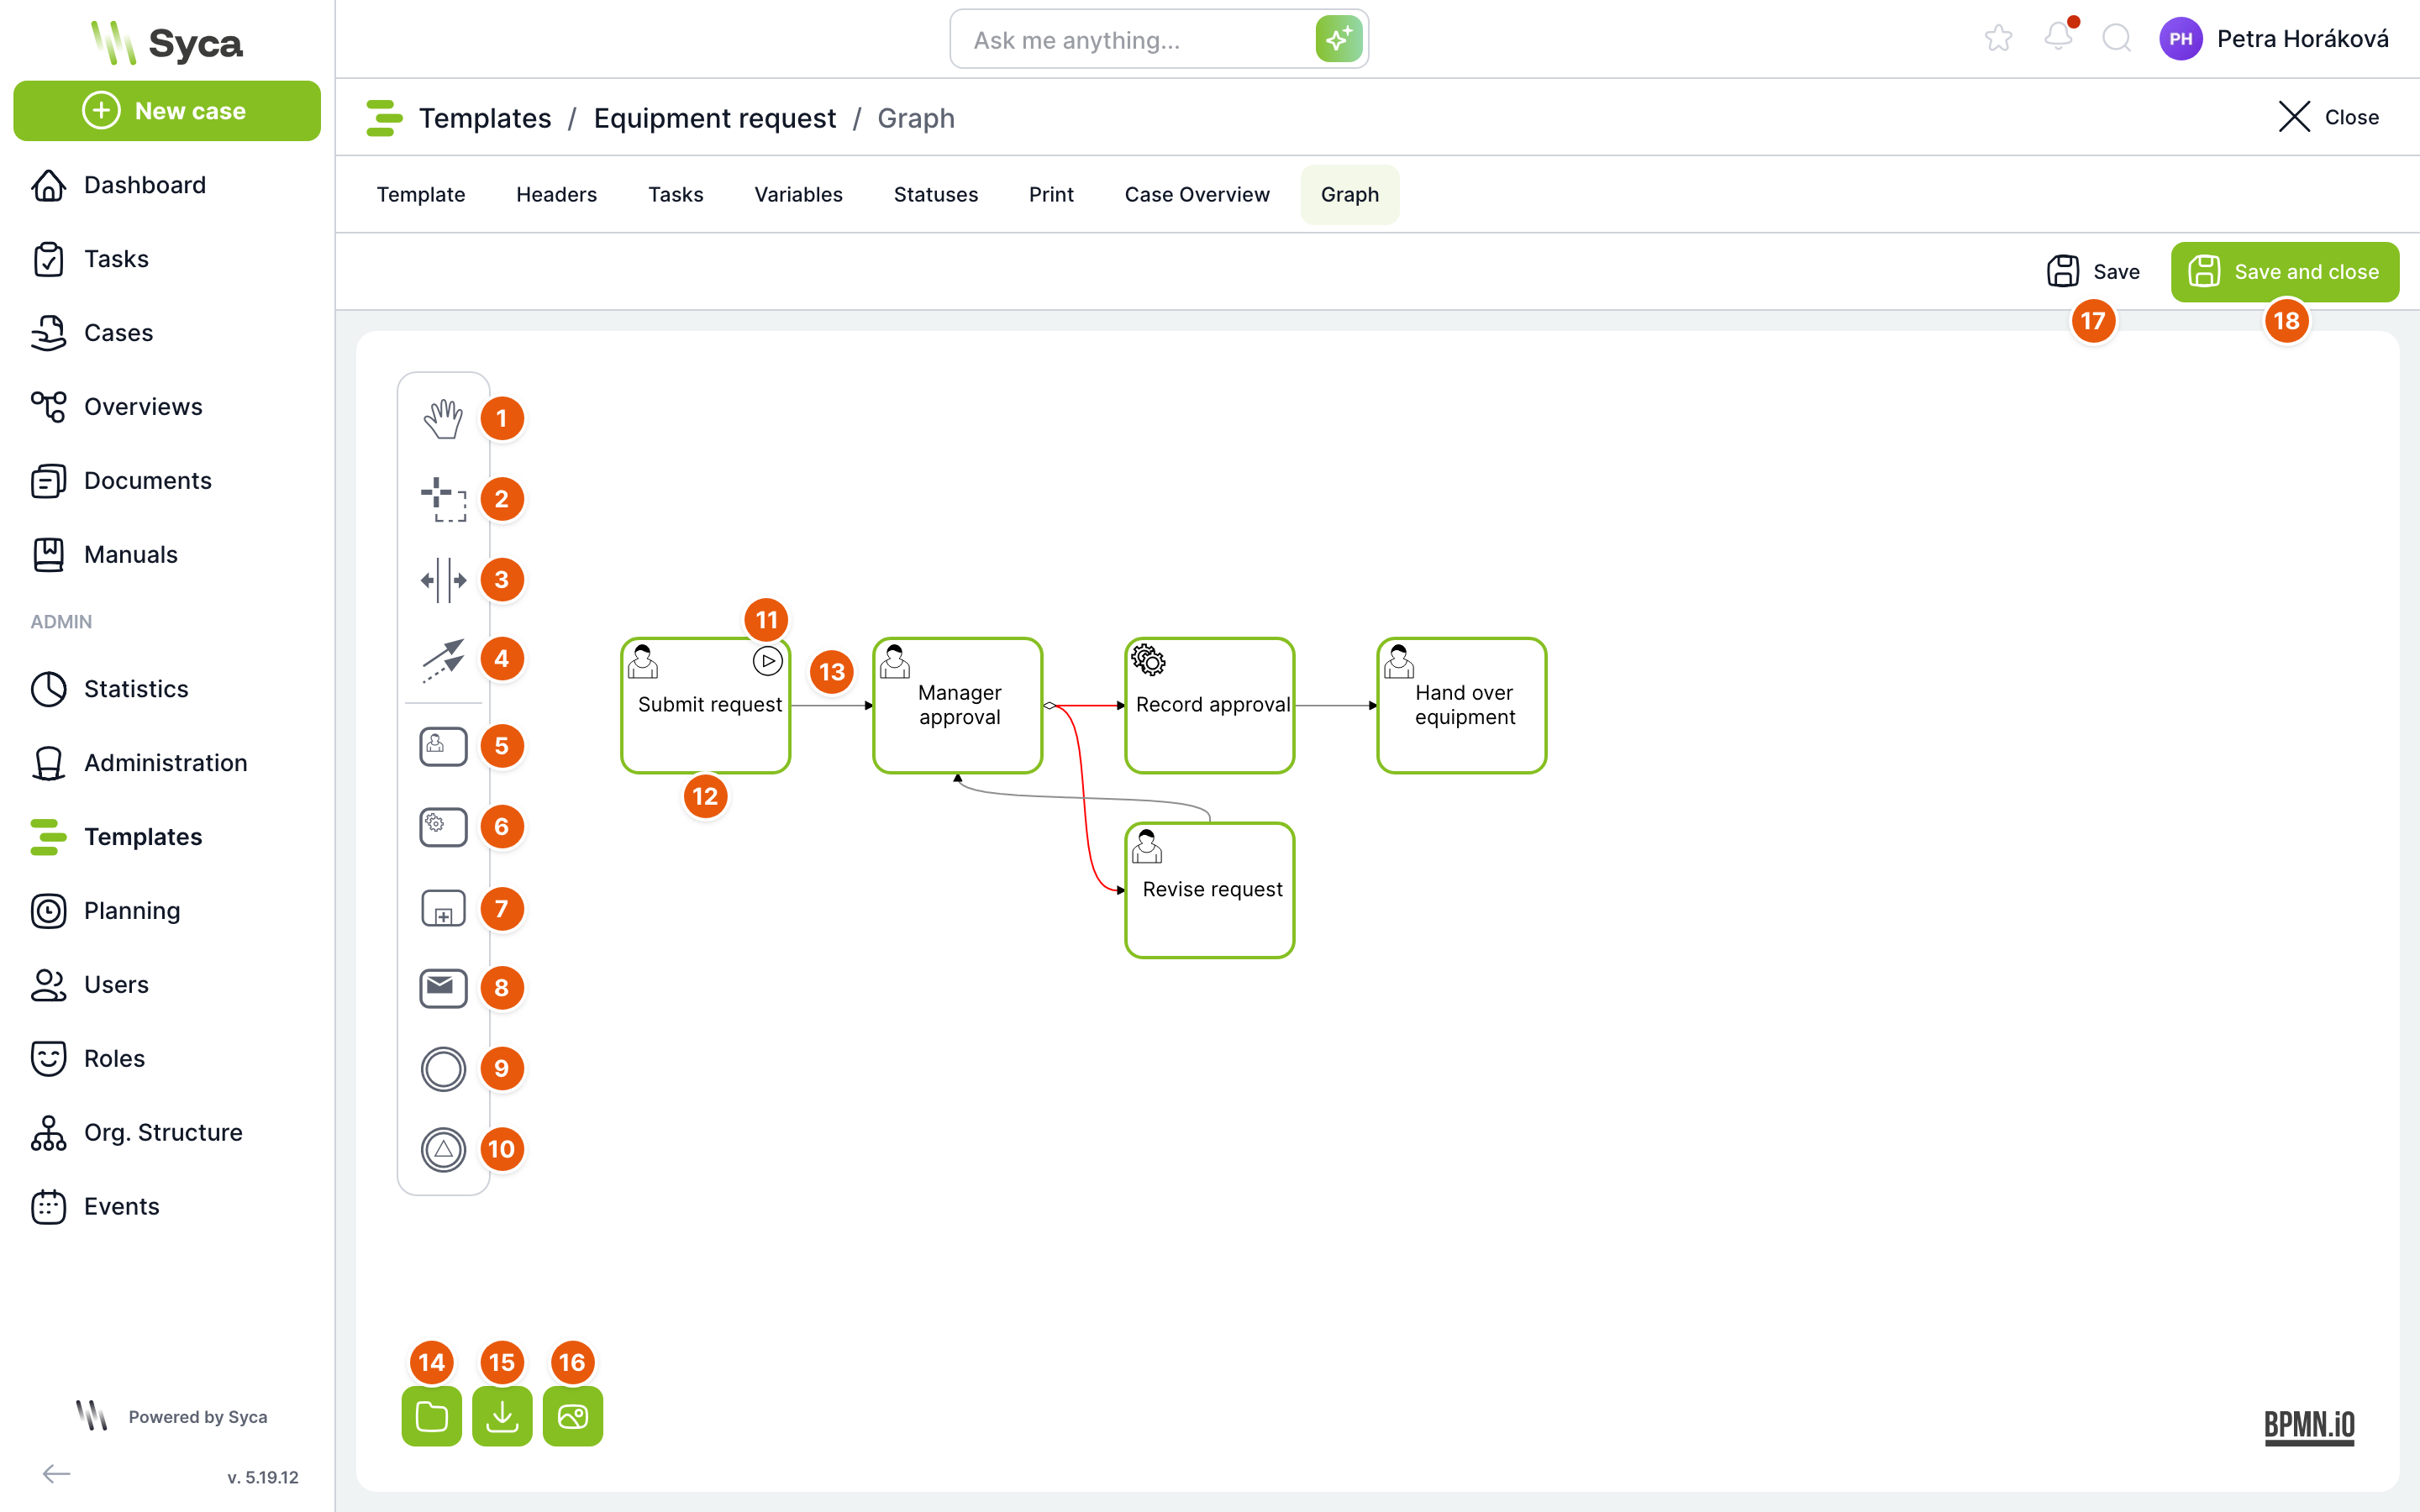
| No. | Element | Purpose |
|---|---|---|
| 1 | Hand | Moves the canvas when you drag with the mouse. You can also move the canvas by dragging an empty area. To zoom in and out, hold Ctrl and turn the mouse wheel. |
| 2 | Lasso | Selects several elements when you drag a rectangle. You can then move the selected elements together. |
| 3 | Space | Adds or removes space: drag right or down to move all elements beyond the cursor and make room for new tasks. Drag back to reduce the space. |
| 4 | Global connect | Connects two elements: click the source task, then the target task. |
| 5 | To be solved by user | New task that a user solves. |
| 6 | Automatic without intervention | New automatic task that runs without a user (typically a calculation). |
| 7 | Controlled by subprocess | New task that creates a subprocess from another template. |
| 8 | E-mail notification | New task that sends an e-mail. |
| 9 | Launch external event | New task that triggers an event. |
| 10 | Event | New task that waits for an event. |
| 11 | Start task | Marker on a task that has no incoming connection. Such tasks are activated when the case is created. |
| 12 | Task | A template task. The icon in the top-left corner shows the task type. |
| 13 | Connection | Arrow from one task to another. A black connection has no condition. A red connection with a diamond at the source has conditions. |
| 14 | Upload file | Loads a diagram from a BPMN file, see Diagram import. |
| 15 | Download BPMN diagram | Downloads the graph as the file <název šablony>.bpmn. |
| 16 | Download as SVG image | Downloads the graph as an SVG image, for example for documentation. |
| 17 | Save | Saves all changes in the graph: new, renamed, moved and removed tasks and connections. |
| 18 | Save and close | Saves the graph and closes the template. |
Changes in the graph are only saved when you click Save. If you leave a graph with unsaved changes, TAS asks "Save changes made to the whole diagram?".
For large templates, first zoom out of the graph (Ctrl and mouse wheel), then zoom in on the part of the process you need. Selecting a task fades the other tasks, so it is easier to see where its connections lead.
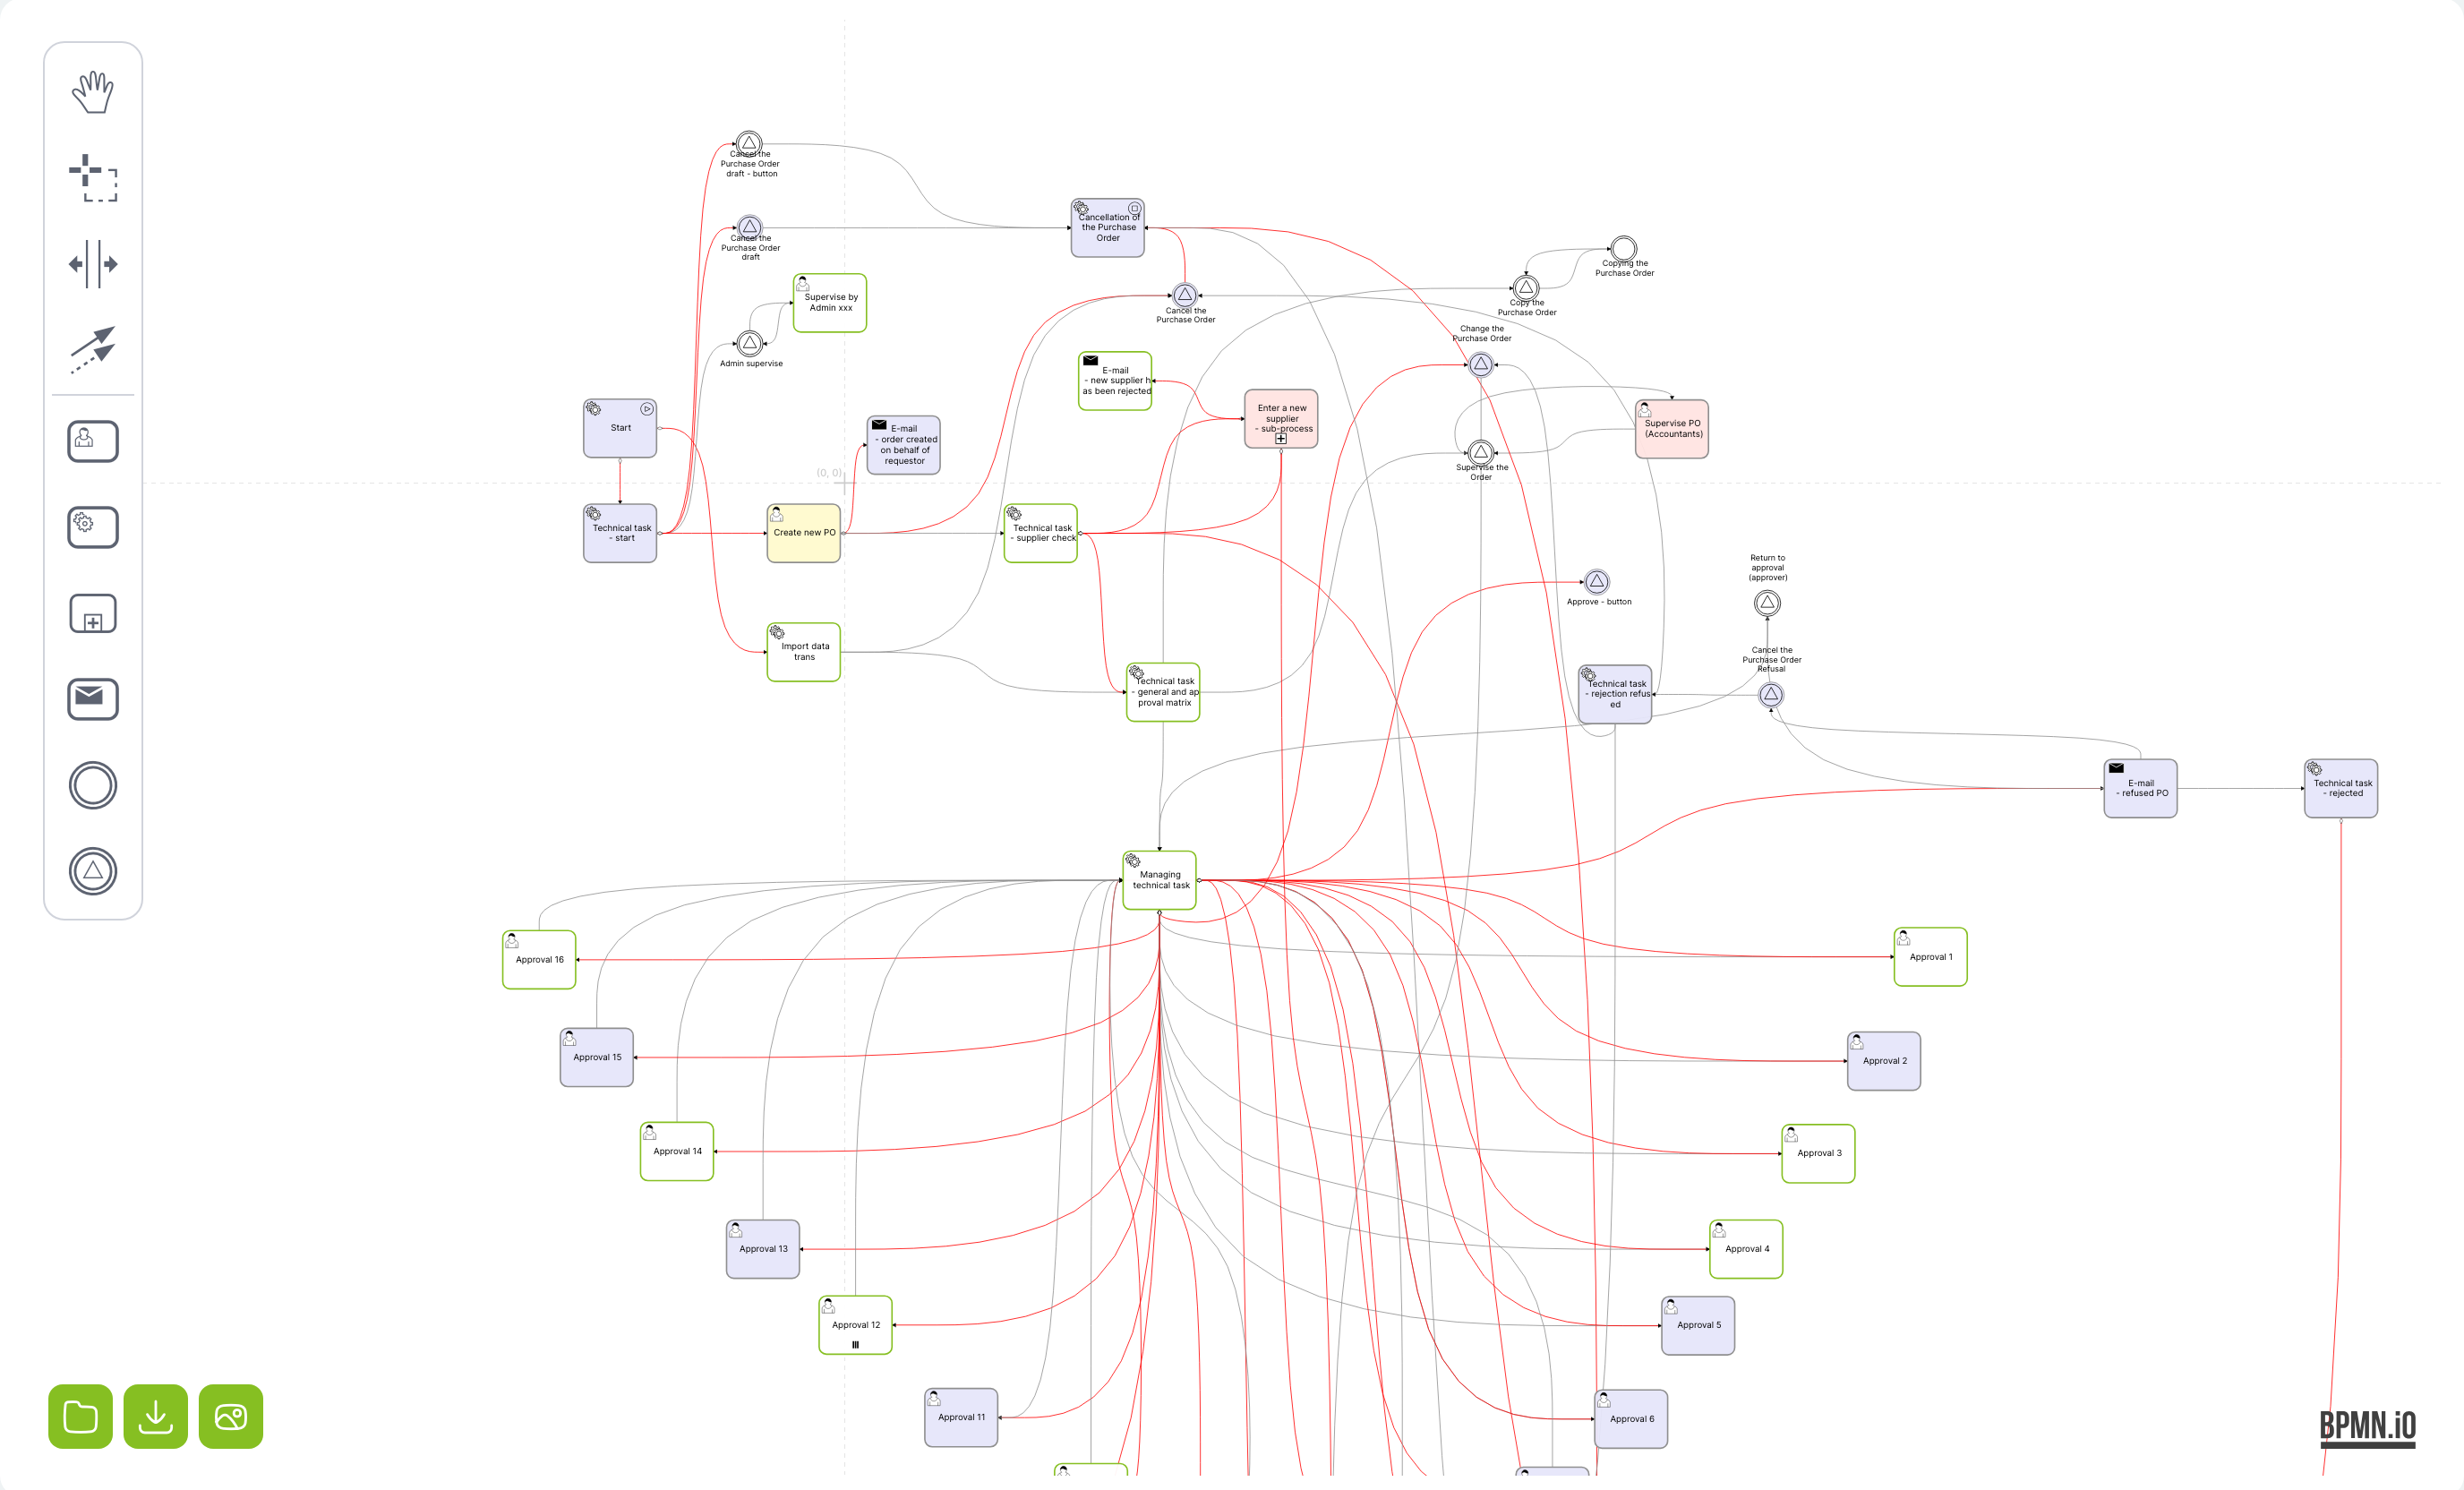
Graph of the sample template Purchase Order: in the centre is an automatic task with conditional (red) connections leading to sixteen approval tasks. Tasks with a coloured fill have a colour set, the task marked ||| runs as a multi-instance task and the task marked ⊞ creates a subprocess. The circles with a triangle are Event tasks that wait for a button or another event.
How to add a task
- In the palette on the left, drag the icon of the task type you want onto the canvas.
- Double-click the new task and type its name. Click outside the task to confirm the name.
- Connect the task to the other tasks (see Task context menu).
- Click Save. The task is created in the template and appears on the Tasks tab only after you save.
A faster way is to add a task directly after an existing one: select the task and click the type icon in its context menu. The new task is placed to the right and is automatically connected to the previous task.
Task context menu
When you click a task, a context menu appears next to it:
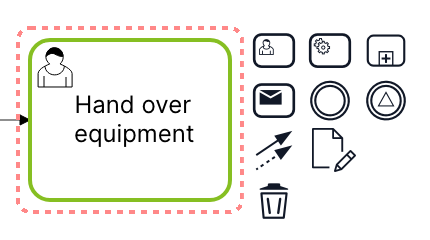
| Icon | Purpose |
|---|---|
| First two rows | Add a new task of the selected type after this task: To be solved by user, Automatic without intervention, Controlled by subprocess, E-mail notification, Launch external event, Event. The new task is connected to the selected task. |
| Arrow | Add a connection: click (or drag), then click the target task. |
| Sheet with pencil | Edit: opens the task settings window (solver, calculations, variables…). For a connection, it opens the Connection window. |
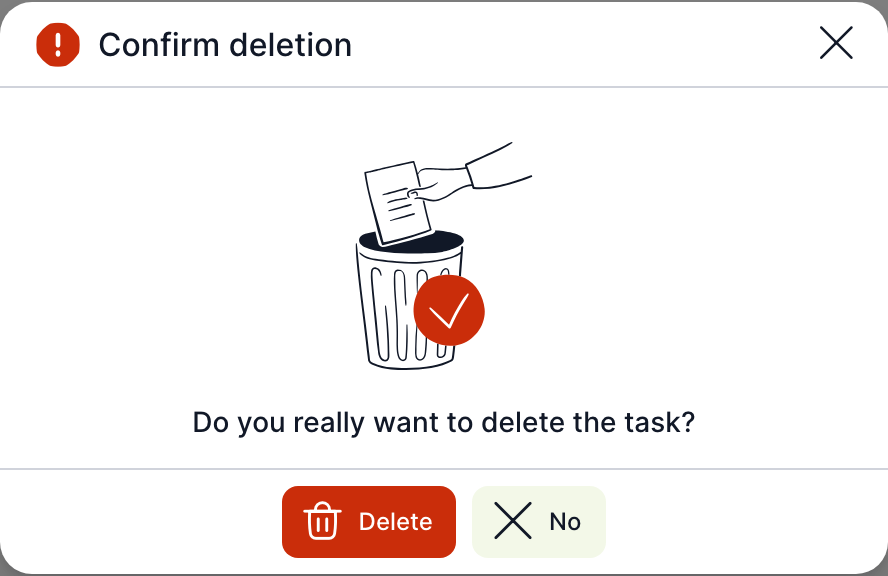
| Bin | Remove the task or connection. For a task, TAS asks "Do you really want to delete the task?". The task disappears from the graph, but it is deleted from the template only when you save the graph. |
The context menu of a connection has only the Edit and Remove items.
Properties panel
The panel in the top-right corner describes the selected element. Use the arrow in its header to collapse it.
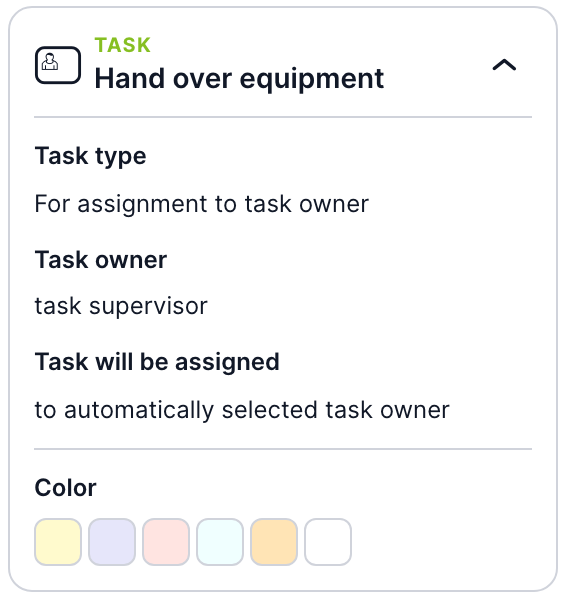
For a task, the panel shows the task type, who the solver will be and how the solver is selected. In the Color section you choose the fill colour of the task. Colours help tell phases or roles apart in a large graph and are saved with the graph.
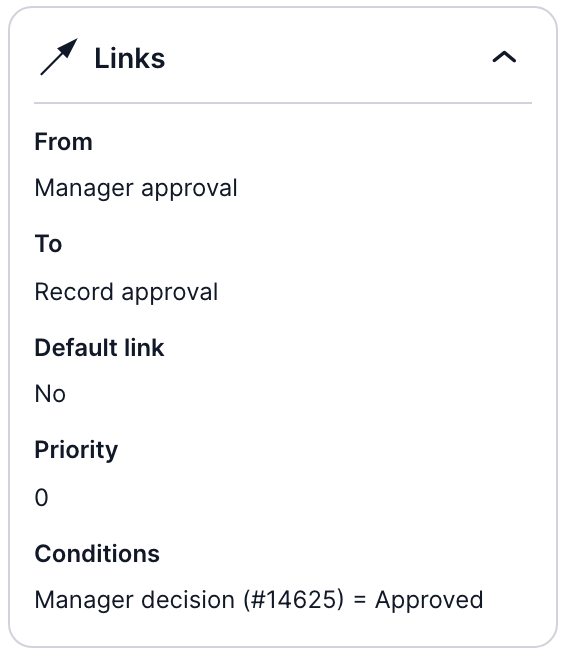
For a connection, the panel shows the source and target task (From, To), whether it is the default connection, its priority and a summary of the conditions with variable IDs.
Connections and conditions
A connection determines which task is activated after the previous task is completed. To open the connection settings, use the connection's context menu (Edit) or the Connections page.
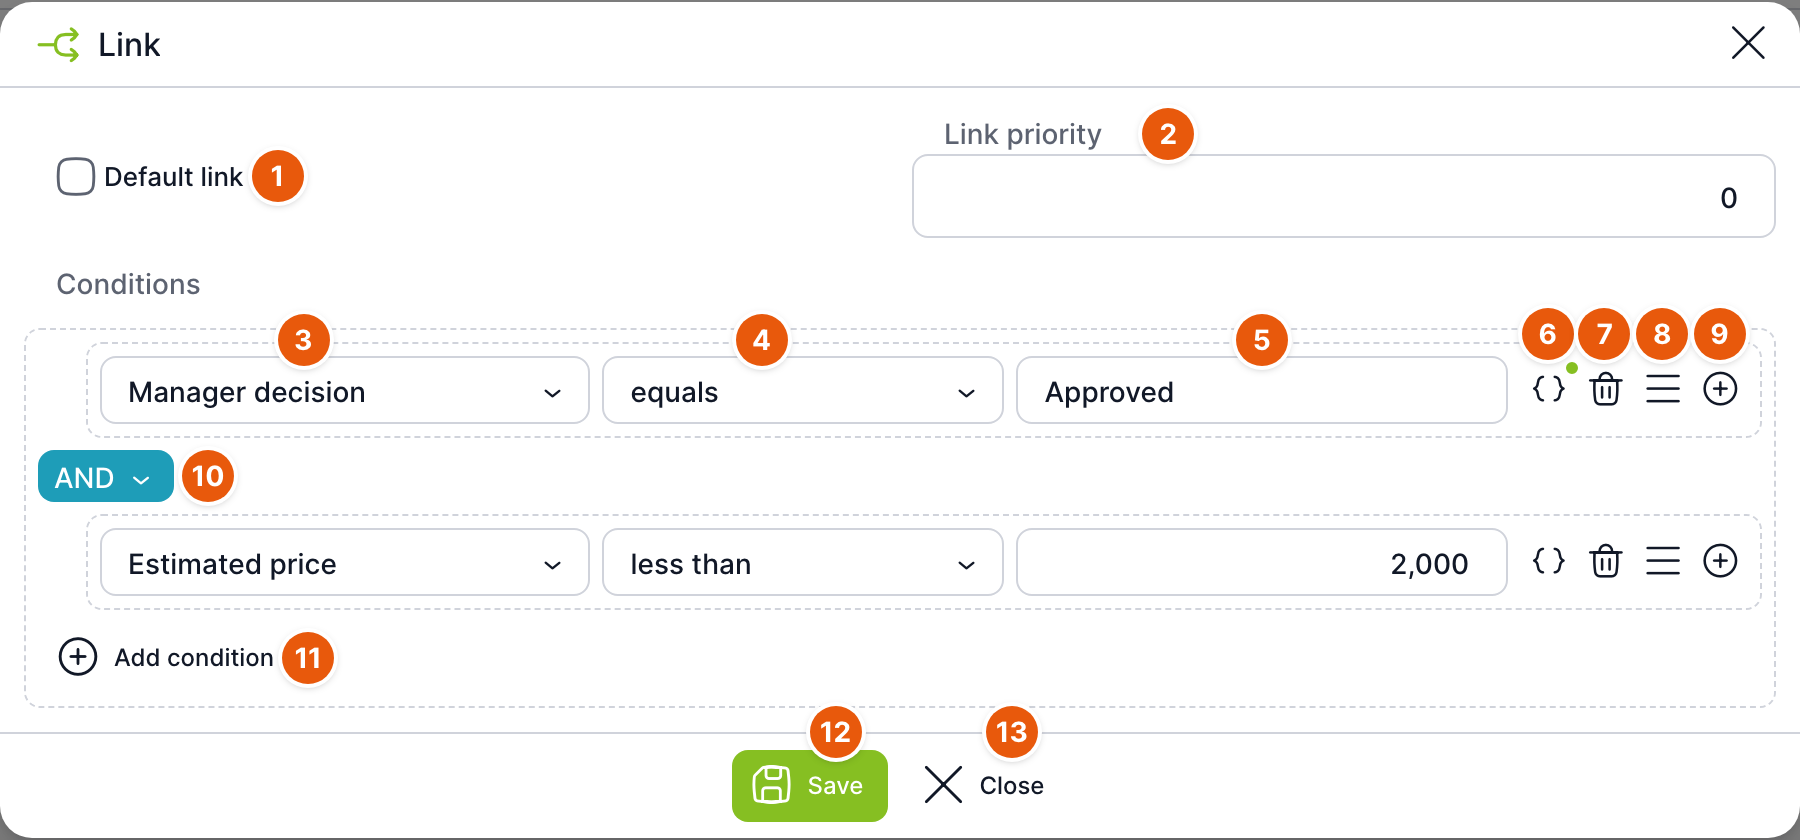
| No. | Element | Purpose |
|---|---|---|
| 1 | Default connection | The connection is used only if no other outgoing connection applies after the task is completed (the "else" branch). A default connection has no conditions; when you select this option, the Conditions block is hidden. |
| 2 | Connection priority | The order in which TAS evaluates outgoing connections and activates target tasks (lower number first). The default value is 0. |
| 3 | Variable | The template variable whose value is compared. |
| 4 | Operator | How the values are compared, see the Operators table. The options depend on the variable type. |
| 5 | Value | The value to compare with. The field adapts to the variable type: for a list it offers the list values, for a date a calendar, for a number a numeric field. It is not shown for the is empty and is not empty operators. |
| 6 | Value from variable | Switches the Value field to a mode where you select another variable in the form {Název proměnné} or type text. This is useful for comparing two variables, for example "Estimated price is greater than {Budget}". A green dot marks the active mode. |
| 7 | Delete condition | Removes the row. |
| 8 | Move | Drag to move the condition to another position or another group. |
| 9 | Add condition to group | Adds another row to the same group. An AND/OR option appears between the rows of the group. |
| 10 | AND / OR | How groups (and individual conditions within a group) are combined: AND – all must apply, OR – one is enough. |
| 11 | Add condition | Adds a new group of conditions. |
| 12 | Save | Saves the connection. On the Connections page it is saved immediately; in the graph the change is shown in the graph and saved with the graph's Save button. |
| 13 | Close | Closes the window. If there are unsaved changes, TAS asks for confirmation. |
A connection without conditions always applies. In the image, the connection to the Record approval task applies only if the manager selected Approved and the estimated price is lower than 2,000.
Operators
| Operator | For which variables |
|---|---|
| equals, does not equal | All types. |
| greater than, greater than or equal, less than, less than or equal | Number (except checkbox), date, number list and date list. |
| contains, does not contain | Text and multiple-selection variables. |
| starts with, ends with | Single-value text. |
| is empty, is not empty | All types. |
How conditions are evaluated
After a task is completed, TAS goes through all its outgoing connections in order of priority and activates every task whose connection applies. If several connections apply, the process splits into several parallel branches. The default connection is used only if no other connection applies.
If several connections lead into a task (for example after parallel branches or in a loop), its start is controlled by the Task start condition in the task settings: waits for one, waits for (a specified number) or waits for all.
The Connection window adapts to the branching mode of the source task: for parallel branching it shows only the priority and a note that the connections are always executed; for exclusive branching the priority is required. In version 5.19.12 the branching mode cannot be set in the task settings; all tasks use inclusive branching (every branch whose condition is met applies), and the process is evaluated accordingly.
How to set up an approve / return decision
- From the approval task, draw two connections: one to the next step of the process and one to the rework task.
- Open the first connection and click Add condition. Select the variable with the decision, the equals operator and the value Approved. Click Save.
- For the second connection, set the same variable with the value Rejected, or mark it as Default connection.
- From the rework task, draw a connection back to the approval task.
- Save the graph.
Connections page
On the Tasks tab, the Connections button opens a list of all connections in the template.
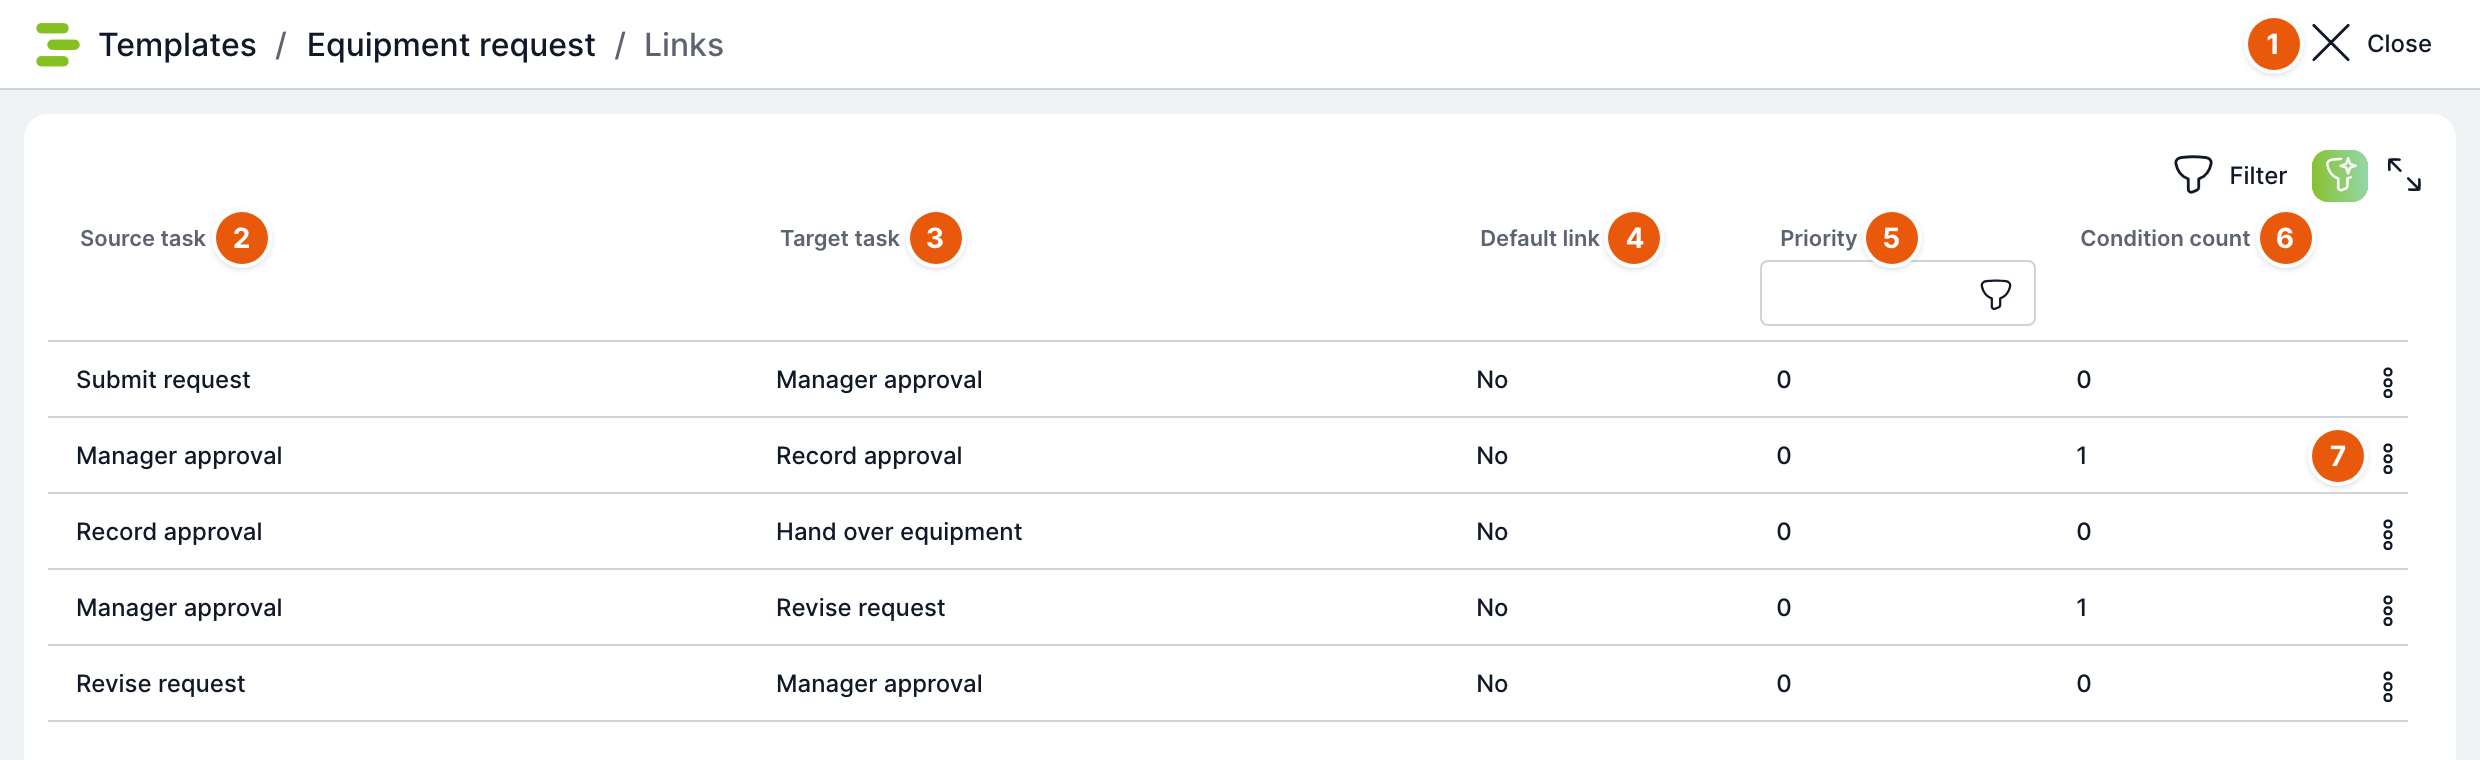
| No. | Element | Purpose |
|---|---|---|
| 1 | Close | Returns you to the template. |
| 2 | Source task | The task the connection leads from. |
| 3 | Target task | The task the connection leads to. |
| 4 | Default connection | Yes or No. |
| 5 | Priority | Connection priority. There is a filter below the header. |
| 6 | Number of conditions | How many conditions the connection has. |
| 7 | Row menu | Edit opens the Connection window, Delete deletes the connection after confirmation. You can also open a connection by double-clicking the row. |
The page is useful for quickly checking conditions in templates with many connections that are hard to find in the graph. New connections are created in the graph.
Check on save
The graph is not saved if:
- a task has no name ("Please fill in names for all tasks."),
- two tasks have the same name ("The diagram contains errors…"). The editor highlights the problematic tasks.
For two connections between the same tasks, the editor shows only a warning and the graph can be saved.
Diagram import
Use the Upload file button or drag a .bpmn file onto the canvas to load a diagram from a file into the editor, for example from another tool or from the downloaded graph of another template. The loaded diagram replaces the content of the canvas.
In version 5.19.12 the loaded diagram is displayed, but when you click Save, TAS reports "Not valid XML according to the official BPMN 2.0 specification!" and saves nothing – even for a file downloaded from TAS. Use import only as a preview. Create the tasks and connections manually in the editor. Before making further changes, reload the graph page so that the saved state is displayed.
Related: Template tab; Case statuses; Template headers.