Creating and Editing an Overview
Any user can create their own overview. You select a template, name the overview and choose the columns. You set the filter, sorting and sharing in the full overview settings. To create a new overview, go to Overviews and click Add overview below the overview tree.
New overview
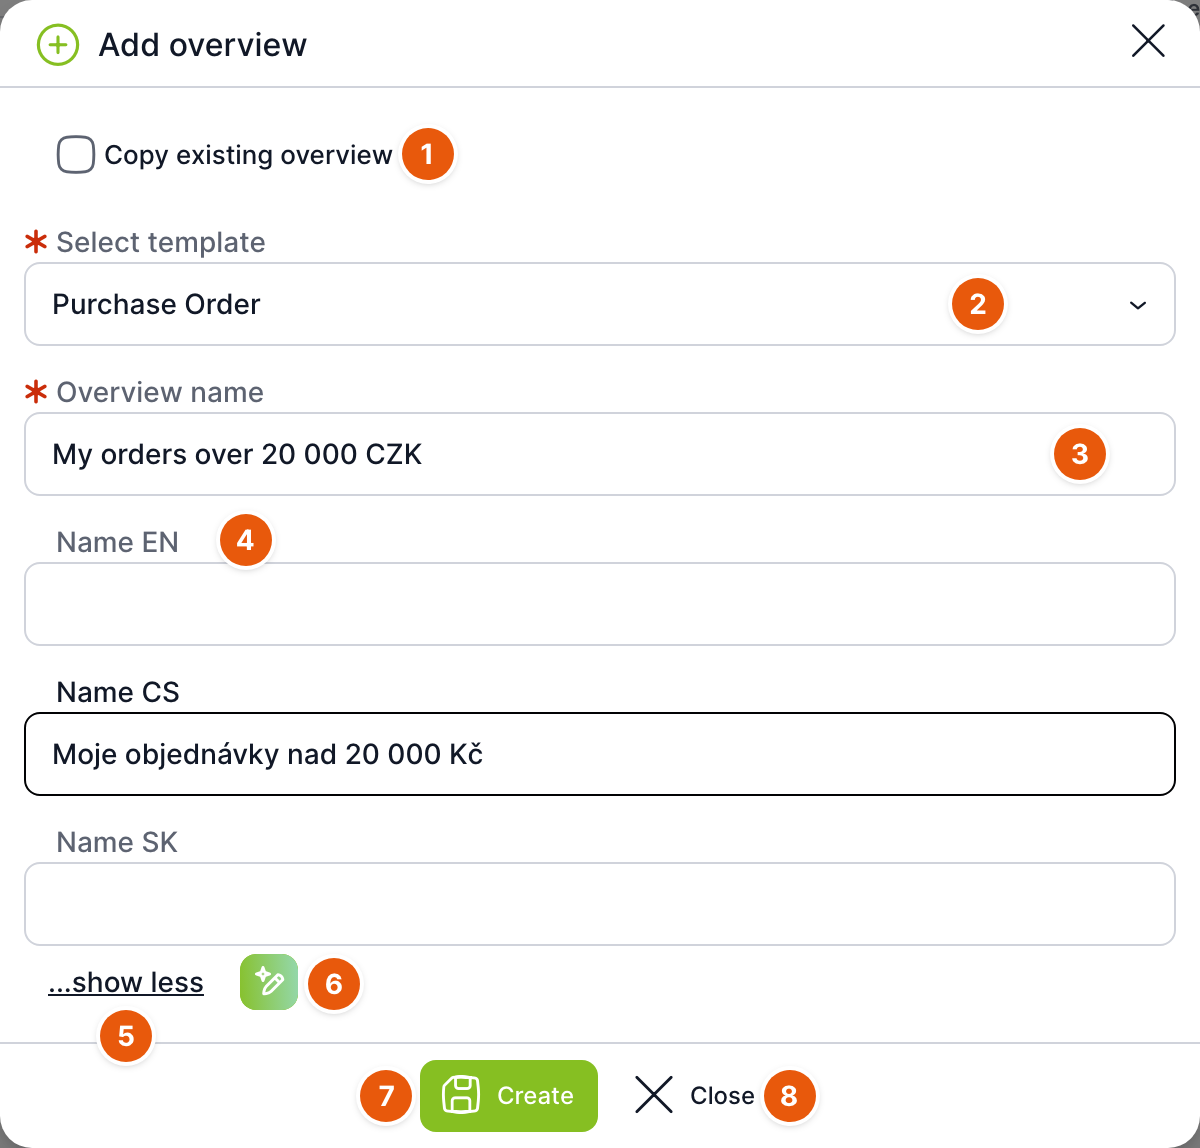
| No. | Field | Purpose |
|---|---|---|
| 1 | Copy existing overview | When checked, the new overview is created as a copy of another overview. You then select an overview instead of a template. Off by default. |
| 2 | Use template | The template (more precisely, its header) whose cases the overview will display. Required. Only templates you have access to are offered. |
| 3 | Overview name | The name under which the overview appears in the tree. Required. Use a slash in the name to place the overview in a folder, for example "Purchasing/My orders". |
| 4 | Name EN, CS, SK… | Names in other languages. Optional. Users see the name in their language, otherwise the default name. Displayed after clicking More language variants. |
| 5 | …show less | Hides the language variant fields. |
| 6 | AI translation | Fills in the language variants of the name automatically. Displayed only if AI is enabled in the installation. |
| 7 | Create | Creates the overview. |
| 8 | Close | Closes the window without creating the overview. |
After checking Copy existing overview, select the overview to copy from in the Select overview field. The name is prefilled.
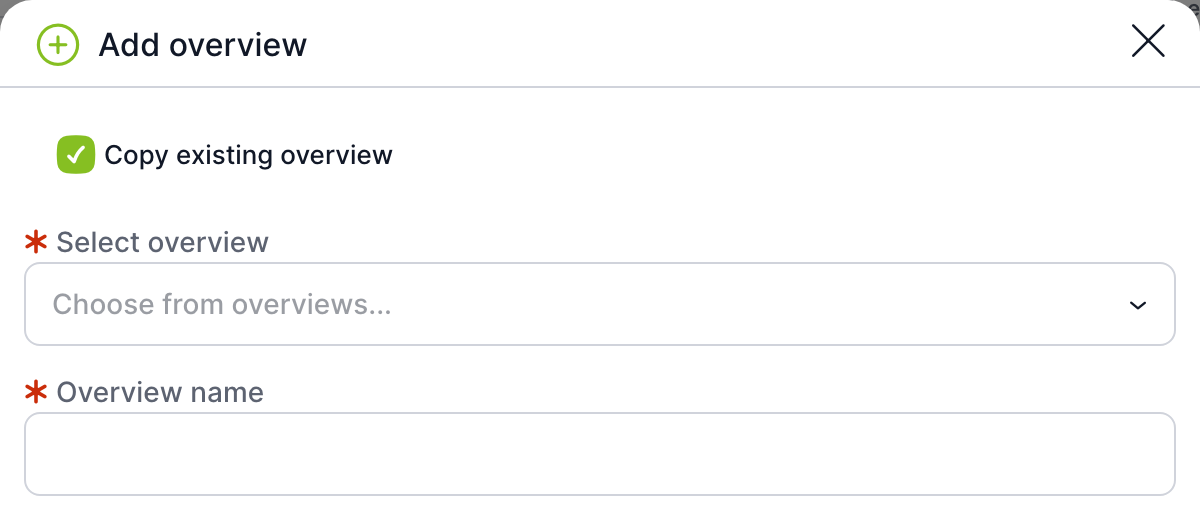
The overview name must be unique. If you or another user already uses it, TAS does not save the overview and prompts you to change the name.
A new overview has only the Case name column, no filter, sorting or sharing, and you are its owner. After it is created, it opens directly in column editing mode.
Editing columns
Turn on editing mode with the Edit overview button (or the pencil next to the overview in the tree). You can edit only your own overviews. An administrator can edit any overview.
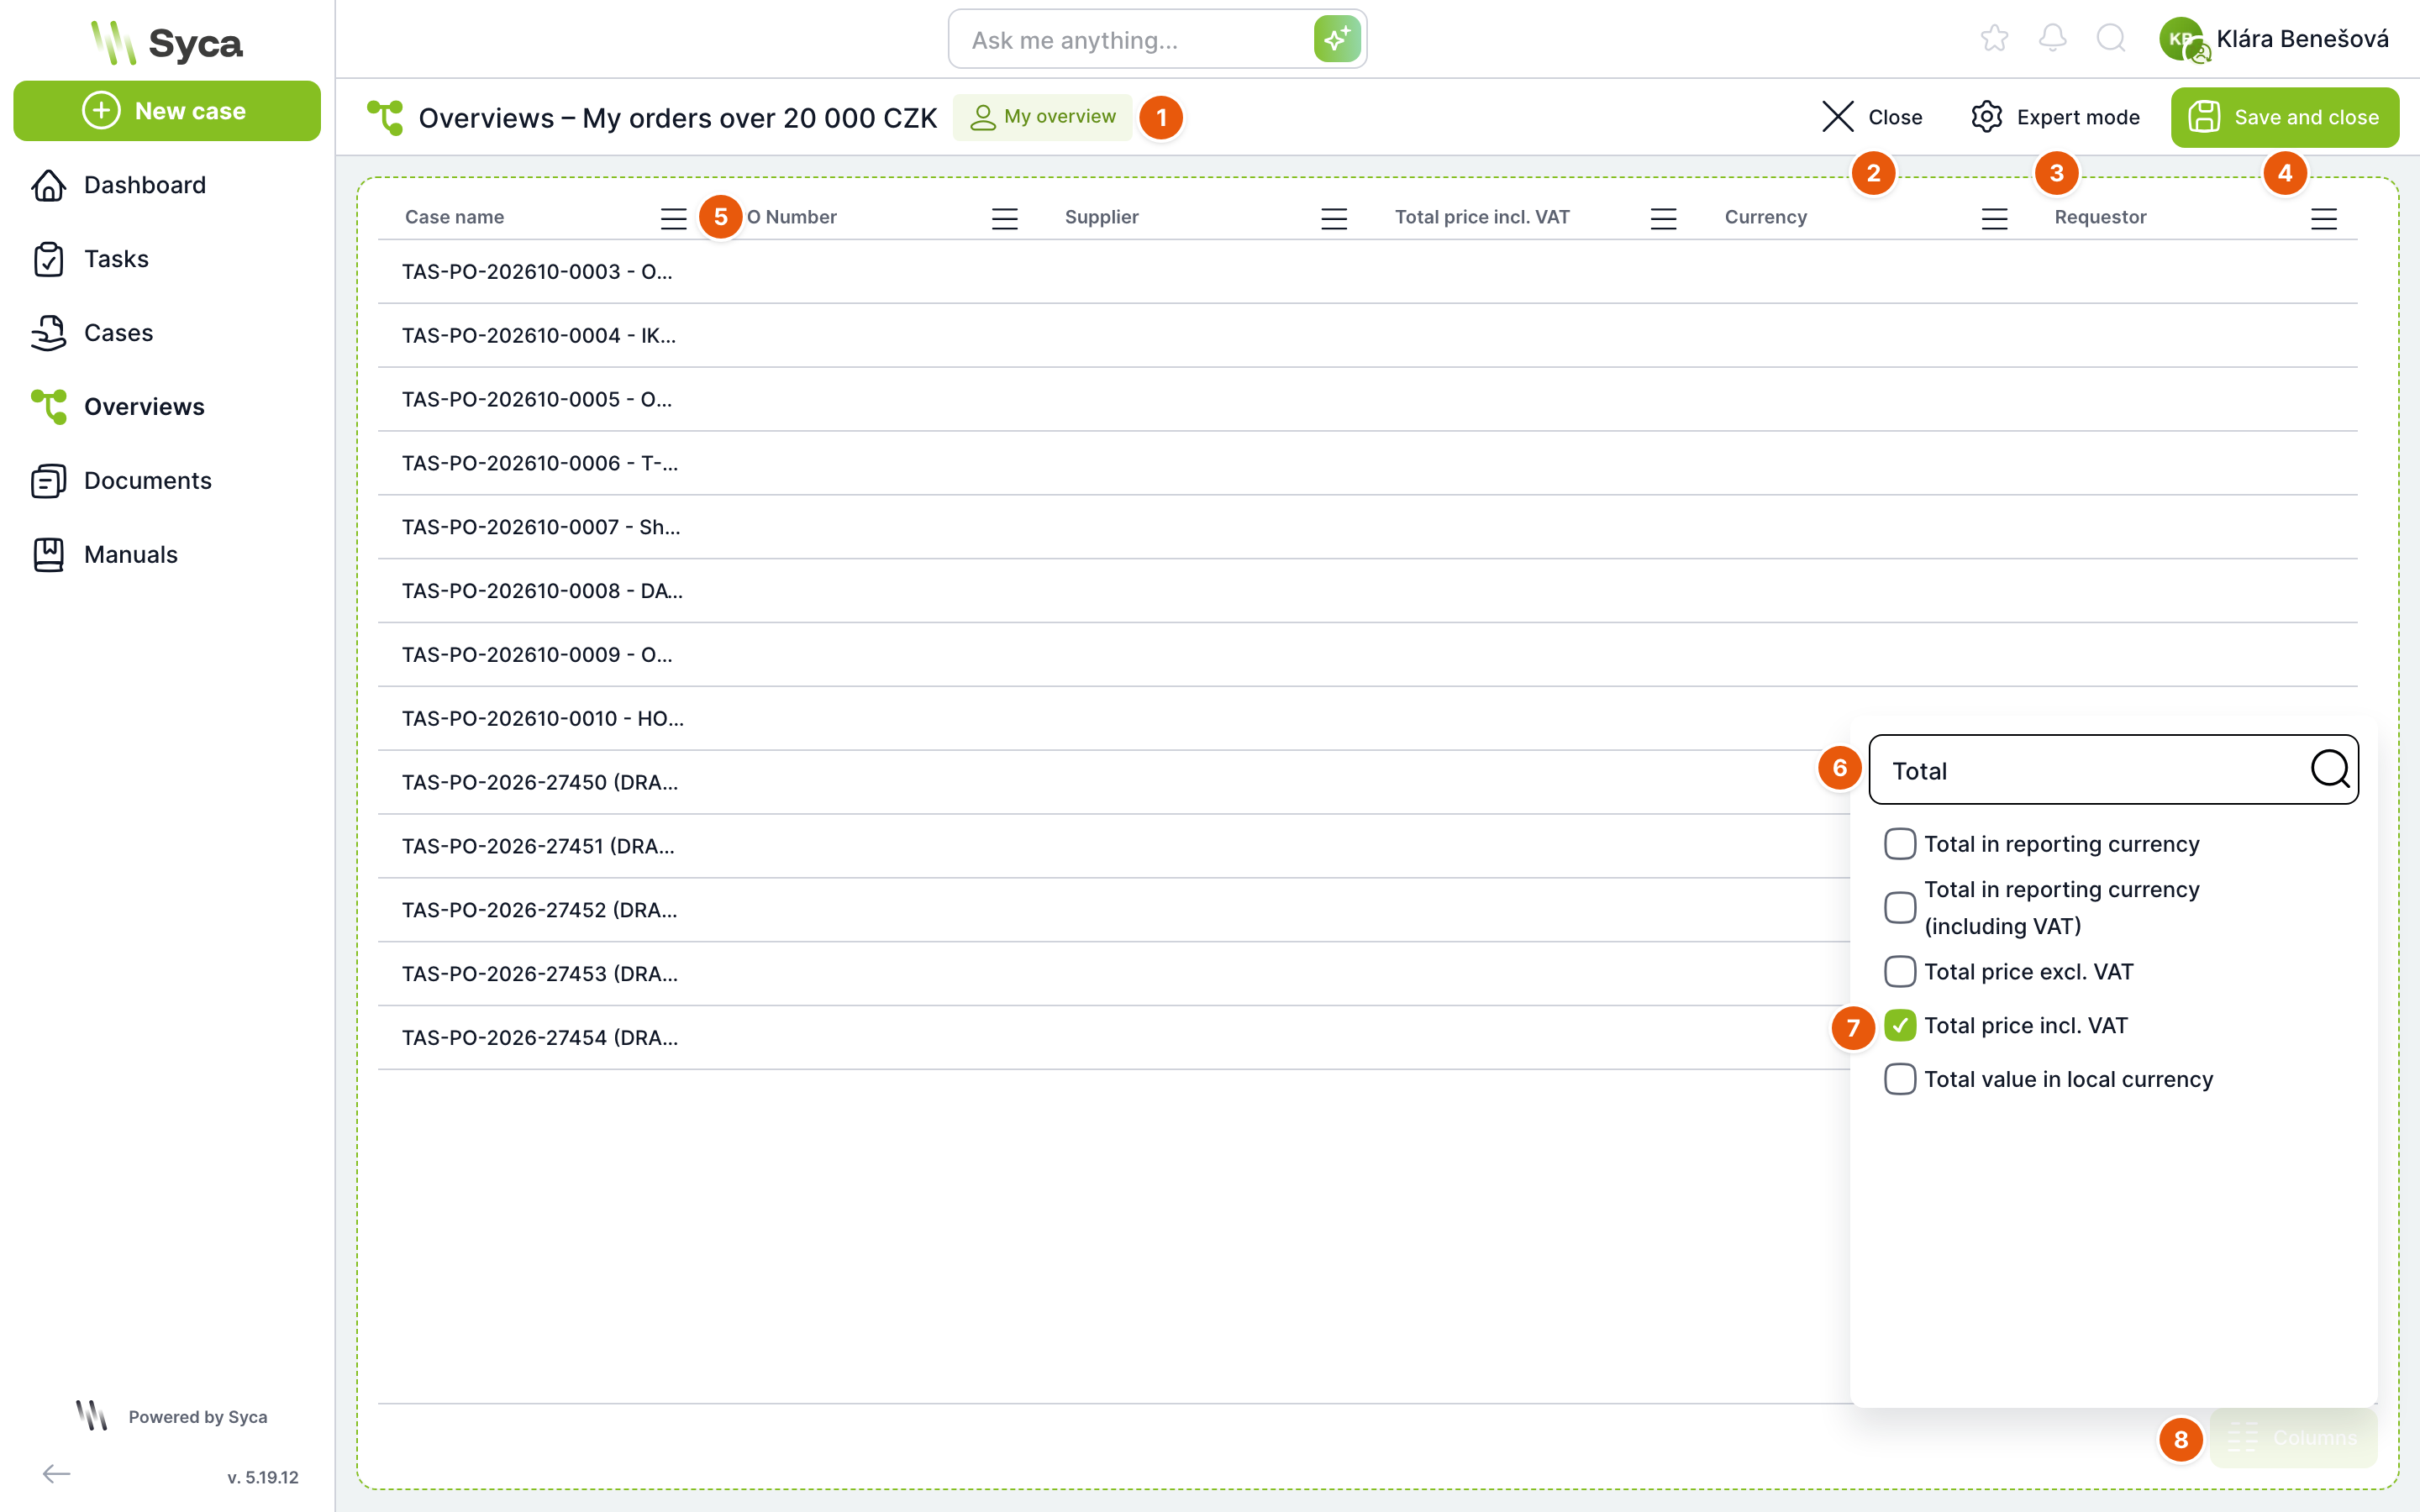
| No. | Element | Purpose |
|---|---|---|
| 1 | My overview | A label indicating that this is your overview. |
| 2 | Close | Ends editing. If you have unsaved changes, TAS asks whether to save them. |
| 3 | Expert mode | Opens the full overview settings (see below). |
| 4 | Save and close | Saves the visible columns in the order they appear on the screen and ends editing. |
| 5 | Column header | Rearrange columns by dragging their headers. |
| 6 | Search | Searches the list of available fields. |
| 7 | Checkbox | Check to add a column, uncheck to remove it. Fields marked (sys) are system fields of the case. |
| 8 | Columns | Opens and closes the list of available fields. |
In editing mode, the table is displayed with a dashed border and loads 100 rows so you can see how the columns will look with data.
Full overview settings
Open the full settings with the Expert mode button. The overview owner finds it in column editing mode. An administrator also has the Expert mode button directly in the overview header. The window has four tabs.
Settings
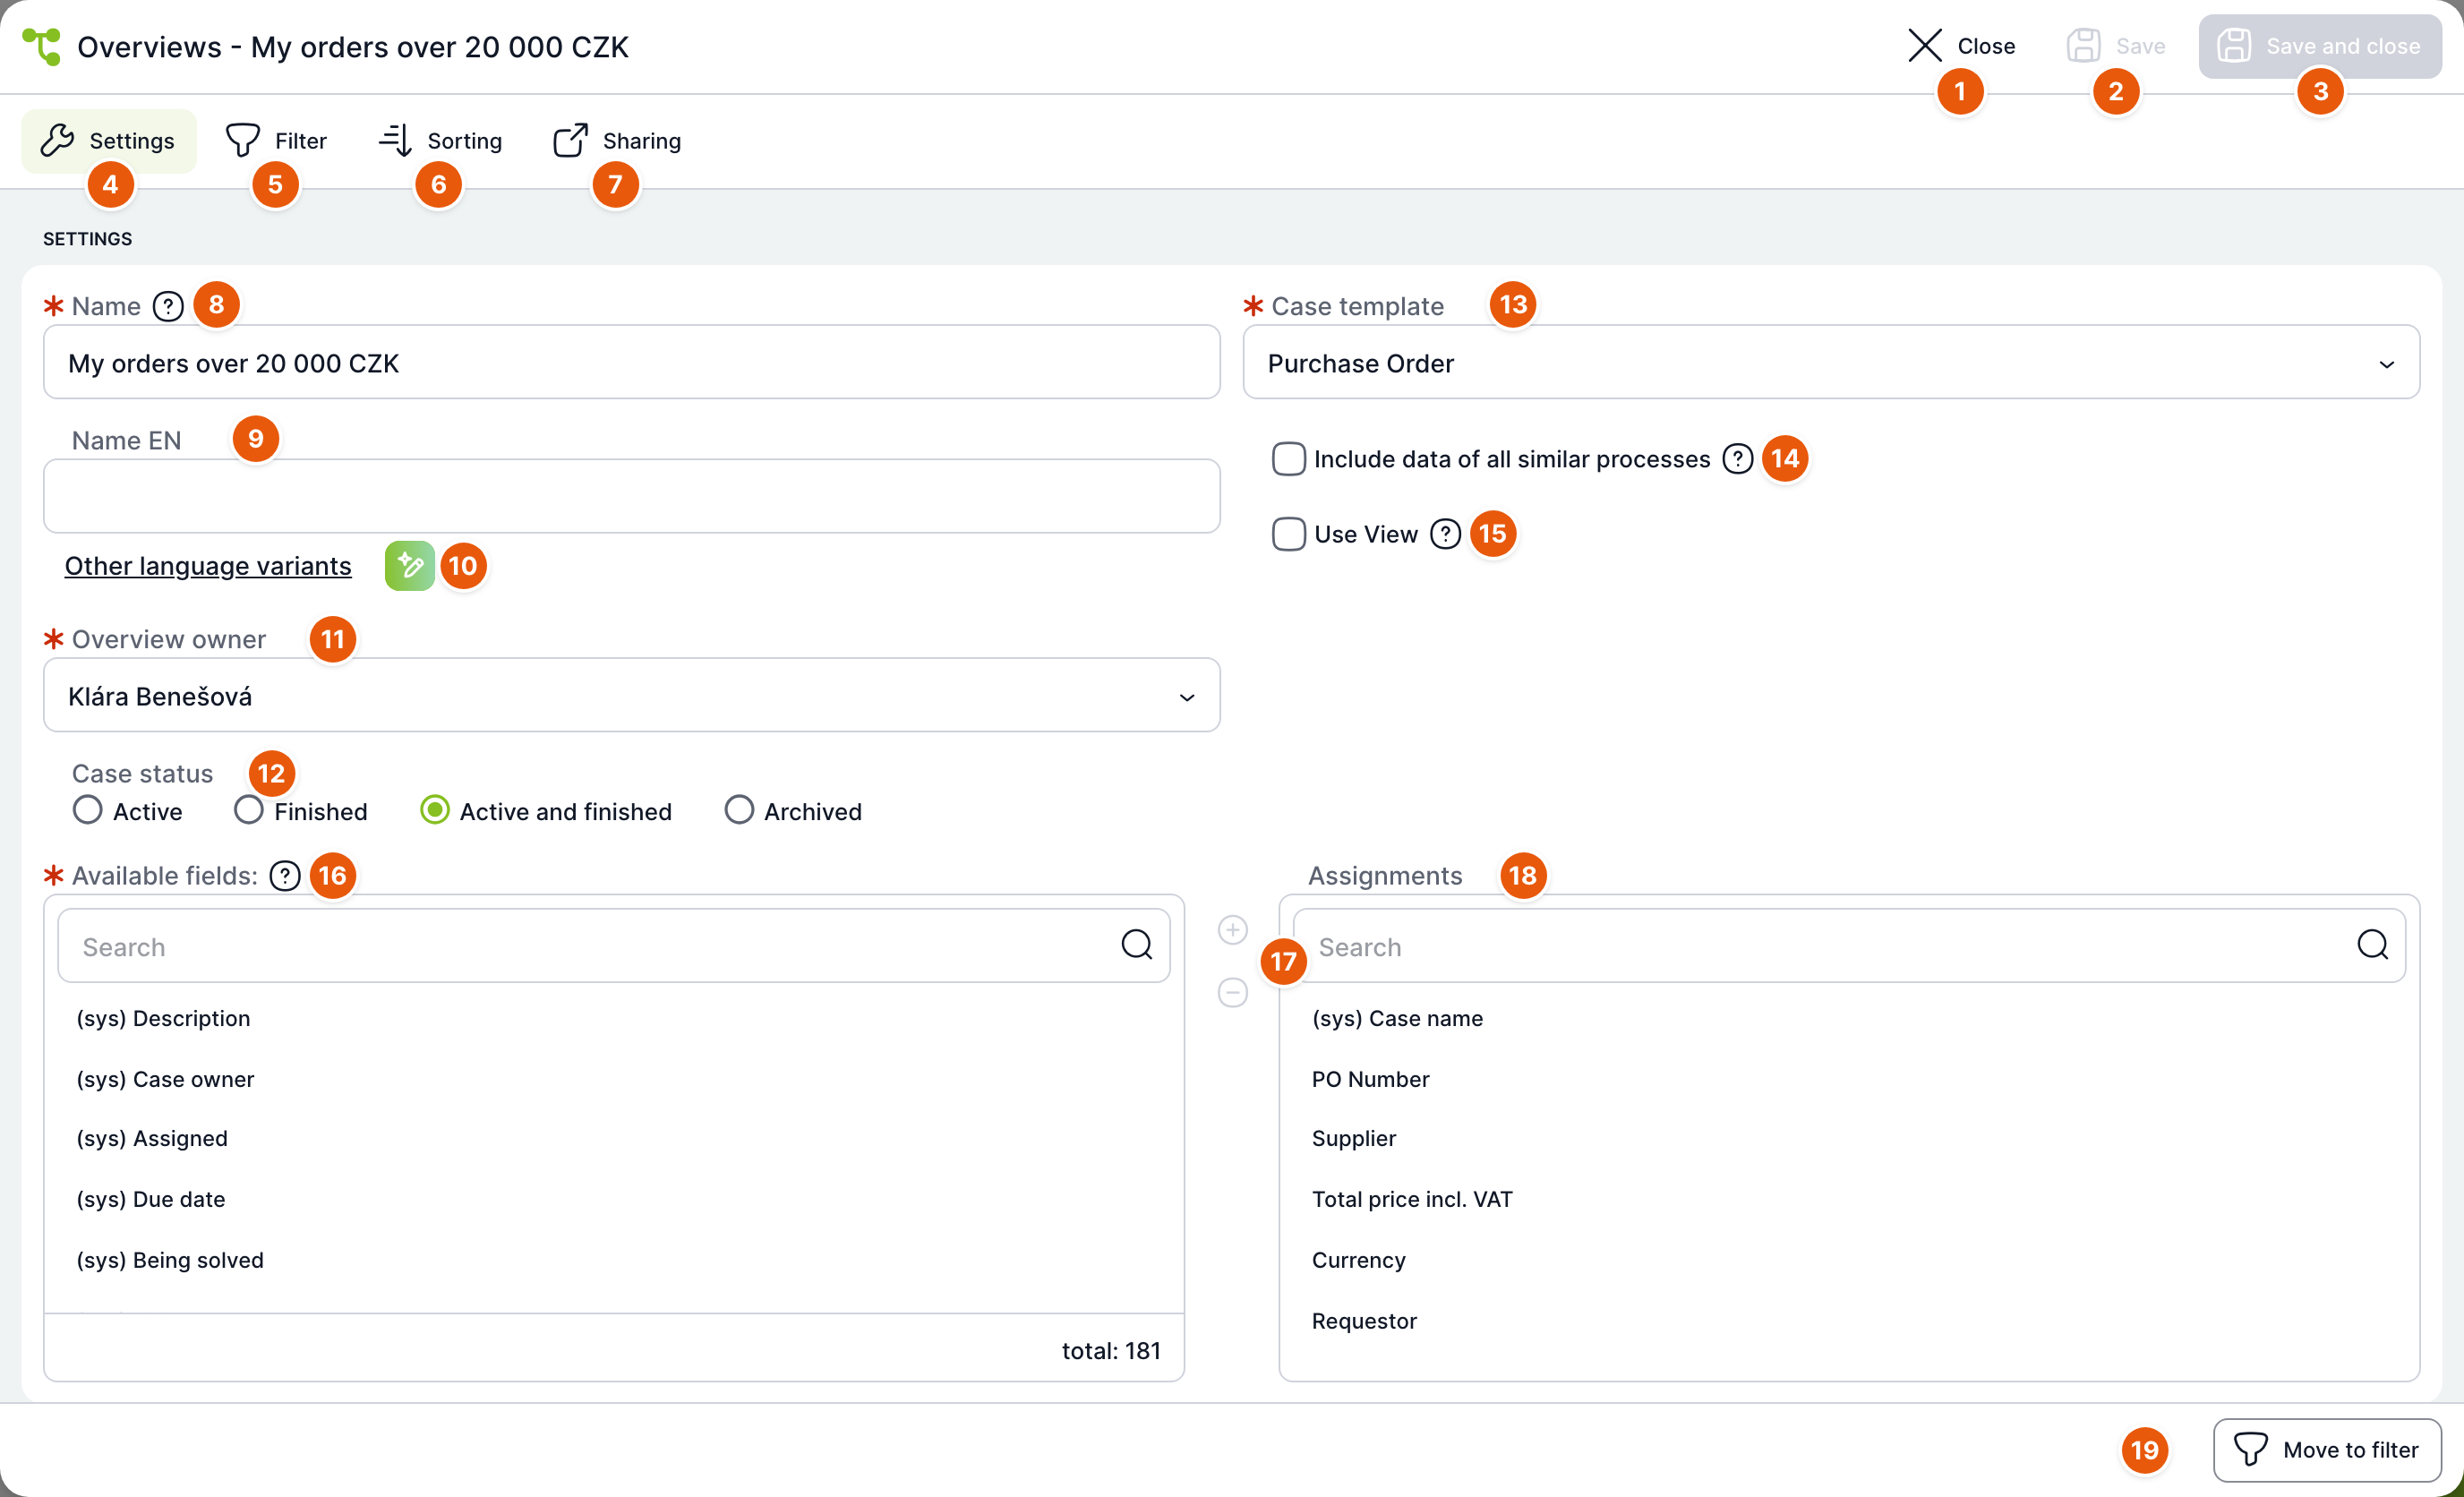
| No. | Element | Purpose |
|---|---|---|
| 1 | Close | Closes the window. If you have unsaved changes, TAS asks whether to save them. |
| 2 | Save | Saves changes and keeps the window open. Active only after you change something. |
| 3 | Save and close | Saves changes and closes the window. |
| 4–7 | Tabs | Settings, Filter, Sorting, Sharing. Before switching tabs, TAS checks the required fields. |
| 8 | Name | Default overview name. Required. The help text at the question mark reminds you that a slash places the overview in a folder. |
| 9 | Name EN | Name in the interface language. Display other languages with the More language variants link. |
| 10 | AI translation | Fills in the language variants automatically. Only when AI is enabled. |
| 11 | Overview owner | The user the overview belongs to. Required. If you change the owner, the overview belongs to them after saving. |
| 12 | Case status | Which cases the overview displays: Active, Completed, or Active and completed (default). The Archived option is displayed only if archiving is enabled in the installation. |
| 13 | Case template | The template from which the overview draws cases. Required. Changing the template deletes the columns, filter and sorting. |
| 14 | Include data from all similar processes | The overview also displays cases from the other headers of the same template. |
| 15 | Use View | The overview reads data from a database view instead of variables. Adds the Source table field and, instead of the field list, the Variable and Column name rows. Intended for administrators who have prepared such a view. |
| 16 | Available fields | Fields you can add as columns: system fields (sys) and template variables. Search is at the top, the field count at the bottom. |
| 17 | Plus and minus | Moves the selected field to the overview columns, or removes it from the columns. |
| 18 | Assignment | Overview columns in the order in which they are displayed. At least one column is required. Change the order by dragging. |
| 19 | Go to filter | Switches to the next tab. |
A superadministrator also has the Ignore case rights option. With it, the overview shows all users all cases of the template regardless of their rights.
Filter
The filter is permanent: it applies to everyone who opens the overview. It consists of groups of conditions.
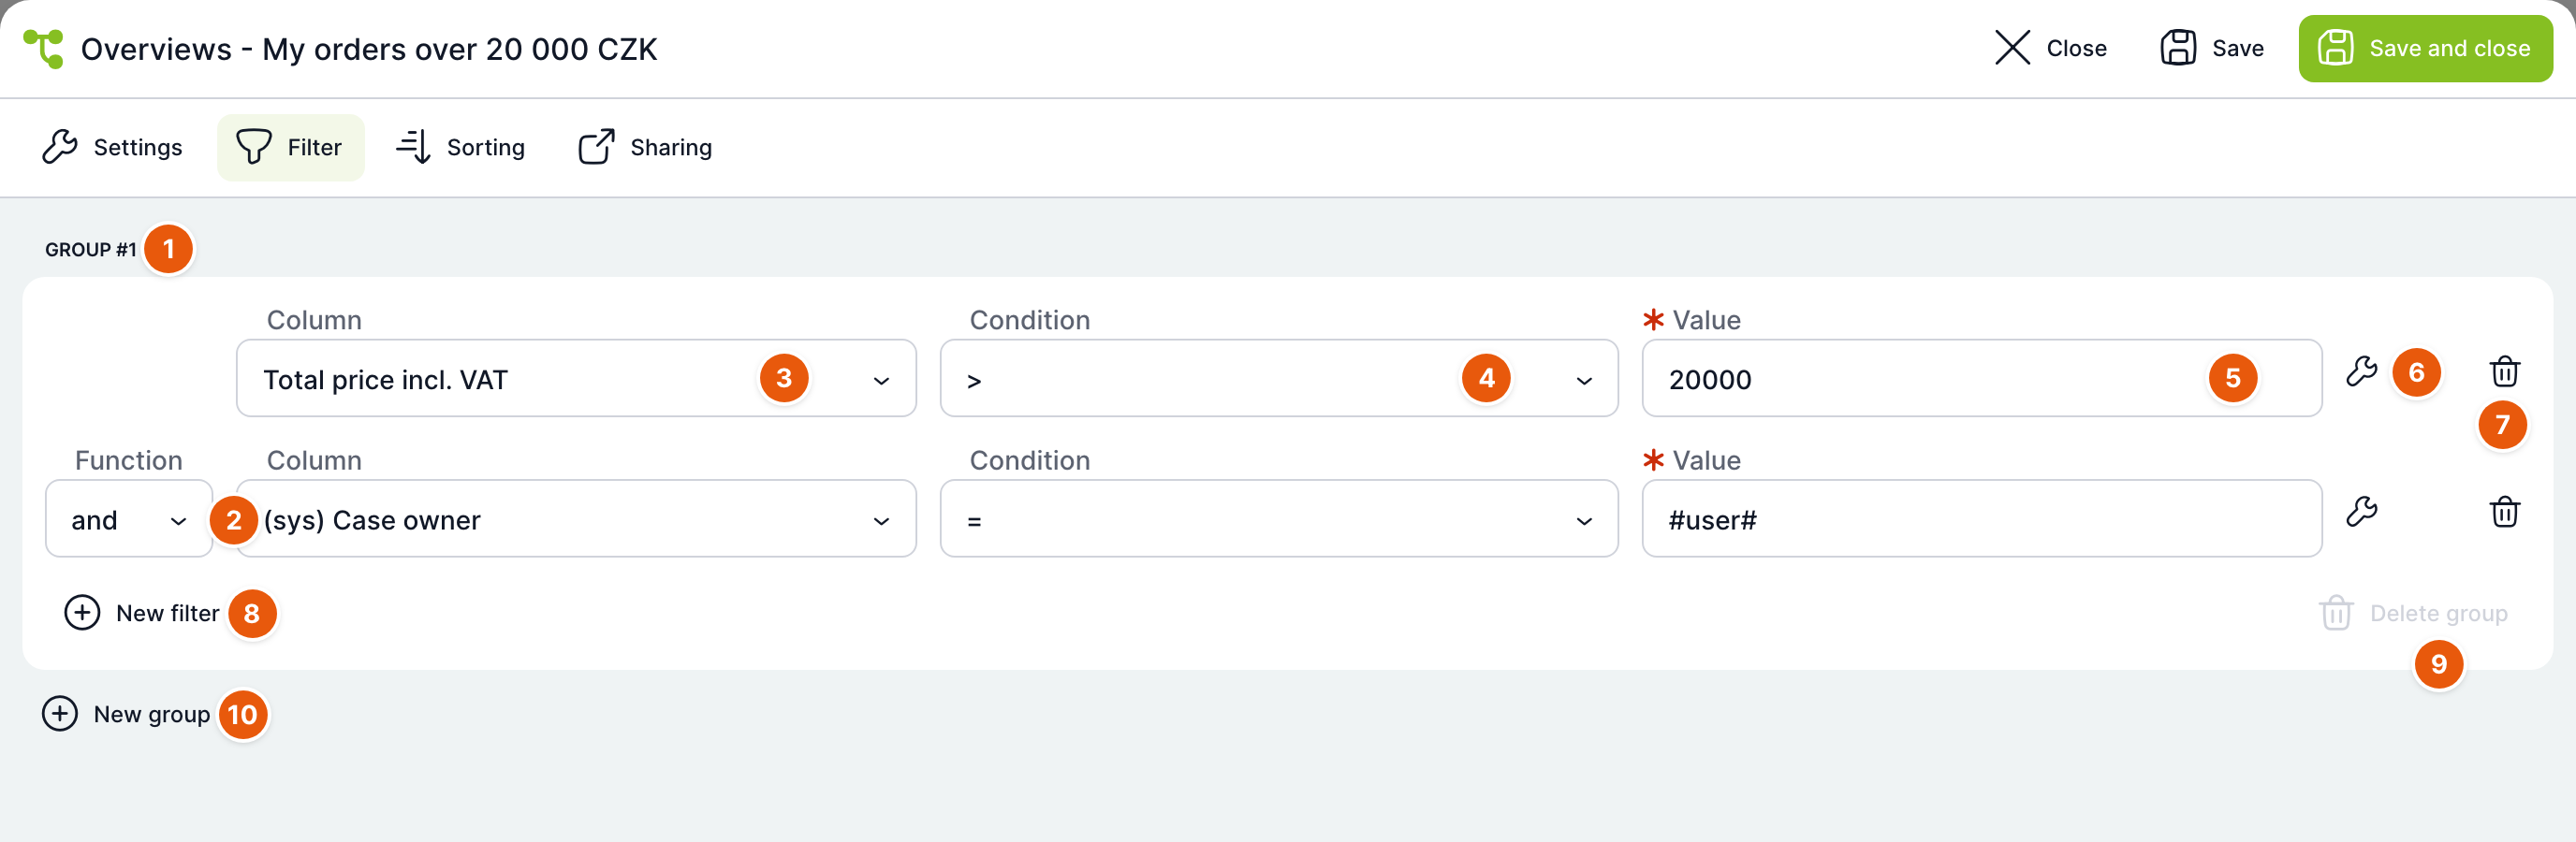
| No. | Element | Purpose |
|---|---|---|
| 1 | Group #1 | A group of conditions. There can be multiple groups. When there are several, Function between groups (and/or) is displayed above them and applies to all groups. |
| 2 | Function | How the conditions in the group are combined: and (all must be met) or or (one is enough). Set once for the whole group. |
| 3 | Column | The field the condition applies to. Offers system fields and template variables except multiple selections and dynamic rows. |
| 4 | Condition | Comparison: =, <>, >, >=, <, <=, is empty, is not empty. For texts, also contains and does not contain. |
| 5 | Value | The value to compare with. Required. A calendar is displayed for dates, a value picker for lists. |
| 6 | Key | A dynamic value instead of a fixed one. For dates: Date, Today, Today(+/-), Yesterday, Tomorrow, Previous working day, Start and End of month (+/-). For text: User (#user#) and Org. unit (#orgUnit#), i.e. whoever is currently viewing the overview. |
| 7 | Trash | Deletes the condition. |
| 8 | New filter | Adds a condition to the group. |
| 9 | Delete group | Deletes the entire group. The only group cannot be deleted. |
| 10 | New group | Adds another group of conditions. |
In the image, the filter shows cases with a price over 20,000 whose owner is the person viewing the overview. Thanks to the #user# value, the same overview can serve everyone: each user sees their own cases in it.
Sorting
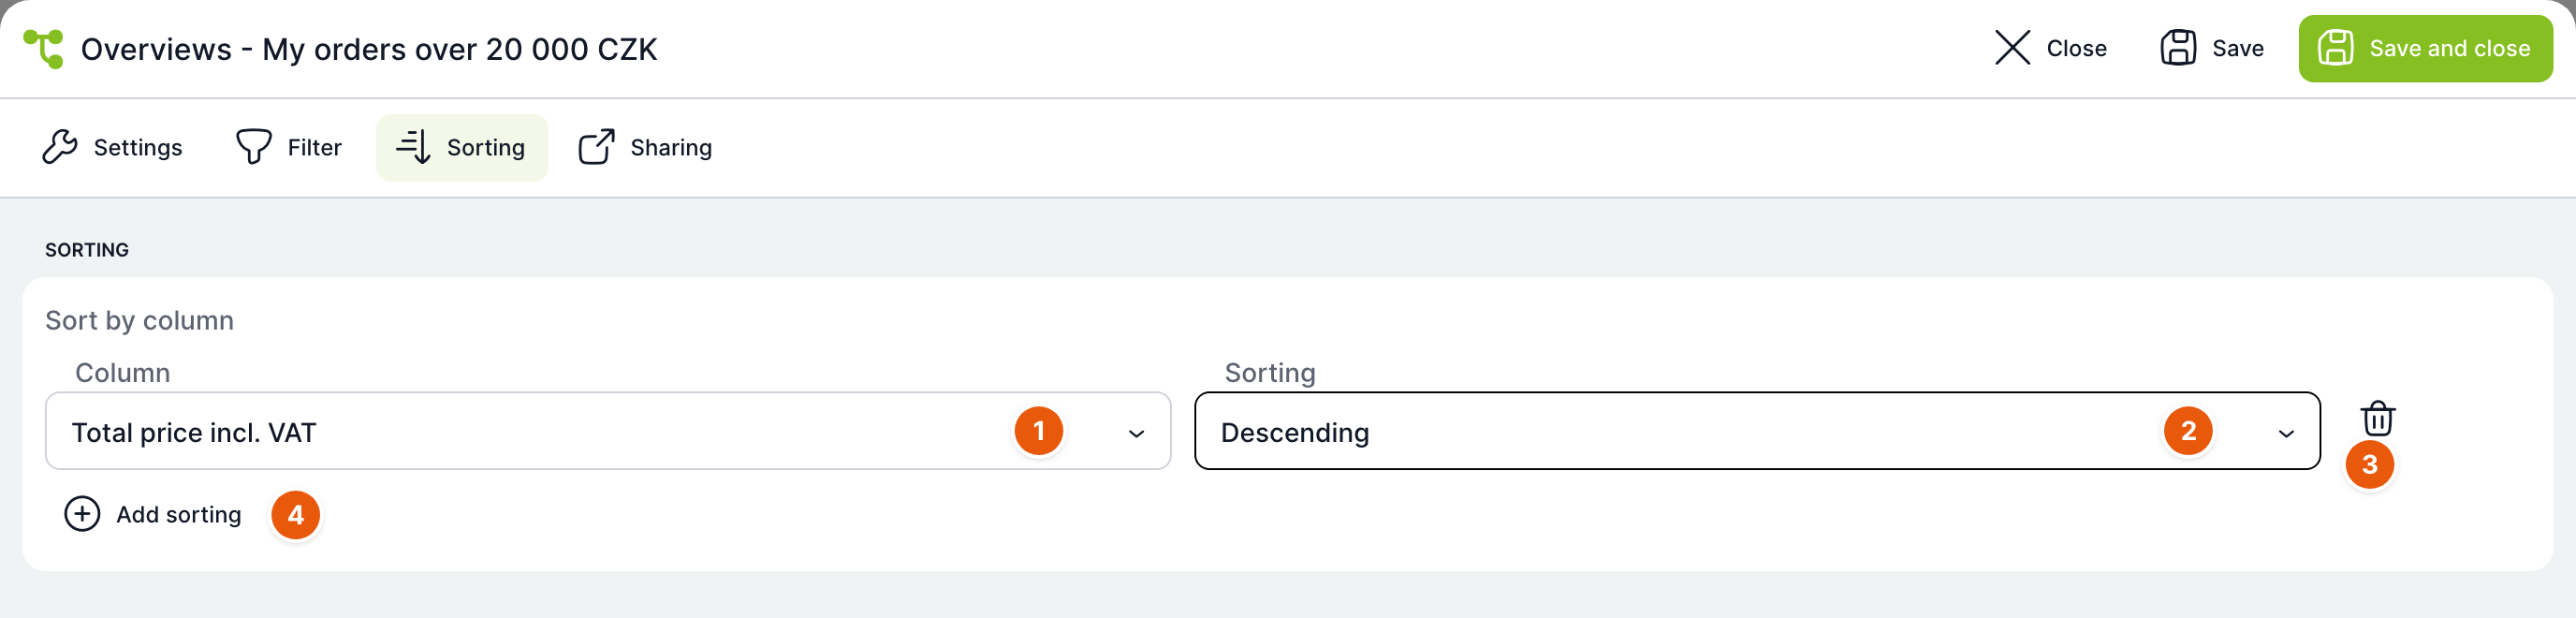
| No. | Element | Purpose |
|---|---|---|
| 1 | Column | The field to sort by. Each field can be used only once. Multiple selections, dynamic rows and document lists cannot be sorted. |
| 2 | Sorting | Ascending or Descending. |
| 3 | Trash | Deletes the sorting. |
| 4 | Add sorting | Adds another sorting level. Levels apply in order from top to bottom. |
If no sorting is set, the text "No sorting is set" is displayed. Users can temporarily re-sort the table by clicking a column header.
Sharing
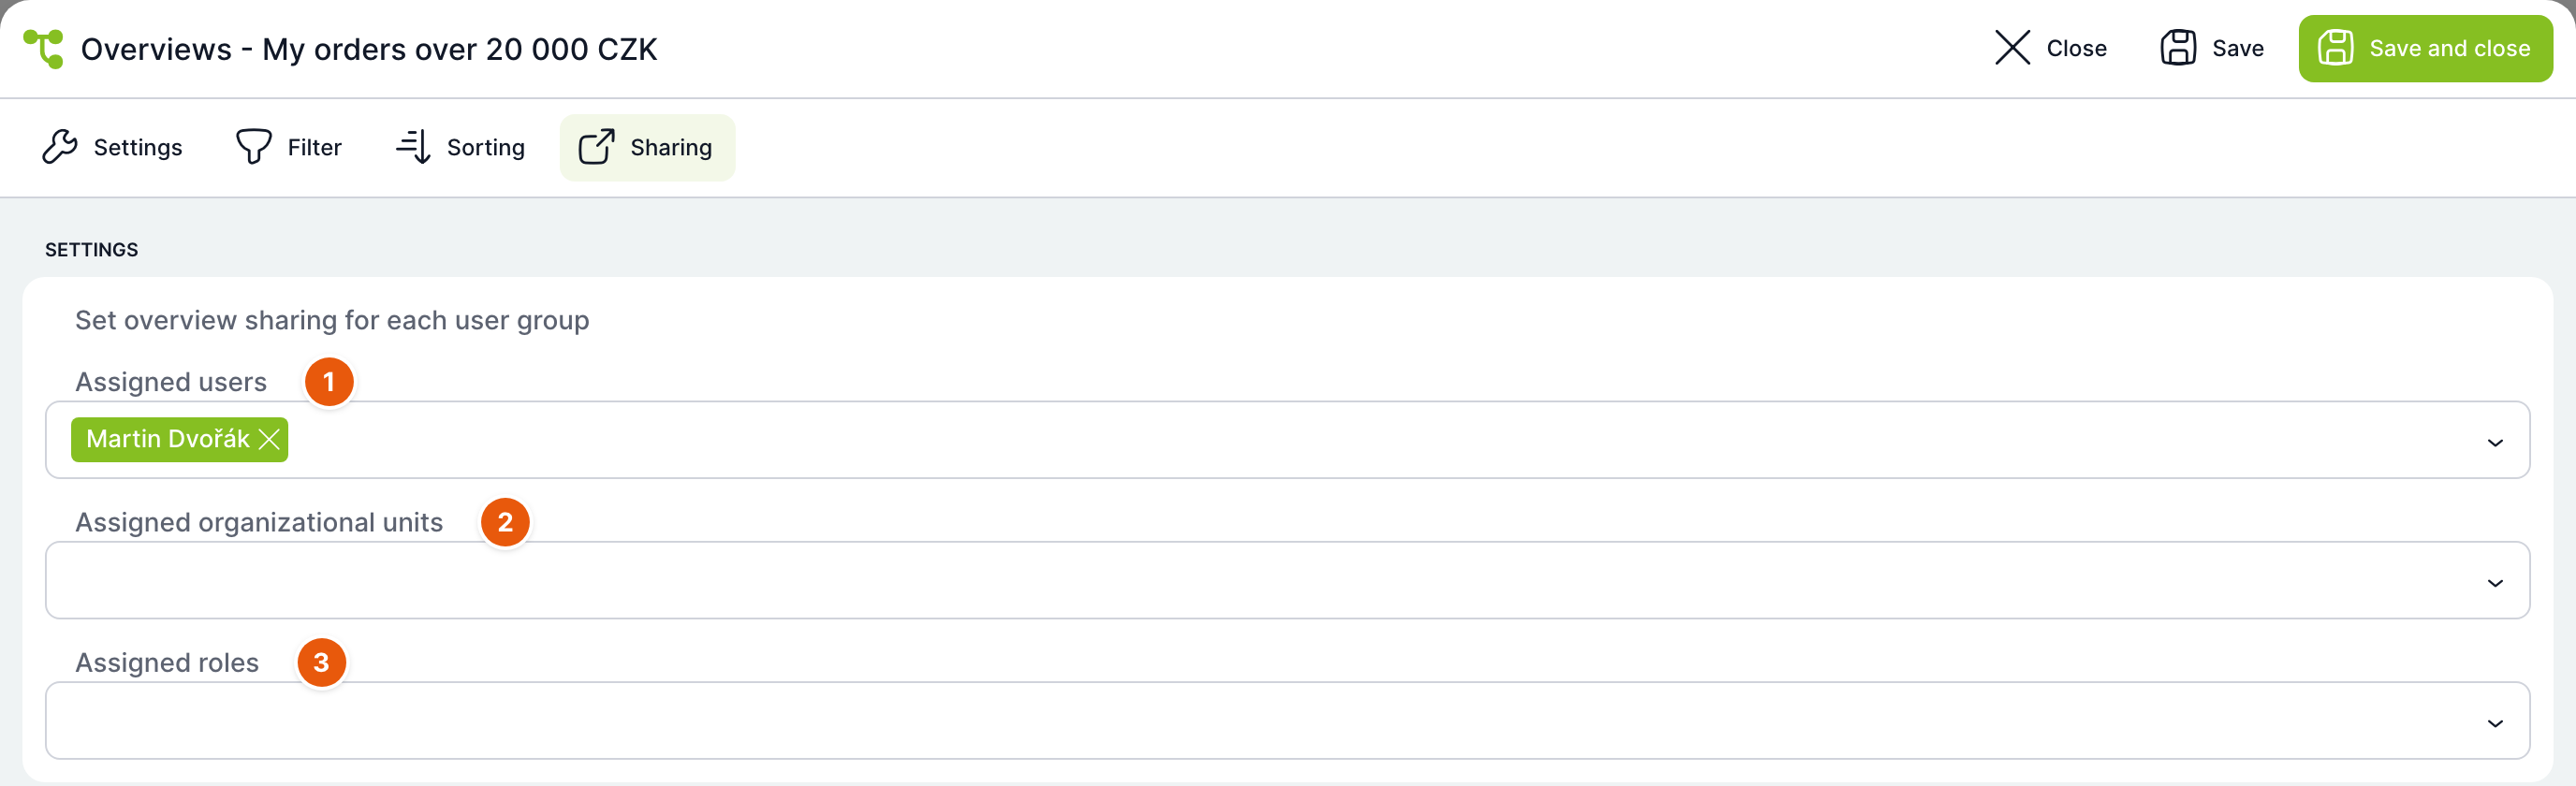
| No. | Field | Purpose |
|---|---|---|
| 1 | Assigned users | Specific users who will see the overview. |
| 2 | Assigned organizational units | Entire units. People from subordinate units will also see the overview. |
| 3 | Assigned roles | All holders of the selected roles. |
A user you share the overview with can see it and copy it, but cannot save or delete it. In addition, their table shows only the cases they themselves have rights to.
Copying an overview
To copy an overview, use the Copy item in the overview's menu in the tree. You can also copy overviews shared with you.
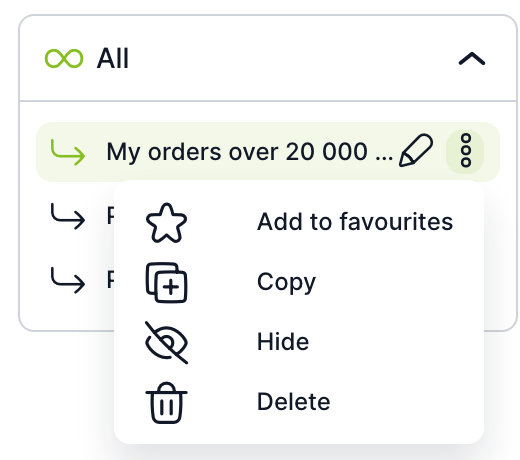
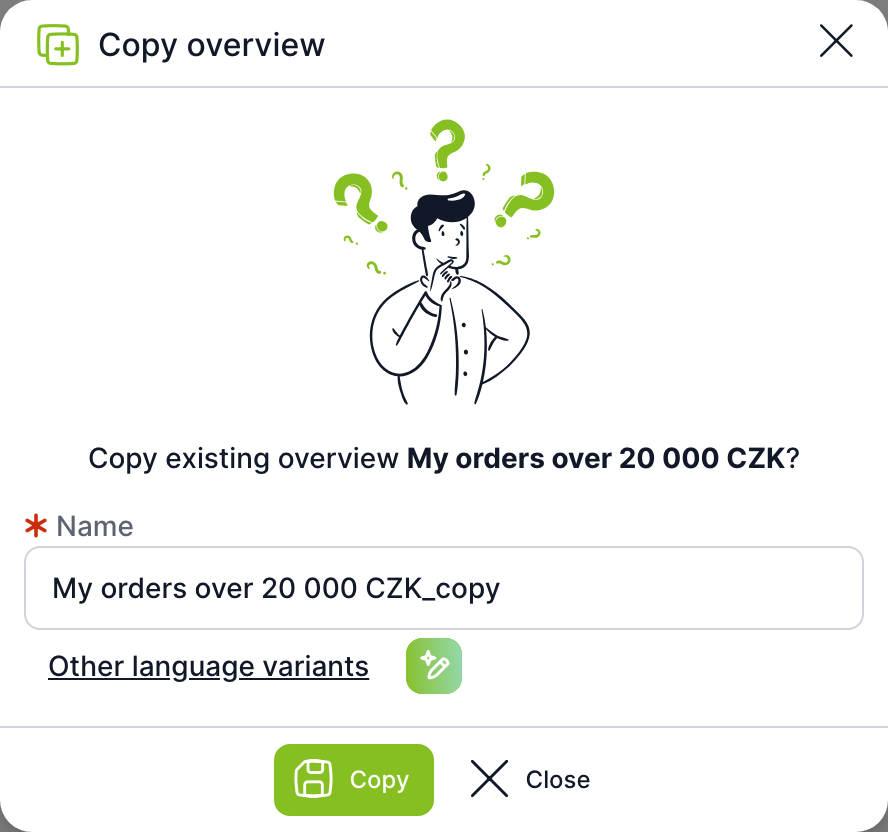
The Name field is prefilled with the original name and the suffix "_copy". The Copy button creates a copy owned by you. The copy takes over the columns, filter and sorting, but not the sharing. After it is created, it opens in column editing mode.
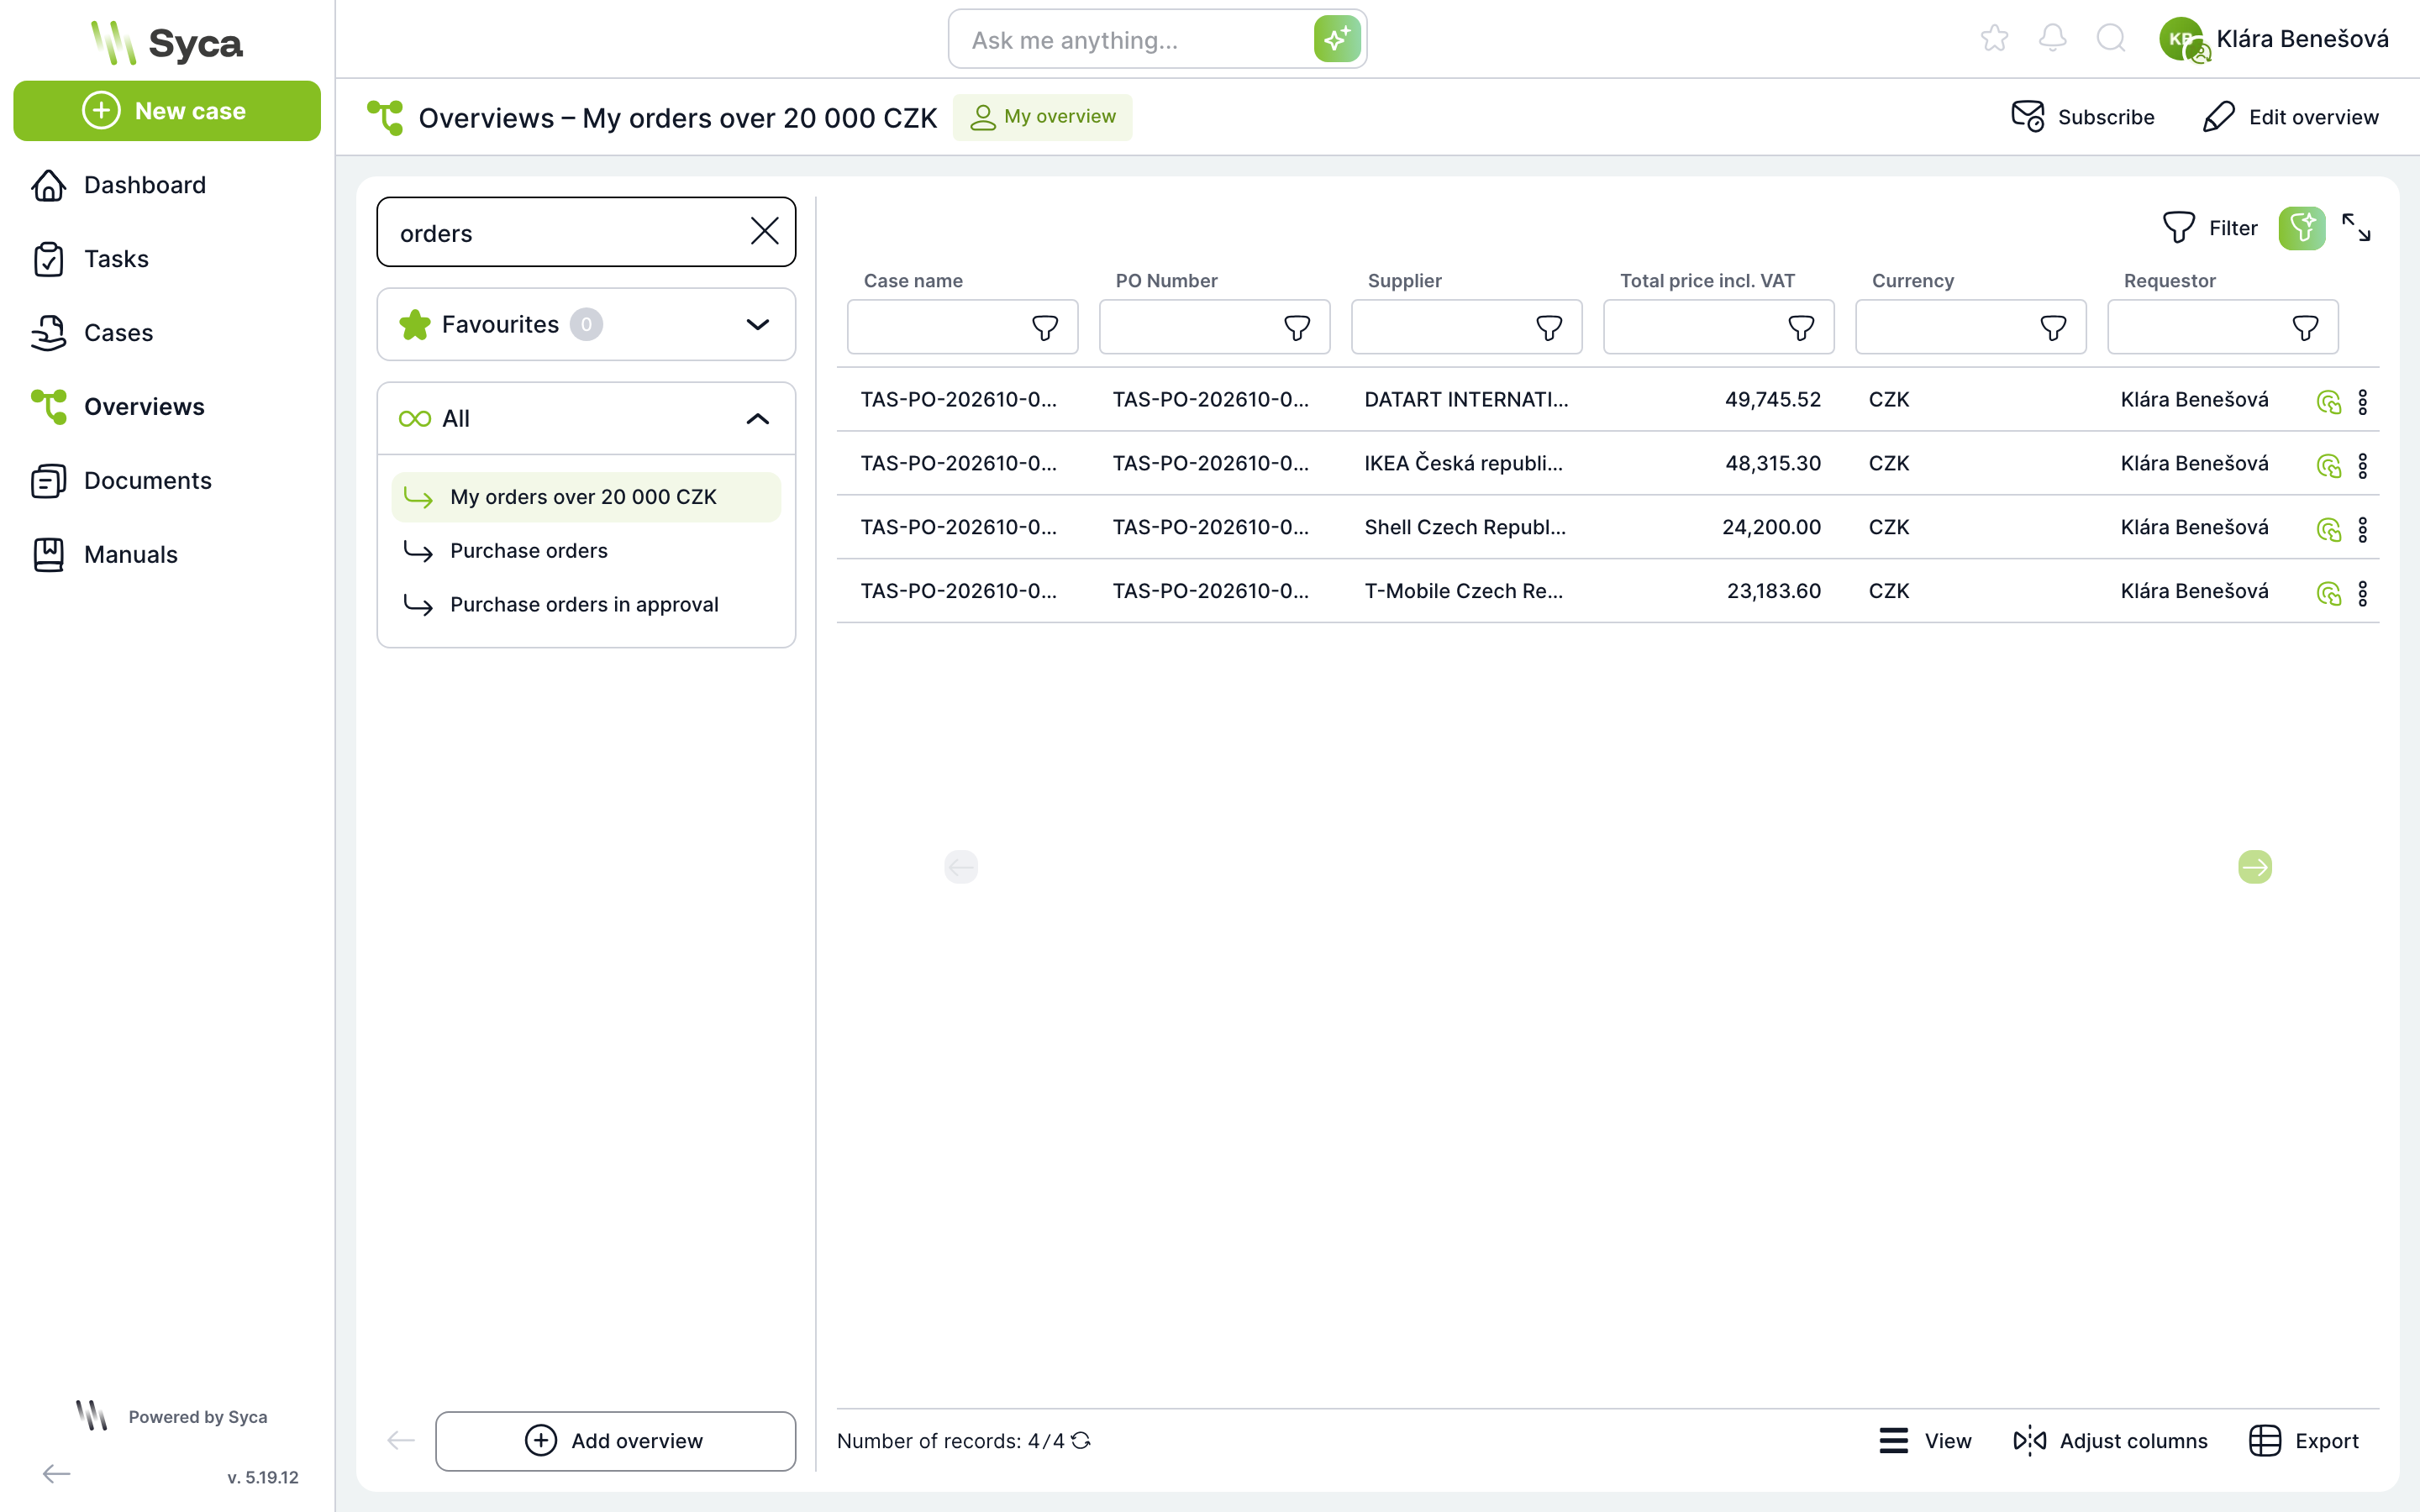
How to create a "My orders over CZK 20,000" overview
- In Overviews, click Add overview.
- In the Use template field, select the order template, enter a name in Overview name and click Create.
- In editing mode, click Columns and check the Order number, Supplier, Total price, Currency and Requester fields.
- Click Expert mode and confirm saving when asked "Save changes?".
- On the Filter tab, add the condition Total price > 20000 and a second condition Case owner = User (using the key next to the value).
- On the Sorting tab, add Total price, Descending.
- On the Sharing tab, optionally add a colleague or role and click Save and close.
Deleting an overview
To delete your overview, use the Delete item in its menu in the tree. For other users' overviews, the item is inactive. Instead of deleting another user's overview, you can only hide it.
Related: Overviews, Overview email subscription.